background image

ES

FR

IT

NO

CA

DE

NL

PT

SV

1 - Bohren

A.  Setzen Sie die Wandplatte an die Wand und markieren Sie die Befestigungspunkte.

B.  Bohren Sie Löcher an den markierten Befestigungspunkten.

C.  Setzen Sie die Wandanker in die Befestigungslöcher ein.

1 - Boren

A.  Plaats de muurplaat op de muur en markeer de bevestigingspunten.

B.  Boor de gaten waar de bevestigingspunten zijn gemarkeerd.

C.  Steek de wandverankeringsschroeven in de bevestigingsgaten.

1 - Perfuração

A. Coloque a placa de parede na parede e marque os pontos de fixação.

B.  Perfure os orifícios onde os pontos de fixação estão marcados.

C.  Insira as buchas nos orifícios de fixação.

1 - Borrning

A. Placera väggplattan på väggen och markera fästpunkterna.

B.  Borra hål där fästpunkterna är markerade.

C.  Sätt i ankarskruvarna i fästhålen.

1 - Perforación

A. Coloca la placa de montaje en la pared y marca los puntos de fijación.

B.  Taladra los orificios donde marcaste los puntos de fijación.

C.  Inserta los tacos en los orificios de fijación.

1 - Perçage

A. Placez la plaque murale sur le mur et marquez les points de fixation.

B.  Percez les trous à l’emplacement des points de fixation.

C.  Insérez les ancrages muraux dans les trous de fixation.

1 - Foratura

A. Posizionare la piastra a parete sulla parete e tracciare i punti di fissaggio.

B.  Procedere con la foratura laddove sono tracciati i punti di fissaggio.

C.  Inserire gli ancoraggi a parete nei fori di fissaggio.

1 – Boring

A. Plasser koblingsholderen på veggen og merk festepunktene.

B.  Bor hull der festepunktene er merket.

C.  Sett ankerskruene inn i festehullene.

1 - Trepant

A. Col·loqui la placa a la paret i marqui els punts de fixació.

B.  Trepi els forats on es marquen els punts de fixació.

C.  Insereixi els cargols d’ancoratge en els forats de fixació.

Summary of Contents for QUASAR

Page 1: ...Installation Guide QUASAR...

Page 2: ...eMO B Dimensions 350x350x150 mm C Package weight and net weight 27 kg 22 kg D Operating Temperature E Storage Temperature F Grid Codes 25 C to 40 C 40 C to 70 C G99 UK VDE AR N 4105 Germany General Sp...

Page 3: ...ment A Kabell nge und Steckertyp B Abmessungen C Verpackungsgewicht und Nettogewicht D Betriebstemperatur A Kabellengde og koblingstype B Dimensjoner C Vekt p pakke og nettovekt D Driftstemperatur A C...

Page 4: ...ak 6 A 32 A B Maximum AC Current D Rated Frequency AC Voltage 50 Hz 230V 10 E DC Voltage Range 150 V 500 V F Protection Rating Surge G 1 Depending on country specific regulations IP54 IK10 CAT II C Ca...

Page 5: ...ffekt topp B Maximal v xelstr m C Kabelsektion D Nominell frekvens och v xelstr mssp nning E Rang de tensi CC F Protecci de qualificaci i sobretensi G 1 Dep n de les normatives espec fiques del pa s E...

Page 6: ...del 4 Power 2 Cable 5 Version 3 Connector 6 Custom 7 Revision QSX1 Quasar DC Standard QSB1 Quasar DC Business 0 5 m M 7 m J CHAdeMO K CCS XX2 Black 4 RFID X Revision X 1 4 6 kW 2 7 4 kW XXXX X X X X X...

Page 7: ...nnecteur 4 Alimentation 1 Modell 2 Kabel 3 Kontakt 4 Str m 5 Versi n 6 Personalizado 7 Revisi n 5 Versione 6 Personalizzato 7 Revisione 5 Version 6 Personnalis 7 R vision 5 Versjon 6 Egendefinert 7 Re...

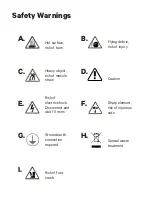
Page 8: ...of injury H Special waste treatment G Ground earth connection required F Sharp element risk of injurious cuts E Risk of electric shock Disconnect and wait 10 mins I Risk of foot crush C Heavy object...

Page 9: ...scular D Cuidado E Risco de choque el trico Desligue e aguarde 10 min A Het yta risk f r br nnskador B Flygande skr p risk f r personskador C Tungt f rem l risk f r muskelbelastning D Varning E Risk f...

Page 10: ...present before and during installation G Installation must be performed following local regulations and by wallbox trained personnel Always use safety shoes during the installation and safety glasses...

Page 11: ...empre le temperature di funzionamento del dispositivo F Installare il caricabatterie in una posizione ventilata e non installarlo in luoghi esposti alla luce solare diretta G Usare sempre scarpe di si...

Page 12: ...charger in vertical position K Remove the power supply at least 30 minutes before unmounting the device J Practice discretion before touching the charger s metal parts as they can be hot M Do not ins...

Page 13: ...uporta o peso do carregador e for as mec nicas I Esteja atento ao peso ao manusear a embalagem e o dispositivo J Tenha cuidado antes de tocar nas pe as met licas do carregador uma vez que podem estar...

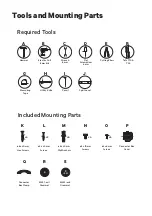
Page 14: ...and Mounting Parts Required Tools Included Mounting Parts Measuring Tape G Flat Screwdriver 6 mm D Utility Knife H x2 L 5 x 40 mm Screws x4 5 x 10 mm Screws N Connector Box Cover P Connector Box Clamp...

Page 15: ...ing Eines necess ries A Martell B Trepant el ctric amb broques de 8 mm C Clau de 6 mm D Tornav s pla de 6 mm E Alicates de tall F Torx T10 i T25 G Cinta m trica H Ganivet I Llapis J Nivell de bombolla...

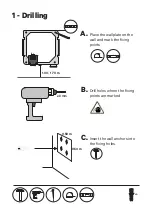
Page 16: ...Drilling A B C x4 Insert the wall anchors into the fixing holes 1 30 1 70 m 8 mm Drill holes where the fixing points are marked Place the wallplate on the wall and mark the fixing points 0 50 m 0 50...

Page 17: ...sth len 1 Perforaci n A Coloca la placa de montaje en la pared y marca los puntos de fijaci n B Taladra los orificios donde marcaste los puntos de fijaci n C Inserta los tacos en los orificios de fij...

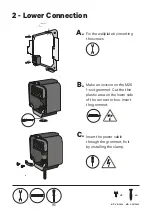
Page 18: ...2 Make an incision on the M25 1 exit grommet Cut the thin plastic area on the lower side of the connector box Insert the grommet Fix the wallplate by inserting the screws Insert the power cable throug...

Page 19: ...ntaje insertando los tornillos B Haz un corte en el pasacables de 1 salida M25 Corta la parte de pl stico delgada en el lado inferior de la caja de conectores Inserta el pasacables C Haz pasar el cabl...

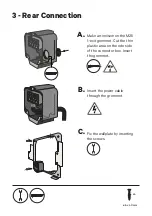
Page 20: ...x4 6 x 40 mm Make an incision on the M25 1 exit grommet Cut the thin plastic area on the ride side of the connector box Insert the grommet Insert the power cable through the grommet Fix the wallplate...

Page 21: ...az un corte en el pasacables de 1 salida M25 Corta la parte de pl stico delgada en el lado trasero de la caja de conectores Inserta el pasacables B Pasa el cable de alimentaci n a trav s del pasacable...

Page 22: ...ocal regulations regarding Overvoltage Category II equipment Always use standard copper cables having conductor area between 6 mm2 to 10 mm2 The charger must be permanently connected to electrical ear...

Page 23: ...ea de suministro el ctrico debe estar conectada a una instalaci n existente y debe cumplir las normativas locales relativas a equipos de categor a II para sobretensiones 2 Usa siempre cables est ndar...

Page 24: ...x 0 4 m 6 x 30 mm Fix the device on the wall by inserting and tightening the screws Place the plug holder on the wall and mark the fixing points Drill holes where the fixing points are marked Insert...

Page 25: ...qui el tap de l endoll a la paret i marqui els punts de fixaci B Trepi els forats on es marquen els punts de fixaci Insereixi els cargols d ancoratge en els forats de fixaci C Fixi el dispositiu a la...

Page 26: ...s well connected and roll the hose around the holder B C OK Make sure the charger is fixed to the wallplate before inserting the screws x4 5 x 10 mm Hold the Quasar by opposite corners and fix it on t...

Page 27: ...t i enrotlli la m nega en el suport B Mantingui el Quasar prop de les cantonades oposades i fixi l a les connexions alineant lo amb la caixa del connector C Asseguri s que el carregador estigui fixat...

Page 28: ...16 R 10 25 20 R 0 3 7 1 4 8 2 6 5 9 POSITION Position the current selector to an appropriate setting Position 0 8 and 9 are reserved for Power Sharing Smart Contact your sales agent for more informati...

Page 29: ...ajust adequat Les posicions 0 8 i 9 estan reservades per a Power Sharing Smart C Tanqui la tapa del port de comunicaci d Ethernet si no s ha d utilitzar Posi s en contacte amb el seu agent de vendes...

Page 30: ...a Insert the M25 3 exit grommet B Insert the ethernet cable only crimp the RJ45 connector to the cable and connect it to the ethernet port C Close the communication lid Inserting the cable with the RJ...

Page 31: ...landera M25 de 3 sortides B Insereixi nom s el cable d Ethernet encasti el connector RJ45 per al cable i connecti l al port d Ethernet Si s insereix el cable amb el connector RJ45 a trav s de la volan...

Page 32: ...p your charger refer the user guide on the Wallbox Academy page https support wallbox com Locate the Serial Number SN and the UID of your charger Download the Wallbox App and register Add your charger...

Page 33: ...r A Localitzi el n mero de s rie SN i l UID del carregador B Descarregui l aplicaci Wallbox i registri s C Afegeixi el carregador mitjan ant la introducci de les dades sol licitades Per obtenir m s in...

Page 34: ...emy page https support wallbox com Check the local regulations and the electricity supplier requirements for vehicle to grid vehicle to business and vehicle to home features Wrong settings may cause p...

Page 35: ...ula V2G A Comprovi la normativa local i els requisits del prove dor d electricitat per al vehicle per a quadr cula vehicle per a feina i vehicle per a la llar B La configuraci incorrecta pot causar pr...

Page 36: ...on the Wallbox Academy page https support wallbox com On the Wallbox App access the Installation Options on the configurations menu Access Grid Codes and select the required normative Selecting NONE w...

Page 37: ...0 1 Configuraci del vehicle per quadr cula V2G A En l aplicaci de Wallbox accedeixi a Opcions d instal laci al men de configuracions B Accedeixi a Codis de quadr cula i seleccioni la normativa requeri...

Page 38: ...ternally stop the charging and discharging process C 1 2 3 4 5 6 7 8 9 0 1 2 3 4 5 6 7 8 9 0 A T10 Right Left Stop Switch Enabled Stop Switch Disabled Open the communication lid and connect through th...

Page 39: ...nexions al port de parada A Obri la tapa de comunicaci i connecti a trav s de la volandera un equip extern o bot d emerg ncia B Stopp Port wird verwendet um den Lade und Entladevorgang extern zu stopp...

Page 40: ...cation lid A Switch Enabled 1 2 3 4 5 6 7 8 9 0 Stop Port Charging Discharging Stop Port Charging Discharging Enabled Signal Open Disabled Enabled Signal Closed Enabled Stop Port Charging Discharging...

Page 41: ...ci A Interruptor Activat Port de parada Habilitat senyal obert C rrega i desc rrega Desactivat Port de parada Habilitat senyal tancat Carrega i desc rrega Activat B Interruptor Desactivat Port de para...

Page 42: ...representar un riesgo de seguridad y o provocar un fallo de funcionamiento del equipo Cualquier da o resultante por negligencia o por acciones contrarias a las instrucciones de este manual queda excl...

Page 43: ...ctive 2012 19 CE la fin de sa dur e de vie utile le produit ne doit pas tre limin comme d chet urbain Il doit tre remis un centre de collecte ou un distributeur qui propose des services d limination d...

Page 44: ...rovocar un mal funcionament de l equip Qualsevol dany que es produeixi per no tenir en compte o per accions contr ries a les instruccions d aquest manual s exclou de la garantia del producte Av s lega...

Page 45: ...gebracht werden der f r die Entsorgung von speziellen und differenzierten Abf llen zust ndig ist Veiligheidsaanbevelingen Volg alle veiligheids en installatie instructies zorgvuldig op Het niet opvol...

Page 46: ...x para obter instru es sobre como enviar ou transportar para repara o PT Conselhos de elimina o De acordo com a diretiva 2012 19 EC no final da sua vida til o produto n o deve ser eliminado como lixo...

Page 47: ...930181668 Danmark Deutschland France 33 186260541 39 694804494 31 202410845 Espa a Italia Nederland Norge 47 51742000 351 308809158 43 720882116 Portugal sterreich Schweiz Suisse 41 435084675 46 85250...

Page 48: ...support wallbox com...
Reviews: