background image

English   

- 17 -

Dolby Digital

In the Con

fi

guration Menu, highlight the Dolby D item 

by pressing 

“ ”

 or 

“ ”

 buttons. Use the 

“ ”

 or 

“ ” 

buttons to set the Dolby Digital as On or Off. If the
channel that you are watching supports Dolby Digital 
and Dolby Digital Plus, you can turn this setting on.

Hard of Hearing (*)

Use “ ” or “ ” button to select Hard of Hearing and 
then press “ ” or “ ” button to set this setting as 
On or Off.
If the broadcaster enables any special signal 
concerning the audio, you can set this setting as On 
to receive such signals.

(*) Hard of Hearing function will not be available for UK.

Channel List

Use “ ” or “ ” buttons to go to Channel List option. 
Use  or  buttons to toggle Channel List Mode. If you 
select “

TV Only

”, with the “ ” or “ ” buttons, you 

navigate through only TV channels. If you select 

Radio Only

”, with the “ ” or “ ” buttons, you 

navigate through only radio channels.  If you select 

Text Only

”, with the “ ” or “ ” buttons, you navigate 

through only text channels. If you choose “

Show All

” 

all  channels can be navigated. To save the recent 
changes and exit; press the 

MENU

 button.

Digital Audio Out

Use this setting to de

fi

 ne digital audio out signal type. 

Use  “ ” or “ ” buttons to set Digital audio out as 

AC3

 or 

PCM

.

If your selected channel includes AC3 sound stream, 
you should connect your TV to external equipment 
by using Spdif out of your TV for enabling the sound 
output.If you have no external sound equipment, 
please select Digital Audio Out as “PCM” by using “

” or “ ” button.

A/V Delay

You can use this setting when there is an AV 
synchronization problem in the received broadcast. 
Press “ ” or “ ” button to change the delay.

Audio Description (Optional)

Audio description refers to an additional narration 
track for blind and visually impaired viewers of visual 
media. You can use this feature, only if the broadcaster 
supports that additional narration track. Use “ ” or 
“ ” buttons to select an item. Then use “ ” or “ ” 
buttons to set.

Audio Description (Optional)

This function enables or disables the audio description 
feature by pressing the “ ” or “ ”buttons.

Preferred Language (Optional)

By pressing the “ ” or “ ” buttons the preferred audio 
description language is being changed. This setting 
can be used, only if it is available.

Relative Volume (Optional)

Using this option, the Audio Description volume level 
can be increased or decrased relatively, according to 
the general volume.

Standby Search (*)

(*) This setting is visible only when the Country option 
is set to Denmark, Sweden, Norway or Finland.
Use “ ” or “ ” button to select Standby Search and 
then press “ ” or “ ” button to set this setting as On or 
Off. If you change Standby Search to Off, this function 
will be unavailable.
To use Standby search please make sure that
you select Standby Search as On.

Active Antenna (*)

Use “ ” or “ ” buttons to highlight Active Antenna 
option. When antenna power option is set as On by 
pressing “ ” or “ ” button, +5V will be transmitted to 
the antenna output.This feature enables the use of 
active antenna.

Note:

 Antenna power should be “Off” when standard 

antenna is used instead of the active antenna.

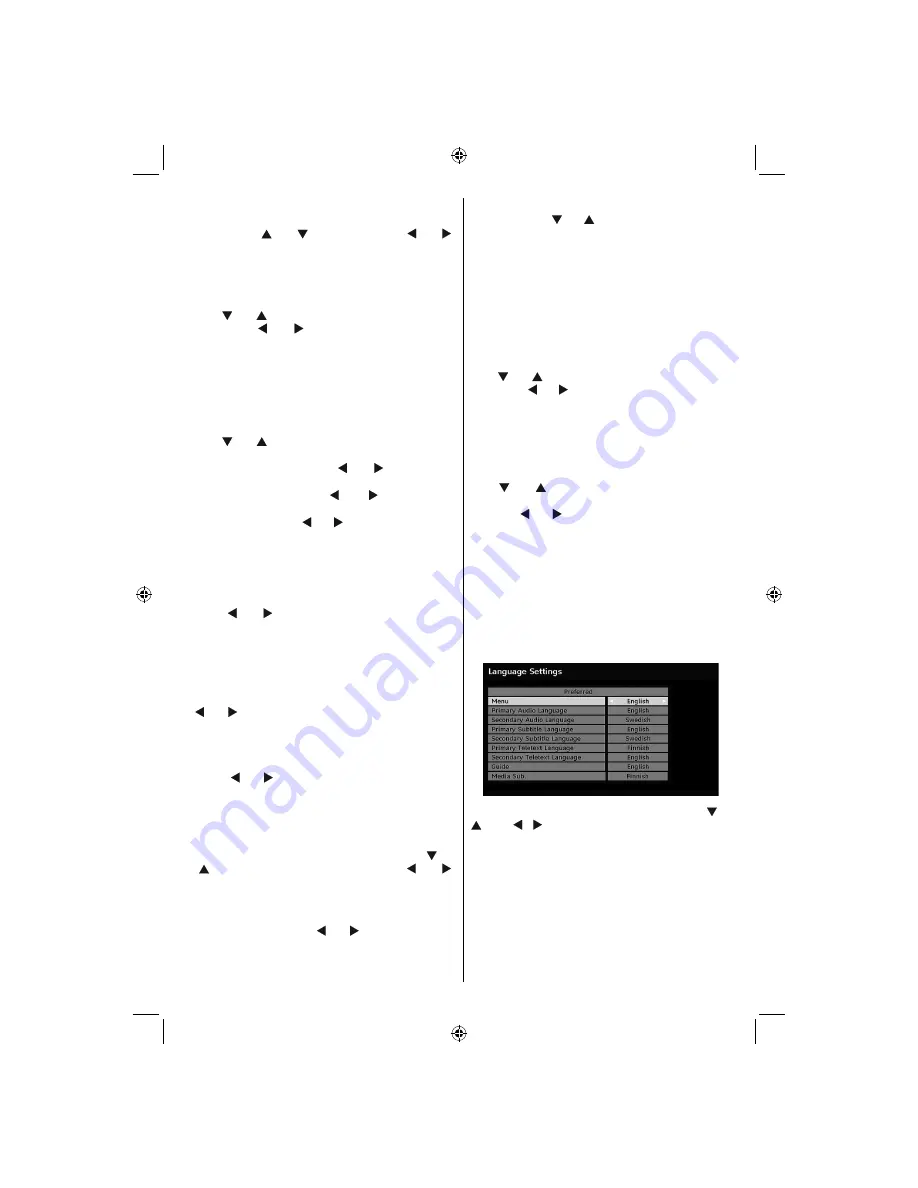
Language Settings

In this menu the user can adjust the preferred language.
Select “Language” item in the Setup menu and press 
OK button. Then language settings menu will be 
displayed.

You can set the desired language options by using “ ” /“

 and 

“ ”/“ ” buttons.

Note

: If the Country option is set to Denmark, Sweden, 

Norway or Finland, the Language Settings menu will 
function as described below:

01_MB37D_[GB]_(01-TV)_1900UK_IDTV_BRONZE15_MOBIL_TV_16856W_10070329_50177245.indd   17

01_MB37D_[GB]_(01-TV)_1900UK_IDTV_BRONZE15_MOBIL_TV_16856W_10070329_50177245.indd   17

22.10.2010   13:32:19

22.10.2010   13:32:19

Summary of Contents for SaorView WP1640DVD

Page 1: ...COLOUR TELEVISION WITH REMOTE CONTROL OPERATING INSTRUCTIONS WP1640DVD BE WALKER WISE logon to www walker ie...

Page 2: ...PG 12 Programme Options 12 Analogue Teletext 13 Widescreen 13 Dijital TV Menu System 13 Channel List 13 Navigating the Entire Channel List 13 Moving the channels in the channel list 13 Deleting the Ch...

Page 3: ...self automatically to standby mode PLL Frequency Search PC input Plug Play for Windows 98 ME 2000 XP Vista Windows 7 Audio line out Game Mode optional Accessories MENU INFO EPG FAV PRESETS SUBTITLE RE...

Page 4: ...ended for ventilation and to ensure reliable operation To prevent overheating these openings must not be blocked or covered in anyway Heat and Flames The set should not be placed near to open flames a...

Page 5: ...a Television Distribution System Cable TV etc fromTuner Device connected to the protective earthing of the building installation through the mains connection or through other apparatus with a connect...

Page 6: ...e Menu on off 19 Blue Install menu Selects DVB T channels 20 in DTV mode OK Channel list in DTV mode Hold in TXT 21 mode Cursor right Subpage in TXT mode 22 Cursor down Page down in TXT mode 23 Volume...

Page 7: ...nd audio sockets with a device that has component output Connect the component video cables between the COMPONENT VIDEO INPUTS on on the TV and the component video outputs of your device While connect...

Page 8: ...ls No sound connection is needed for an HDMI to HDMI connection Viewing the Connections Side Connectors CI Slot is used for inserting a CI card A CI card allows you to view all the channels that you s...

Page 9: ...made switch to PC source See Input selection section Settheresolutionthatsuitsyourviewingrequirements Resolution information can be found in the appendix parts PC audio cable not supplied to AUDIO INP...

Page 10: ...Connecting Other Equipment via Scart Most devices support SCART connection You can connect a DVD recorder a VCR or a decoder to your LCD TV by using the SCART socket Note that cables shown in the ill...

Page 11: ...ll be displayed on the screen Programme Selection Press P CH button to select the next programme or P CH button to select the previous programme Viewing Main Menu Press buttons at the same time to vie...

Page 12: ...ching you can press MENU button at any time during the process The following OSD will be displayed during the automatic search After Automatic Search is completed the following message will be display...

Page 13: ...ammes Numeric buttons Jump go to preferred channel directly via numeric buttons SWAP Jump to current broadcast 0 SEARCH activates Guide Search window Press 0 button to view Guide Search menu Using thi...

Page 14: ...or Move Delete and Lock functions Channel List is the place where the channels are managed YELLOW Tags untags the selected channel BLUE Tags untags all channels Navigating the Entire Channel List Pres...

Page 15: ...List menu Then press OK button and Edit Favourite List menu appears on the screen Adding a Channel to a Favourites List By pressing or buttons highlight the channel that you want to add to the favour...

Page 16: ...tected message appears on the screen Refer to the module instruction manual for details of the settings NOTE Insert or remove the CI module only when the TV is in STANDBY mode or SWITCHED OFF TV Setup...

Page 17: ...ime Settings item by pressing or buttons Press OK and Time Settings sub menu will be displayed on the screen Use or buttons to highlight the Time Zone Setting Time Zone Setting is set using or buttons...

Page 18: ...mpaired viewers of visual media You can use this feature only if the broadcaster supports that additional narration track Use or buttons to select an item Then use or buttons to set Audio Description...

Page 19: ...asking whether to search for analogue channels appears on the screen Highlight Yes and press OK button to search for analogue channels The following menu appears on the screen for analogue channel se...

Page 20: ...search is completed for digital channels a message asking whether to search for analogue channels appears on the screen This process is same as described in Automatic Search section Media Browser in...

Page 21: ...slideshow the shuffle mode is enabled the next pictures will be chosen randomly If the loop function is not enabled the slideshow will stop at the end If the loop function is enabled after the slidesh...

Page 22: ...Press or button to set this feature On or Off Turn this feature on when you are watching films to see the fast motion scenes clearly Game Mode optional Select Game Mode by pressing or button Use or b...

Page 23: ...selected channel supports that mode AVL Automatic Volume Limiting AVL function adjusts the sound to obtain fixed output level between programmes For instance volume level of advertisements tend to be...

Page 24: ...button to change Teletext Language to West East Turk Gre Cyrillic Arabic or Persian Ext Out Press or button to select Ext Out Use or button to set the Ext Out as On or Off Note For copying from a DVD...

Page 25: ...the cursor in four directions you can reach 20 programmes in the same page You can scroll the pages up or down by pressing the navigation buttons to see all the programmes in TV mode except for the AV...

Page 26: ...menu appears on the screen Autoposition If you shift the picture horizontally or vertically to an unwanted position use this item to put the picture into correct place automatically This setting there...

Page 27: ...for viewing the picture in different zoom modes Press SCREEN button to directly change the zoom mode Available zoom modes are listed below Note In YPbPr and HDMI modes while in 720p 1080i resolutions...

Page 28: ...Holds a text page when convenient Press again to resume P P and numbers 0 9 Press to select a page Note Most TV stations use code 100 for their index pages Coloured Buttons RED GREEN YELLOW BLUE Your...

Page 29: ...ls The picture quality may degrade when two peripherals are connected to the TV at the same time In such a case disconnect one of the peripherals No Picture Is the aerial connected properly Are the pl...

Page 30: ...VESA 20 1280 1024 60 64 0 VESA 21 1280 1024 75 80 0 VESA 22 1600 1200 60 75 0 VESA Appendix B AV and HDMI Signal Compatibility Input Signal Types Source Supported Signals Available EXT 1 SCART PAL 50...

Page 31: ...ot support Picture File Format smi Note Necessary bitrates for some video types are higher than USB limits For this reason some video types cannot be played Products Battery Information for Users on D...

Page 32: ...x 384 x 270 Weight Kg 3 70 Transmission Standards DVB T MPEG2 DVB T MPEG4 HD i DEMODULATION Symbol rate COFDM with 2K 8K FFT mode Modulation 16 QAM 64 QAM FEC for all DVB modes automatically found ii...

Page 33: ...on the remote control or press the button P CH or P CH button on the TV The TV will then switch on Adjust for best picture through antenna position or set TV channels again if necessary 4 Switching th...

Page 34: ...is marked with the letter N or coloured Black The wire which is coloured brown or red must be connected to the terminal which is marked with the letter L or coloured Red For continued protection agai...

Page 35: ...via coaxial and optical digital audio outputs optional Multi Audio up to 8 support According to disc content Multi Subtitle up to 32 support According to disc content Multi Angle up to 9 support Acco...

Page 36: ...leave it in a car parked in direct sunlight as the temperature can rise quickly and damage the disc After playing store the disc in its case On cleaning Before playing clean the disc with a cleaning c...

Page 37: ...to eject Overview of the Remote Control Standby 1 Numeric buttons 2 Return back 3 Language selection Set language 4 Display time DVD menu 5 Clear 6 Stop 7 No function 8 Rapid Reverse 9 Rapid advance...

Page 38: ...o language X X MENU Displays TV menu OK SELECT Enter View Play REPEAT Displays repeat options RETURN Returns back to the previous menu if available ROOT Goes back to the root folder if available SEARC...

Page 39: ...o the disc s priority language Usually a circulation will happen while switching 8 to another language that is you can cancel the subtitle by pressing this button a number of times until Subtitle Off...

Page 40: ...cratch fingerprint etc Clean the DVD disc and try again See instructions described in Notes on Discs to clean your disc properly Ensure that the DVD disc is in the drawer with the label uppermost A da...

Page 41: ...play sometime in the future for even longer duration play Subtitles These are printed lines appearing at the bottom of the screen which translate or transcribe the dialogue They are recorded on the DV...

Page 42: ...ed 240 m in D o u b le sid ed 480 m in S ing le side d 80 m in D o u b le sid ed 160 m in C h aracteristic s D V D co n ta in s ex cellen t so u n d a n d vid eo du e to D olby D igital and M P E G 2...

Page 43: ...not support Picture File Format smi sub ssa ass Note It is not guaranteed that all DivX formats are supported Specifications Types of Discs Supported DVD SS SL 4 7 DVD 5 SS DL 4 7 DVD 9 DS SL 4 7 DVD...

Page 44: ...50177245...

Reviews: