background image

20 

Gas Conversion and Specifications


Conversion Procedure 

NOTE: 

These conversions should only be carried out by qualified persons.  All connections must 
be checked for leaks before re-commissioning the appliance. 

Adjustment of components that have adjustments / settings sealed (e.g. paint sealed) can 
only  be  adjusted  in  accordance  with  the  following  instructions  and  shall  be  re-sealed 
before re-commissioning this appliance. 

For relevant gas specifications refer to 

‘Gas Specifications Tables’ 

at end of this section. 


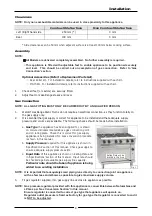
Open Burners. 

1. 

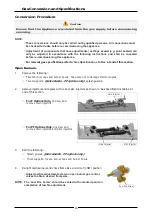
Remove the following:- 

Trivets 

burner caps and burner bowls.  Take care not to damage thermocouples. 

Trivet supports, 

(pilot shields - PF options only), 

splash guards. 

 
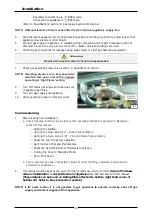
2. 

Remove injectors and replace with correct size injectors as shown in ‘Gas Specifications Tables’ at 

end of this section. 


For F Options Only, Unscrew and 

remove main injectors. 


For PF Options Only, Unscrew and 

remove main injectors and pilot injectors. 


3. 

Refit the following:- 

Splash guards, 

(pilot shields - PF options only)

Trivet supports, trivets, burner caps and burner bowls. 


4. 

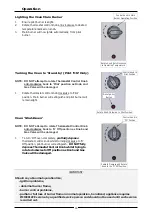
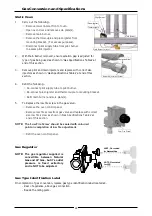
Re-light main burners and check flame size on simmer (LOW) position. 

Adjust low fire adjustment screw on open burner gas control 
valves to obtain desired flame size. 


NOTE:  The  'Low  Fire  Screw'  should  be  sealed  with  coloured  paint  on 

completion of low fire adjustment. 


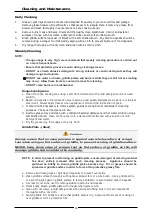
Ensure  that  the  Appliance  is  isolated from  the  gas  supply  before commencing  

servicing. 

Caution 

Main Injector 

Low Fire Screw 

Main Injector 

Pilot Injector 

Summary of Contents for RN8810G

Page 1: ...l l a t i o n a n d O p e r a t i o n M a n u a l Series RN8510G RN8610G RN8810G Gas Range Static Oven Date Purchased Serial Number Dealer Service Provider 228681 13 RNL8510G RNL8610G RNL8810G For use...

Page 2: ...ervice tel 800 263 1455 Toll Free NEW ZEALAND Moffat Limited Web www moffat co nz E Mail sales moffat co nz Main Office tel 0800 663328 UNITED KINGDOM Blue Seal Web www blue seal co uk E Mail sales bl...

Page 3: ...llation 8 Installation Requirements Unpacking Location Clearances Assembly Gas Connection Commissioning Operation 11 Operation Guide Description of Controls Open Burners Griddle Lighting the Oven Pilo...

Page 4: ...T BE LEFT ON UNATTENDED IT IS RECOMMENDED THAT A REGULAR INSPECTION IS MADE BY A COMPETENT SERVICE PERSON TO ENSURE CORRECT AND SAFE OPERATION OF YOUR APPLIANCE IS MAINTAINED DO NOT STORE OR USE GASOL...

Page 5: ...RN 1 8819G 2 Gas Range Static Oven 2 Open Burners 900mm Griddle Storage Cabinet NOTE 1 Back Options Standard Models L Low Back Models 2 Open Burner Options F With Flame Failure Protection PF With Pilo...

Page 6: ...G20 Propane G31 Open Burner each Griddle each 300mm section Oven Open Burner each Griddle each 300mm section Oven Heat Input nett Nominal 6 5 kW 5 5 kW 8 0 kW 6 5 kW 5 5 kW 8 0 kW Reduced 1 75 kW 1 85...

Page 7: ...5 Dimensions RN L 8510G Cook Top Options RN L 8510G RN L 8513G...

Page 8: ...6 Dimensions RN L 8610G Cook Top Options RN L 8610G RN L 8613G RN L 8616G RN L 8619G...

Page 9: ...7 Dimensions RN L 8810G Cook Top Options RN L 8810G RN L 8813G RN L 8816G RN L 8819G...

Page 10: ...djusted by an authorised service agent They are not to be adjusted by the installation person Unpacking Remove all packaging and transit protection from appliance including all protective plastic coat...

Page 11: ...Type the appliance has been supplied for is shown on coloured stickers located above gas connection point and on rating plate Check this is correct for gas supply appliance is being installed for Gas...

Page 12: ...10 Verify operating pressure remains correct Commissioning 1 Before leaving new installation a Check following functions in accordance with operating instructions specified in Operation section of th...

Page 13: ...ing the Oven to Stand By Mode Oven Shut Down Description of Controls Griddle Option Burner Control OFF Position PILOT Burner HIGH Flame LOW Flame Gas Control Knobs Piezo Igniter Griddles Only Piezo Ig...

Page 14: ...ON OFF without having to manually re light burner each time that it is turned ON as burner will automatically light itself off pilot burner Flame Failure Protection is incorporated for each burner by...

Page 15: ...is incorporated by way of a thermo electric system for the main burner Flame failure protection will shut off gas supply to burner in the event that pilot burner goes out so that un burnt gas is not...

Page 16: ...maged 1 To turn Off oven completely partially depress thermostat control knob whilst turning clockwise to O Off position pilot burner will extinguish DO NOT fully depress Thermostat Control Knob whils...

Page 17: ...etergent or cleaning material has been completely removed after each cleaning Appliance should be switched On briefly to ensure griddle plates become dry Oil or grease should be spread over griddle su...

Page 18: ...e is cold and rub in direction of grain c It should not be necessary to remove splash guards covering burner manifolds for cleaning purposes These can be cleaned in situ d Remove grease tray and clean...

Page 19: ...an interior and exterior surfaces of range with hot water a mild detergent solution and a soft scrubbing brush Note that gas control knobs are a push fit onto gas control valve spindles and can be rem...

Page 20: ...ill cover d Dry oven thoroughly with a dry cloth and polish with a soft dry cloth Periodic Maintenance NOTE All maintenance operations should only be carried out by a qualified service person To achie...

Page 21: ...as pressure too low Partially blocked pilot injector Thermocouple connection to gas control is loose or faulty Thermocouple faulty Electromagnet in rear of gas control unit is faulty Hold knob in for...

Page 22: ...ports pilot shields PF options only splash guards 2 Remove injectors and replace with correct size injectors as shown in Gas Specifications Tables at end of this section For F Options Only Unscrew and...

Page 23: ...eplace with correct size injectors as shown in Gas Specifications Tables at end of this section 4 Refit the following Re connect pilot supply tube to pilot burner Re connect piezo igniter to mounting...

Page 24: ...nting bracket Refit main burner and sole plate s 5 To Replace the low fire screw in the gas valve Remove the oven control panel Remove low fire screw from gas valve and replace with correct size low f...

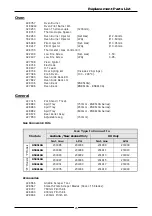
Page 25: ...tion for details DO NOT USE A NAKED FLAME TO CHECK FOR GAS LEAKAGES Warning Natural Gas LP Gas Propane Open Burner Main Burner Injectors 2 45 mm 1 50 mm Pilot Burner PF Option Only 0 30 0 20 Griddle M...

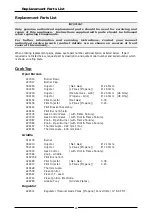
Page 26: ...th Flame Failure 227384 Knob Open Burner with Pilot Flame Failure 228167 Thermocouple 320 mm Front 228166 Thermocouple 600 mm Rear Griddle 014105 Burner 032210 Injector Nat Gas 2 10mm 032130 Injector...

Page 27: ...8106 Oven Rack RN8510G 227896 Oven Rack RN8610G RN8810G General 227015 Pot Stand Trivet 228884 Spill Tray 750mm RN8510G Series 228883 Spill Tray 450mm RN8610G Series 228882 Spill Tray 600mm RN8810G Se...

Reviews: