


23
W 300
GB
11.
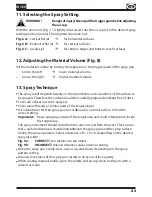
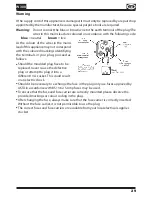
Selecting the Spray Setting
WARNING!
Danger of injury! Never pull the trigger guard while adjusting
the
air
cap.
With the union nut (fig. 7, 1) slightly unscrewed, turn the air cap (2) to the desired spray
setting position (arrow). Then tighten the union nut.
Fig. 6 A
= vertical flat jet
for horizontal surfaces
Fig. 6 B
= horizontal flat jet
for vertical surfaces
Fig. 6 C
= circular jet
for corners, edges and hard-to-reach surfaces
12. Adjusting the Material Volume (Fig. 8)
Set the material volume by turning the regulator on the trigger guard of the spray gun
-
turn to the left
lower material volume
+ turn to the right
higher material volume
13. Spray Technique
•
The spray result depends heavily on the smoothness and cleanliness of the surface to
be sprayed. Therefore the surface should be carefully prepared and kept free of dust.
•
Cover all surfaces not to be sprayed.
•
Cover screw threads or similar parts of the target object.
•
It is advisable to test the spray gun on cardboard or a similar surface to find the
correct setting.
Important:
Begin spraying outside of the target area and avoid interruptions inside
the target area.
The spray movement should come from the arm, not just from the wrist. This ensures
that a uniform distance is maintained between the spray gun and the spray surface
during the spray operation. Select a distance of 5 - 15 cm, depending on the desired
spray jet width.
Fig. 9 a:
CORRECT
Even distance to the object.
Fig. 9 b:
INCORRECT
Uneven distance causes uneven coating.
•
Move the spray gun evenly cross-wise or up-and-down, depending on the spray
pattern setting.
•
An even movement of the spray gun results in an even surface quality.
•
When coating material builds up on the nozzle and air cap, clean both parts with a
solvent or water.
Summary of Contents for W 300
Page 1: ...wagner group com D GB NL F WOOD METAL SPRAYER W 300 ORIGINAL BETRIEBSANLEITUNG...
Page 2: ...W 300 1 1 2 8 9 3 16 6 7 5 4 14 13 10 11 12 15 2 17 18...
Page 3: ...W 300 3 4 a b B A 5...
Page 4: ...W 300 a b 8 6 7 2 1 9 10 16 15 14 11...
Page 5: ...W 300 13 a b 2 3 4 13 14 12 17 7 6 9 8 10 7 5 C 12 13 11 4 3 2 1 19 18 14 4 3 20 12...


