43
W 950 Flexio
W
all pain
t
43
W 950 Flexio
EN
i
In order to reduce overspray and to improve the sprayed result, the colour on
the quantity scale (white or black) should match the colour of the width of the
spray jet (white or black).
15. Starting your work with the spray lance
•
Put the machine down only on a level, clean surface.
•
Before connecting to the mains supply, be sure that the supply voltage is identical
with the value given on the rating plate.
Attention! Before switching on the device, check that the trigger is not
pulled/held. A held trigger can result in paint being sprayed by accident.
Only put the trigger on hold when cleaning.
•
Plug in the power cable.
•
Set the multifunction switch (fig. 6, A) to "FILL/CLEAN".
•
Hold the spray lance over the paint container.
•
Keep the trigger kept pressed down until paint starts to come
out of the nozzle.
Now the system is filled with paint and ready to be operated.
•
Hold the spray lance away from the paint container.
•
Set the multifunction switch (fig. 6, A) to "ON".
16.
Spraying technique when using the
spray lance
•
Mask all areas that are not going to be sprayed.
•
It can be valuable to do a test spray on a piece of cardboard or similar surface to work
out what the most suitable settings are.
Important:
Start at the edge of the spray area. Start the spray movement first of
all, and then press the trigger. Avoid
interrupting the spraying process
inside the spray area.
•
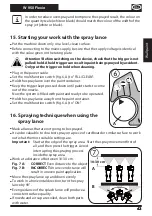
Work at a distance of between 10-30 cm.
Fig. 7 A:
CORRECT
Even distance to the object.
Fig. 7 B:
INCORRECT
An uneven distance will
result in uneven paint application.
•
Move the spray lance up and down evenly .
•
To work in a horizontal direction, turn the spray
lance by 90°.
•
Even guidance of the splash lance will produce a
consistent surface quality.
•
If nozzle and air cap are soiled, clean both parts
with water.
10-30 cm
A
B
Volume
A


