Item No. 2600
Elite
™
200W PRO
DC to AC Pure Sine Inverter
User’s Manual
Page 1: ...Item No 2600 Elite 200W PRO DC to AC Pure Sine Inverter User s Manual ...
Page 2: ...icult motorized appliances Advanced microprocessor controlled circuits run cooler and are more reliable than competing units The DC terminals have been designed apart from each other to ease installation and minimize the risk of accidental shortage when handling the DC cables The Elite 200W PRO also operates at high efficiency up to 90 that results in long run time and extended battery life compar...
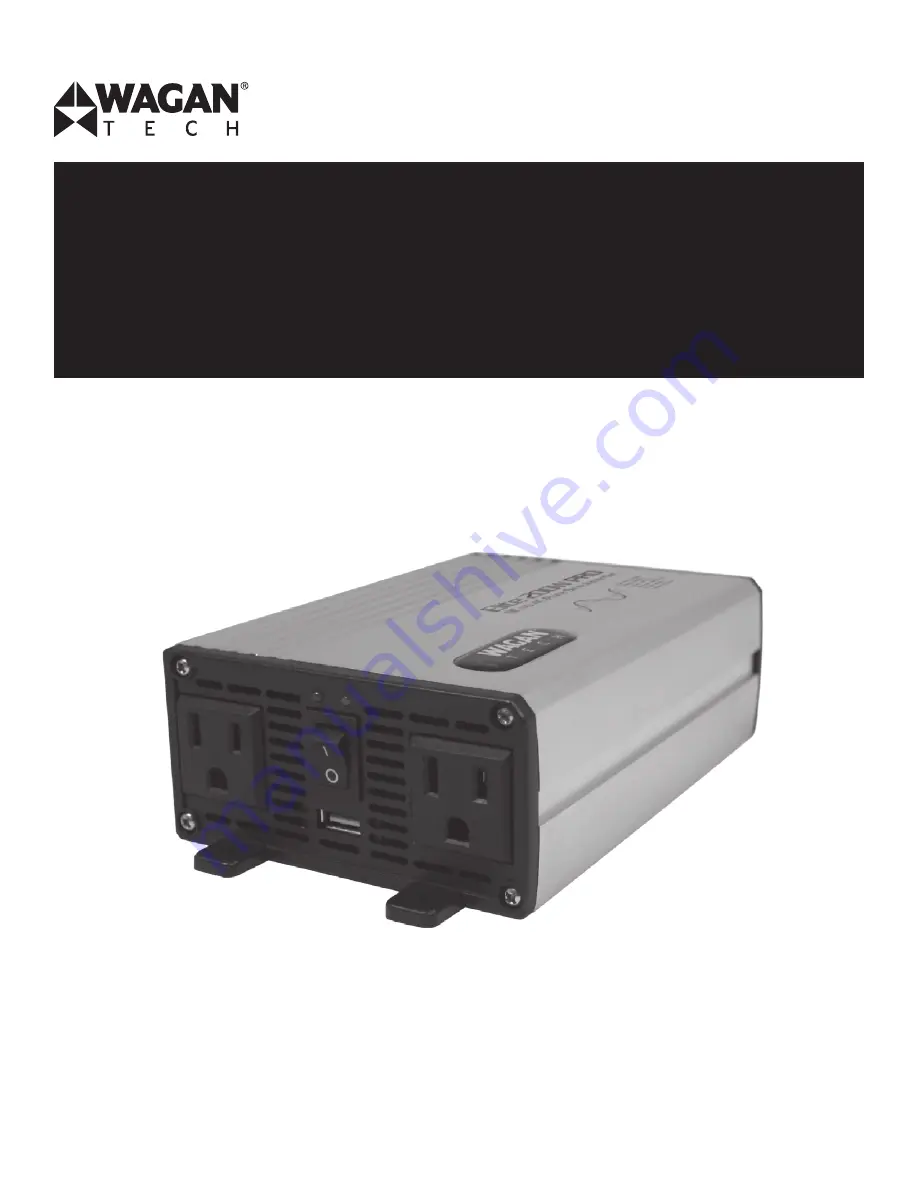
Page 3: ...monic distortion THD 3 No load current draw 0 4A Battery low alarm 10 5V 0 5V DC Battery low shutdown 9 5V 0 5V DC Over voltage shutdown 15 5V 0 5V DC Cooling fan Thermally controlled AC output sockets 2 USB power port 2 1A 5V 0 25V Power switch AC output ON OFF control Dimensions body only 6 2 in 4 1 in 2 0 in 15 8 cm 10 5 cm 5 2 cm Net weight approximate 1 5 lbs 0 7 kg All specifications are typ...
Page 4: ...nerates heat Keep this inverter in a dry environment Do not operate any equipment over 200 watts This inverter is designed to operate from a 12 volt DC power source only Do not attempt to connect the inverter to any other power source including any AC power source Incorrect battery polarity will damage the inverter and void the warranty Do not open the inverter there are no user serviceable parts ...
Page 5: ...on as the inverter shuts down due to overheating overload under voltage or over voltage Immediately turn off all AC appliances if the FAULT LED is lit Allow the inverter to cool before continuing Make sure that the ventilation vents are not blocked If an inverter shutdown was preceded by a buzzing sound there may be an excessive load in combination with a low voltage or cable problem AC Outlets Th...
Page 6: ...gative Terminal Black Postive Terminal Red Fuse Positive Terminal Positive DC Input Red Negative Terminal Negative DC Input Black Cooling Fan High speed and load controlled Fuse Replaceable external fuse Load Considerations The startup load of an appliance is a major factor of whether this inverter can power it This initial load is only momentary With many appliances it is approximately twice the ...
Page 7: ... follow the procedure located under the Connecting the Inverter section 2 Install a separate fused DC accessory socket wired to the vehicle s battery Fuse this circuit at 20 amps There is no danger in leaving the inverter directly wired to the battery if the inverter is turned OFF after each use The inverter will shut off when the vehicle s battery level drops down to 9 5 volts to protect the batt...
Page 8: ...icle s 12V DC accessory outlet You may need to place the ignition switch to Accessory Position if the vehicle engine is not operating 3 Plug the AC appliance cord into the inverter s AC receptacle and or your USB appliance into the USB power port 4 Place the ON OFF power switch in the ON position The green LED should turn on indicating the inverter is powered and operating normally 5 When the inve...
Page 9: ...unt on the alternator to reduce the noise Change the positions of the inverter antenna cables and television power cord Isolate the television its power cord and antenna cables from the 12 volt power source by running an extension cord from the inverter to the television Troubleshooting PROBLEM Low or No Output Voltage Fault LED Lit Reason Solution Poor contact with battery inverter terminals or D...
Page 10: ...t use the equipment with this inverter use a higher wattage inverter PROBLEM Continuous Buzzing Sound Reason Solution Input voltage is below 10 5 volts Keep input voltage above 10 5 volts Poor or weak battery condition Recharge or replace battery Poor or loose cable connection Inspect terminals and tighten all connections Inadequate power being delivered to the inverter or excessive voltage drop U...
Page 11: ...lease follow the instructions and send the item with PREPAID SHIPPING along with all of the required documentation a complete explanation of the problem your name address and daytime phone number WAGAN Corporation will at its option replace or repair the defective part A Returned Merchandise Authorization number RMA is REQUIRED when sending in any defective item WAGAN Corporation is not responsibl...
Page 12: ...d CA 94544 U S A Tel 1 510 471 9221 U S Canada Toll Free 1 800 231 5806 customerservice wagan com www wagan com 2013 Wagan Corporation All Rights Reserved Wagan Tech and wagan com are trademarks used by Wagan Corporation REV20130805 E ...