


EN
33
CoolAir SP950T
Installation
➤
Screw one hex screw M8 x 45 mm (fig.
4
5, page 3) with a washer
(fig.
4
3, page 3) and spring washer (fig.
4
4, page 3) in the 8
thread inserts on the bottom of the unit.
A
➤
Tighten the screws with a torque of 8 Nm.
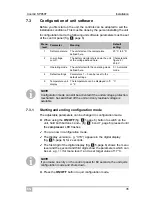
7.2.5
Installing the electrical supply lines
!
A
I
You can connect the unit to the battery via the lorry's terminal block or
directly. The terminal block is to be preferred for the connection. Ask your
vehicle manufacturer for the specifications of the terminal block.
➤
Lay the supply line and connect it to the vehicle (red line to plus, black
line to minus).
➤
Plug in the supply line plug into the socket of the air conditioning roof
unit supply line.
➤
To relieve strain on the supply line, secure it with a cable tie, e.g. to
the cab roof.
NOTICE!
Do not exceed the specified torque under any circumstances. This is the
only way to ensure that the thread inserts are not torn out.
WARNING!
The electrical power supply may only be performed by qualified
personnel with specialist knowledge.
Make sure there is no voltage present on electrically operated
components before carrying out work on them!
NOTICE!
Fit a fuse of 25 amps to the connection to the vehicle's power supply.
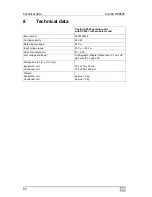
The battery must be able to supply the required current and voltage
(chapter “Technical data” on page 40).
NOTE
The unit is equipped as standard with a 4 m long cable with a cross-
section of 6 mm
2
. If longer cable lengths are required, then the cable
cross-section must be increased by an authorised specialist workshop:
In this case cut off the cable as closely as possible to the unit
(max. 0.5 m) and then establish a suitable connection with a larger
cable cross-section.
When the cable is extended by 4 m to 6 m in length, the manufacturer
recommends using a cross-section of at least 8 mm
2
.
Summary of Contents for CoolAir SP950T
Page 3: ...3 CoolAir SP950T 75 291 286 1 779 2 3 11 1 3 5 4 2 6 4...
Page 4: ...CoolAir SP950T 4 4 2 m 5 1 2 3 4 6...
Page 5: ...5 CoolAir SP950T 11 1 2 3 4 5 8 7 6 9 10 7...
Page 199: ...RU 199 CoolAir SP950T 1 A I 1 5 3 5 1 3 2...
Page 200: ...RU CoolAir SP950T 200 2 1 0 C 75...
Page 201: ...RU 201 CoolAir SP950T 2 2 25 3 3 1...
Page 204: ...RU CoolAir SP950T 204 7 A 7 1 1 3 2 3 8 10...
Page 205: ...RU 205 CoolAir SP950T 9 6 1 2 3 4 5 6 7 25 A 8 4 A 9 4 A 10 11 12...
Page 206: ...RU CoolAir SP950T 206 I 7 2 A 7 2 1 I 7 2 2 6 5 4 5 3 8 5 210...
Page 208: ...RU CoolAir SP950T 208 7 2 5 A I 25 216 4 6 2 0 5 4 6 8 2...
Page 209: ...RU 209 CoolAir SP950T 7 2 6 4 20 5 4 6 1 4 I 6 4 6 2 4 6 4 4...
Page 211: ...RU 211 CoolAir SP950T 7 3 1 8 1 6 8 6 7 6 8 5 6 2 3 1S 8 5 6 1 17 1 17 C I 60...
Page 212: ...RU CoolAir SP950T 212 7 3 2 1 17 30 C 62 86 F 211 8 5 6 8 4 6 8 6 7 6 C 8 4 6 1 7 3 3 2 A 211...