10
Connecting to a Power Amplifer
There are two different ways the di322 may be oper-
DWHGLQDQDXGLRV\VWHP7KHILUVWZD\DVWKH0DLQ
Audio Preamplifier connected directly to a Power
Amplifier, instructions on this page. The second way
LVDVD'LJLWDOWR$QDORJ&RQYHUWHUZLWK,QSXW6ZLWFK
-
ing, follow instructions on the next page.
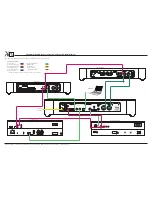
The connection instructions below, together with
the di322 Connection Diagram located on the separate
folded sheet “ 1A”, is an example of a typical audio
system. Your system may vary from this, however the
actual components would be connected in a similar
manner. For additional information refer to “Connec-
tor and Cable Information” on page 5.
1RWHV7KH2XWSXW&RQQHFWLRQ%DODQFHGRU8QEDO
-
DQFHGPD\EHXVHGVLPXOWDQHRXVO\
)RUDGGLWLRQDOLQIRUPDWLRQRQ3RZHU$PSOL
-
fier requirements when the Wadia di322 is
FRQQHFWHGGLUHFWO\WRD3RZHU$PSOLILHUUHIHU
WRSDJH
1
1RWH
Audio Connections:
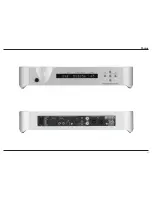
1. Connect balanced audio cables from the di322 AU-
',228738765LJKWDQG/HIWFRQQHFWRUVWRWKH
balanced Input connectors on the Power Amplifier.
1RWH,IWZR3RZHU$PSOLILHUVDUHXVHGFRQQHFWRQH
RIWKHXQEDODQFHG$8',22873876/RU5
to the unbalanced Inputs on the second Ampli-
ILHU
'LJLWDO$XGLR&RQQHFWLRQV
2. Connect a Digital DIN Cable from the di322
',*,7$/',1,1-DFNWRWKH6$&'&'7UDQVSRUW
Digital Audio DIN Output Jack.
3. Connect a Digital Optical Cable from the di322
',*,7$/$8',2,13876237,&$/FRQQHFWRU
WRWKH0HGLD3OD\HU'LJLWDO2SWLFDO2XWSXWFRQQHF
-
tor.
4. Connect a Digital Coaxial Cable from the di322
Connecting to a Power Amplifier
',*,7$/$8',2,13876&2$;,$/FRQQHF
-
WRUWRWKH$0)07XQHU'LJLWDO&RD[LDO2XWSXW
connector.
&RQQHFWD86%FDEOHZLWKW\SH$WRW\SH%FRQ
-
QHFWRUVIURPWKHGL',*,7$/$8',2,1387
86%FRQQHFWRUWRWKH&RPSXWHU86%FRQQHFWRU
6. Connect any additional Components in a similar
manner, as outlined in steps 2 thru 5.
7ULJJHU&RQWURO&RQQHFWLRQV
7. Connect a Control Cable from the Wadia di322
TRIGGER OUT Jack to the Power Control IN
-DFNRQWKH6$&'&'7UDQVSRUW
&RQQHFWD&RQWURO&DEOHIURPWKH6$&'&'
7UDQVSRUW3RZHU&RQWURO2XW-DFNWRWKH$0)0
Tuner Power Control In Jack.
&RQQHFWD&RQWURO&DEOHIURPWKH$0)07XQHU
3RZHU&RQWURO2XW-DFNWRWKH0HGLD6HUYHU7ULJ
-
ger In Jack.
&RQQHFWD&RQWURO&DEOHIURPWKH0HGLD6HUYHU
Trigger Out Jack to the Power Amplfier Trigger In
Jack.
11. Connect any additional Components in a similar
manner, as outlined in steps 7 thru 9.
$&3RZHU&RUGV&RQQHFWLRQV
12. Connect the di322 AC Power Cord to a live AC
outlet.
Summary of Contents for di322
Page 15: ...15 Notes ...
Page 20: ...20 ...
Page 21: ...21 Photos ...
Page 27: ...di322 digital audio decoder ...


