background image


26 


"


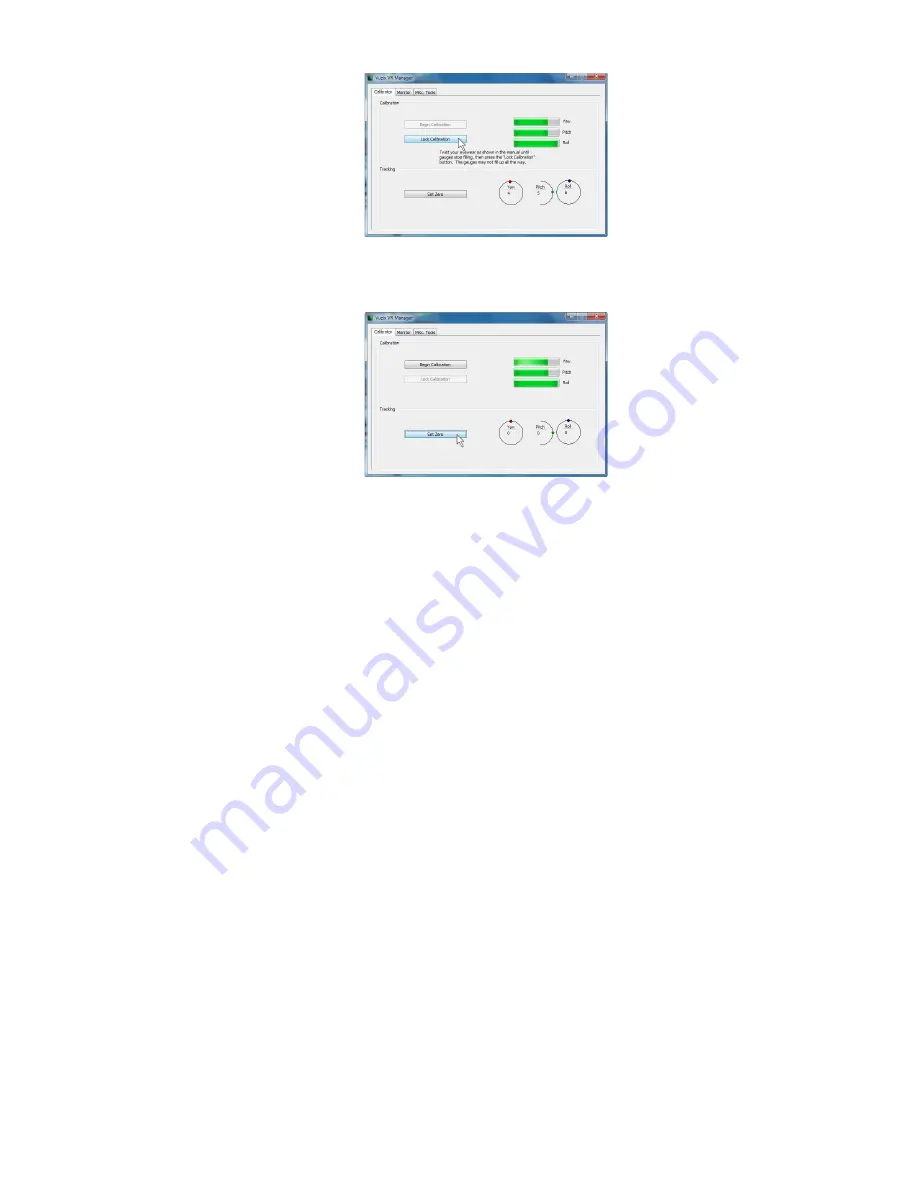
Put  on  your  eyewear  positioning  them  as  they  will  normally  be  used  – 
upright,  at  eye  level  and  facing  your  computer  –  and  then  press  the  “Set 
Zero” button. 


The  Set  Zero  button  establishes  the  Tracker’s  home  or  centered  position. 
As you move your head you will see the indicators and values in the Yaw, 
Pitch  and  Roll  indicators  reflect  movement  relative  to  that  centered 
position.  


Summary of Contents for Star 1200

Page 1: ...STAR 1200 1200XL Augmented Reality Systems User Guide VUZIX CORPORATION ...

Page 2: ...2 VUZIX CORPORATION STAR 1200 1200XL User Guide 2012 Vuzix Corporation 2166 Brighton Henrietta Town Line Road Rochester New York 14623 Phone 585 359 5900 Fax 585 359 4172 www vuzix com ...

Page 3: ...PowerPak Controller 29 OSD Display Options 30 4 STAR HARDWARE 34 STAR Display 34 Nose Bridge 36 Focus Adjustment 37 Eye Separation 37 Accutilt Adjustment 38 Camera Removal 38 Wrap Noise Isolating Earphones 39 Tether Strap 39 Wrap Tracker 40 5 DEVELOPER TOOLS SUPPORT 42 Vuzix VR AR SDK Windows version 42 Acquiring Vuzix VR AR SDK 43 6 EYEWEAR CARE SUPPORT 44 Cleaning 44 Support Services 44 Technica...

Page 4: ... the large size of the video screens in this device As a result consult a physician if you have any epileptic condition before using this device or if you experience any of the following symptoms while using this device altered vision muscle twitching other involuntary movements loss of awareness of your surroundings mental confusion and or convulsions 6 Immersive video whether viewed on a regular...

Page 5: ...ct If service work is required contact VUZIX using the Support contact information shown in this manual 11 Do not pull or yank on the cable kink any of the cables or tie them in sharp or tight knots Do not hang the product or allow it to be suspended by any of its cables To disconnect cables pull on the cable connector Cables damaged by such actions are not covered by the product s limited warrant...

Page 6: ... the only warranty made to You and is provided in lieu of all other express or implied warranties and conditions except for any non disclaimable implied warranties that exist including any created by any other documentation or packaging No information or suggestions oral or in a record given by Vuzix its agents affiliates dealers or suppliers or its or their employees or agents shall create a warr...

Page 7: ...not supplied by Vuzix except where such restriction is prohibited by applicable law Technical support is defined as assistance with questions on issues about the Vuzix hardware product Technical support for hardware and its software is available for the first ninety 90 days from date of product purchase Your dated sales or delivery receipt showing the date of purchase or lease of the product is Yo...

Page 8: ...n of special indirect incidental or consequential damages so the above limitation or exclusion may not apply to You but the remainder of this Limited Warranty shall remain in full force and effect EXCEPT TO THE EXTENT PROHIBITED BY APPLICABLE LAW ANY IMPLIED WARRANTY OR CONDITION OF MERCHANTABILITY OR FITNESS FOR A PARTICULAR PURPOSE ON THIS HARDWARE PRODUCT IS LIMITED IN DURATION TO THE LIMITED W...

Page 9: ...differences between the two models are noted in the respective topic headings Other than where such a distinction is made both models will simply be referred to as the STAR 1200 through this User Guide System Requirements Compatibility A STAR 1200 is a modular design able to connect to and work with a number of host devices Due to the ports and internal support provided by some devices they may no...

Page 10: ...f the Key Product Components is compatible with a Windows based personal computer as specified above For other host devices see each of the Key Product Components as listed below The video display is compatible with the host devices supported by the current Controller Both 2D and 3D video are supported with the Controller governing the 3D formats supported Both support the most common 3D format kn...

Page 11: ...A and a USB 2 0 port A VGA compliant adapter can be used for connection to other video port formats A USB hub may be used if sufficient USB ports are not available The USB hub must be powered and be USB 2 0 compliant A PowerPak Controller connects host devices such as mobile phones and tablets that provide either a composite or component A V connection In addition to the side by side 3D video form...

Page 12: ...oller connection Software applications must be explicitly enabled to support a Wrap Tracker A Vuzix SDK is available to aid in the addition of head tracking support in Windows software A 1080p HD camera is provided with the STAR 1200 This camera is UVC Universal Video Class compliant meaning it will work with Windows Mac and Linux based PCs without additional drivers Tip Additional features and be...

Page 13: ...ad contains two software applications VR Manager and maxReality plus documentation and a variety of resources VR Manager is a Windows application that enables calibration of the head tracker and VR support for a broad variety of games and simulation program maxReality is a plug in software that enables Autodesk 3ds Max scenes and content to be transformed into 3D AR content Tip The STAR 1200 is co...

Page 14: ...aptor Cloth Carry Pouch Carrying Case Dual cable clips Double Cable Temple Clip AR Marker Paddle s0 AR Marker Paddle m0 Note Some product names indicated on some packaged items included in the STAR 1200 package differ from the names shown above Subject to change without notice Digital Distribution Products Note As indicated on the Digital Distribution Instruction Card included with the STAR 1200 t...

Page 15: ...es and Upgrades Vuzix provides two web locations for downloading software and documentation The Digital Distribution web page www vuzix com DD provides complete packages of the current versions of all software and documentation the specific product A Downloads and Drivers web page www vuzix com downloads provides software and documentation updates for individual files ...

Page 16: ... this product before proceeding Step 1 Accessory Installation Earphones The Wrap noise isolating earphones are an optional use accessory not required for the operation of the display module and other components Three sizes of noise isolators are provided The earphones are interchangeable left to right and the eyewear can be used with or without the earphones Plug the stereo earphones into the jack...

Page 17: ... the operation of the display module and other components Plug the Tracker into its port above and to the right of the right side display Prior to using the tracker it must be calibrated Calibration is performed using the VR Manager software explained later in this User Guide Note Although the Tracker connector may look similar to a USB Mini B connector it is not This is a proprietary connector an...

Page 18: ...f the STAR 1200 may not be available or supported on other operating systems Connect the lead from the video eyewear to the Controller as shown above The black side of the connector faces up toward the control buttons Connect the VGA display connector to a VGA port on your computer or your computer s graphics card Tip If your computer does not have a 15 pin VGA port available a graphics port adapt...

Page 19: ...of Windows may refer to Duplicate displays as Mirrored Displays or Cloned Displays From the Resolution drop list choose 1280x720 Click on Advanced Settings Select the Monitor tab Select a Screen refresh rate of 60 Hertz 60 Hz Apply the changes and close the Control Panel If all is well your desktop monitor display should be mirrored in the Star 1200 displays If the STAR eyewear does not mirror you...

Page 20: ...geable lithium ion Controller supporting composite and component video connections Note The PowerPak Controller does not support the tracker data communications Connect the STAR eyewear to the PowerPak s Out labeled port toward the right side Connect the cable from your source device to the PowerPak s middle port labeled In The PowerPak is recharged using a USB cable equipped with a mini B connect...

Page 21: ...r Adjustment Buttons If you are using an alternate audio system use the volume controls provided by that system Accutilt Display Angle Adjustment The display angle of the STAR displays can be adjusted by rotating the display assembly up or down Adjust the display angle by rotating the up down tilt of display module to achieve the best quality image Focal Adjustment STAR 1200 only The STAR AR displ...

Page 22: ...person to another The STAR 1200XL provides an IPD adjustment to accommodate your specific IPD for the best display quality Close one eye and slide the display left and right to find the location that provides the best display quality Repeat the above for the other eye and display Nose Bridge The nose bridge assembly is adjustable It consists of an insertion arm that can be slid into and out of the...

Page 23: ...en moving around a provided tether strap can be used Attached each end of the tether strap to the eyelets on the eyewear stems Adjust the strap synch for a comfortable and secure fit Step 4 Software Installation There are two software installers included in the STAR 1200 software and documentation package VR Manager and maxReality VR Manager is a software application used to calibrate the head tra...

Page 24: ...s operating system to the next When requested to provide permissions during the install simply accept the default choices provided Tip For now you do not need to launch VR Manager It will be run later during the setup process when we calibrate the Tracker Camera Software Installation The STAR 1200 s camera is UCV compliant and does not require additional drivers other than those provided by Window...

Page 25: ...k the maxReality_setup exe program to launch the installer Note Additional software such as a Visual Studio 2008 Runtime and DirectX June 2010 Runtime will be installed if they are not already on your system When the software installation is complete run 3ds Max to complete the setup When you launch Autodesk 3DS Max or 3DS Max Design a license authentication window will appear Enter the Product Ke...

Page 26: ...by magnetic interference from nearby metal and electrical objects as well as the earth s natural magnetic fields A calibration process helps to minimize external influences Tip Take note of potential magnetic interference nearby to where you are using your tracker enabled eyewear Hidden objects like that huge base speaker under your desk or other objects can sometimes be relocated for increased ac...

Page 27: ...esktop computer monitor Rotate your eyewear fully through each of the three axes This process captures tracker data through its full range of movement The indicator bars will move while new data is being received and stop progressing when no additional new data is received The indicator bars will not fill completely this is normal When the indicator bars stop moving press the Lock Calibration butt...

Page 28: ...level and facing your computer and then press the Set Zero button The Set Zero button establishes the Tracker s home or centered position As you move your head you will see the indicators and values in the Yaw Pitch and Roll indicators reflect movement relative to that centered position ...

Page 29: ...by the OSD may vary when you are using different Controllers but their options and the function of the Controller buttons are similar VGA Controller Below are examples of the buttons and OSD functions for the VGA Controller Menu Select Buttons OSD Displayed Press to change OSD selection OSD Not Displayed Opens and displays the OSD Chapter 3 ...

Page 30: ... option OSD Not Displayed Adjusts Wrap earphone volume OSD Off Toggle View Button OSD Displayed Turns off OSD display OSD Not Displayed Double press to toggle to the previous 2D or 3D mode setting Press and hold to toggle between Straight and Cross eye 3D Views ...

Page 31: ...nd display the OSD Press and hold to turn off the eyewear PowerPak Controller The Control Buttons on the PowerPak are slightly different from those on a VGA Controller This Controller provides only four buttons Menu Power The Menu Power button is used to powers up the video eyewear and turn on its on screen menu OSD ...

Page 32: ...les between 2D and the last 3D setting if the OSD is not displayed Press it once to turn off the OSD if it is displayed Note Charge the PowerPak for a minimum of four 4 hours before using it The Vuzix icon will flash while the PowerPak is charging Allow it to fully charge before connecting it to your AV source and Wrap video eyewear OSD Display Options The OSD or on screen display provides access ...

Page 33: ...omputer based content when used with a Wrap VGA Adapter Controller Aspect Ratio The Wrap 1200VR supports multiple aspect ratios The following choices allow you to select the one best suiting your content 4 3 Configures the displays for 4 3 or standard aspect ratio content If 16 9 content is played using a 4 3 aspect ratio setting the image will compressed horizontally and pillars will be displayed...

Page 34: ...is sometimes required with a desktop monitor Format Selection Your Vuzix video eyewear supports standard 2D video and multiple formats of stereoscopic 3D content 2D This option is used for displaying all standard 2D content It is the default format option SxS A Side by Side format is as used for many TV broadcasts and Wrap stereoscopic 3D support for Windows applications R G Three formats of anagl...

Page 35: ... for this the 3D View may change from one video to the next but a quick double press of the Power Off Toggle View Button makes adjustment fast and easy without requiring the OSD Auto 3D Vuzix has developed a watermark technology that when placed in a 3D video enables Vuzix eyewear to identify and automatically reconfigure to match the content s 3D format and view options Note By default the Auto 3...

Page 36: ...on WVGA 852 x 480 LCD displays Widescreen 16 9 displays with a 31 degree field of view produce a 75 inch virtual screen as viewed from ten feet 3m By default the STAR display supports standard 2D video Stereoscopic 3D video support is included for side by side content when the appropriate display options are selected through the on screen display Computer Connection The STAR 1200 and the provided ...

Page 37: ...splay mode The following display resolutions are supported 640 x 480 60 Hertz VGA 800 x 600 60 Hertz SVGA 1024 x 768 60 Hertz XGA 1280 x 720 60 Hertz 720p Tip The sharpest image is achieved lower display resolutions Note Some of the above resolutions may not be available on some Windows XP system 2D and 3D are supported on all known makes and models of Windows compatible graphics cards Display Rem...

Page 38: ...dge assembly in and out to adjust its reach to position the eyewear displays directly in your line of sight Note If you withdraw the nose bridge assembly too far enough it will come completely out of the display module Don t worry if this happens as it can be easily slid back in and enables you to replace the nose bridge assembly should it be broken Gently bend the wire arms of the nose pad to ach...

Page 39: ...he focus adjuster above the display for your open eye to a position that provides the sharpest image Repeat for the other eye Eye Separation STAR 1200XL only The distance between your eyes or InterPupillary Distance IPD varies from one person to another The STAR 1200XL provides an IPD adjustment not available on STAR 1200 to accommodate your specific IPD for the best display quality Close one eye ...

Page 40: ...lay assembly to achieve the best quality display Camera Removal The STAR camera assembly is an optional use accessory and is not required for the operation of the display module and other components To remove the STAR camera assembly Loosen the retainer screws on either side of the camera assembly They require a 0 35 Allen wrench hex key Pull the camera assembly off the receivers protruding throug...

Page 41: ...solator size easy Adjustment Buttons Volume adjustment for the STAR earphones is controlled using the Adjustment Buttons on the Controller Volume adjustment is only available when the OSD is not displayed If you are using an alternate audio system use its controls to adjust volume Windows Speaker Selection When a new device with a speaker system is connected to a Windows based computer Windows aut...

Page 42: ...r the right temple Calibrate the Tracker using VR Manager Note Although the tracker connector looks similar to a mini USB connector it is not Do not attempt to connect a USB device or cable into this port or plug the Tracker into a USB port The Tracker requires calibration before being used and periodically thereafter If you connect your Tracker to a different computer you should reset or zero the...

Page 43: ...DK is available to assist software developers in enabling native support for the Wrap Tracker 6TC in their applications It provides sample code and technical information that enables programmers to read raw tracker sensor data See the Support section of this User Guide for additional information on the Vuzix Developer Program found in the Developer Program section of the Vuzix website www vuzix co...

Page 44: ...t is a set of development resources and examples that demonstrate the application of native support for features and capabilities provided by certain models of Vuzix video eyewear It demonstrates support for stereoscopic 3D video head tracking and video capture for AR applications It is available in a Windows version with examples provided in C C and XNA and demonstrates support for OpenGL Full sc...

Page 45: ...oll support additional calibration and algorithms not provided by Vuzix are required RAW and Cooked output is available from the Wrap Tracker and is demonstrated in the SDK Support for the AR camera and ALVAR fiduciary markers provided by the Vuzix SDK in its AR Extension packed in a separate installer It demonstrates the use of OpenCV for camera support Acquiring Vuzix VR AR SDK The Vuzix VR AR S...

Page 46: ... Never use solvents abrasive cleaners or paper towel on your eyewear These items will damage the lens coatings permanently degrading the eyewear s image quality Support Services Technical Support Support for Vuzix products is offered through facilities in the region in which the product was purchased In some cases this may mean that the Vuzix regional office closest to you does not provide support...

Page 47: ...ort experience please gather the following information before making your call Complete model name and model number of your video eyewear Vuzix manufactures many models of video eyewear and several may share parts of their model name such as Wrap or a number like 920 Though they may share some common name content they can be very different in feature and capabilities Make and model of the audio vi...

Page 48: ...only we tend to present our own analysis of the problem or only the symptoms we feel are relevant By not including all the symptoms we sometime leave out vital clues that could more quickly lead to a solution ...

Page 49: ... radio or television reception which can be determined by turning the equipment off and on the user is encouraged to try to correct the interference by one or more of the following measures 1 Increase the separation between the equipment and receiver or 2 Connect the equipment into an outlet on a circuit different from that to which the receiver is connected Waste Electrical Electronic Equipment W...

Page 50: ...ossed out wheeled bin symbol invites you to use those systems 4 If you need more information on the collection reuse and recycling systems please contact your local or regional waste administration 5 You can also contact us for more information on the environmental performances of our products ...

Page 51: ... and iPad are trademarks of Apple Inc registered in the U S and other countries Vuzix the Vuzix logo View the Future and Wrap are trademarks of Vuzix Corporation registered in the U S and other countries 2012 Vuzix Corporation All rights reserved Designed by Vuzix in New York Made in USA 410PB0020 A ...

Reviews: