background image

11

USING THE SOFTWARE

After the software installation is complete, now you are ready to  

use the scanner mouse.
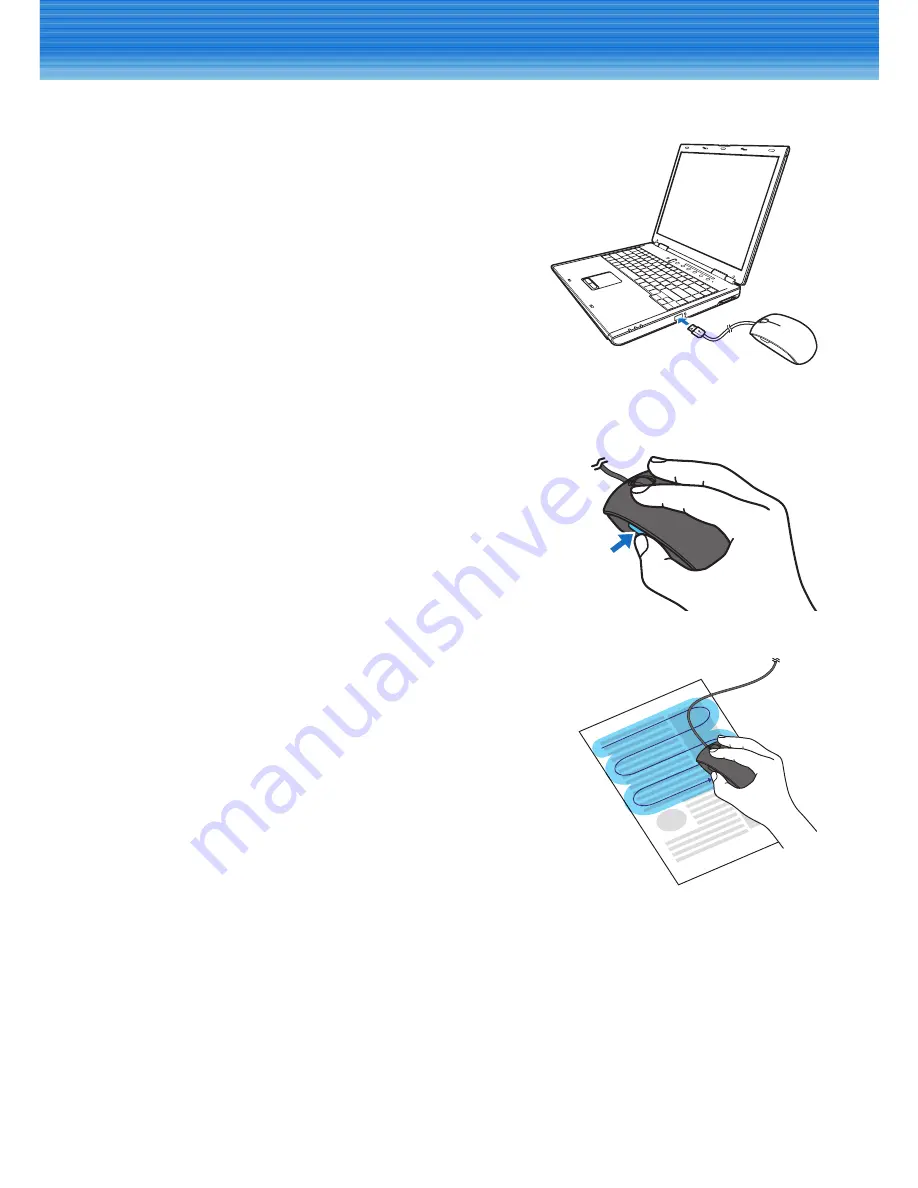
Connect the scanner mouse to the USB port of your  

computer.

Scanning the Document

To scan a document, perform the following:

1

  Place the mouse on the document that you want  

to scan.

2

  Press the 

Scan

 button to start scanning.  

The scanning screen appears.

3

  Move the mouse steadily over the document to scan the desired area.

8

 Note:


y

We highly recommend you scan the  

document in S-shape (from top to bottom). 


y

Make sure to always cover some of the already  

scanned content to ensure the highest scan  

quality. In case an area is not perfectly scanned,  

simply move the device over this area again and  

the scan quality will improve.


y

The scanning process is automatically paused  

when you lift the mouse. To resume, place the  

mouse at an area where you have scanned earlier.


y

When scanning multi-language document or document in a language other 

than English, you can specify the OCR language in 

Settings

 menu. Refer to 

“Text Recognition” on page 19.


y

When scanning a book, be sure the position of the laser sensor is within the 

area of the scanned page.

4

  Press the 

Scan

 button again to end scanning.

Summary of Contents for SM-FL10-VP

Page 1: ...Scanner Mouse User s Manual...

Page 2: ...etc y y Do not install the device in a dusty area y y Do not apply excessive shock to the device y y Do not place heavy objects on the top of the device y y Avoid looking directly into the laser beam...

Page 3: ...Uploading Files to Dropbox Evernote 17 Searching Image via Google Search 17 Translating Text via Google Translation 17 CONFIGURING SOFTWARE SETTINGS 18 Display Language and Scan Resolution 18 Softwar...

Page 4: ...ent including text images tables and QR code y y Support OCR function y y Support document editing right after scanning complete y y Save scanned document in multiple file formats JPEG PNG BMP XLS DOC...

Page 5: ...NTRODUCTION Product Overview Left button Right button Scan button Scroll wheel Scan window Laser sensor 8Note y y Be sure to remove the protective film attached on the scan window before using the mou...

Page 6: ...GMA X3000 or better 1 GB free disk space Macintosh Intel Core Duo 1 8 GHz MacBook Pro 1 1 or Intel Core 2 Duo 1 4 GHz MacBook Air 3 1 or better 2 GB of RAM or more of which at least 512 MB are free AT...

Page 7: ...n process begins 3 Read the License Agreement and check the Agreement check box as shown below Then click Install to continue 8Note y y If you encounter error messages during installation process plea...

Page 8: ...instructions to complete the package installation process You may then restart the scanner mouse installation process again 4 The software installation may take a while to complete 5 Click Finish to c...

Page 9: ...INSTALLATION Macintosh OS 1 Insert the supplied software CD into your CD ROM drive The setup wizard appears 2 Click Continue The installation process begins 3 Specify the language and click Continue t...

Page 10: ...ON 4 Read the License Agreement and click Agree to continue Follow the instructions to complete the installation process 8Note y y On Macintosh OS refer to the software Help for information about the...

Page 11: ...to bottom y y Make sure to always cover some of the already scanned content to ensure the highest scan quality In case an area is not perfectly scanned simply move the device over this area again and...

Page 12: ...ut on the scanned image y y When the scan frame turns yellow or red this indicates the mouse is moving too fast If this happens move the mouse slowly y y The scanning will end automatically when the s...

Page 13: ...stments have been made click OK to save the file 8Note y y Use the scroll wheel to zoom in out on the scanned image y y Press the Scan button to rescan the document y y Press the Right button to activ...

Page 14: ...For example if you double click the txt file the system will automatically launch Notepad and display the extracted plain text Then you can save the file directly to your computer 8Note y y You can al...

Page 15: ...image to the desired file type using other methods a Click Save tab Then browse to select the file path location and specify the desired file type Click Save to save the file b Drag and drop the file...

Page 16: ...en instructions to create an account y y You can also configure the user login settings by clicking Options Manage Apps y y To share your file via social networking site click Share tab and select Fac...

Page 17: ...oogle Search By Image The browser program opens and then it automatically redirects you to the Google Image Search page The thumbnail images appear on the Search Results screen Click the desired thumb...

Page 18: ...General on the left panel menu Configure the following settings y y User interface language Change the display language y y Scan resolution Select the image resolution Available options Low Medium Hi...

Page 19: ...osition Available options Right Left Remember last position Filename Prefix and Document JPEG Quality On Settings screen click Save on the left panel menu Configure the following settings y y Default...

Page 20: ...ods to update the Scan software 8Note y y You can also manually check for the latest software by clicking Options Check for updates Proxy Settings You only need to configure this option if you access...

Page 21: ...cond FUNCTIONS Main Scan Edit Save Share Image Text Paste Print Edit Auto De skew Crop Rotation Zoom In and Out Brightness Contrast Save Format JPEG PNG BMP XLS DOC PDF Share Facebook Twitter Flickr E...

Page 22: ...the following steps to replace the mouse cover 1 Place your hand on the top of the mouse cover 2 Using your fingertips pry the mouse cover to disengage it from the rear side of its main unit 3 Remove...

Page 23: ...cument again y y When using the software observe the remaining scan memory Try to avoid scanning the same areas Software is not activated Activate the scanner mouse software from your computer Your co...

Page 24: ...cloth The protective film is still attached on the scan window Remove the protective film Error messages pop out during installation process Windows system only The PC is lack of a Microsoft software...

Page 25: ...following two conditions 1 This device may not cause harmful interference and 2 this device must accept any interference received including interference that may cause undesired operation FCC U S A FC...

Reviews: