start blinking.
Note:
a)
Do not insert or remove the SD card or SDHC card while recording or playing a video.
3.
Press the “
REC/STOP” button again to stop recording.
b)
When using a high memory SD card or SDHC, a lag time will occur when saving or
viewing files.
Note:
Max video file size is 4GB (around 3.5--4 hours).The unit will create another file for
continuous recording.
c)
The recording file will not be saved if power cuts out in operation.
d)
Beware of the unit over heating if operating continually.
To view your recordings that are saved:
e)
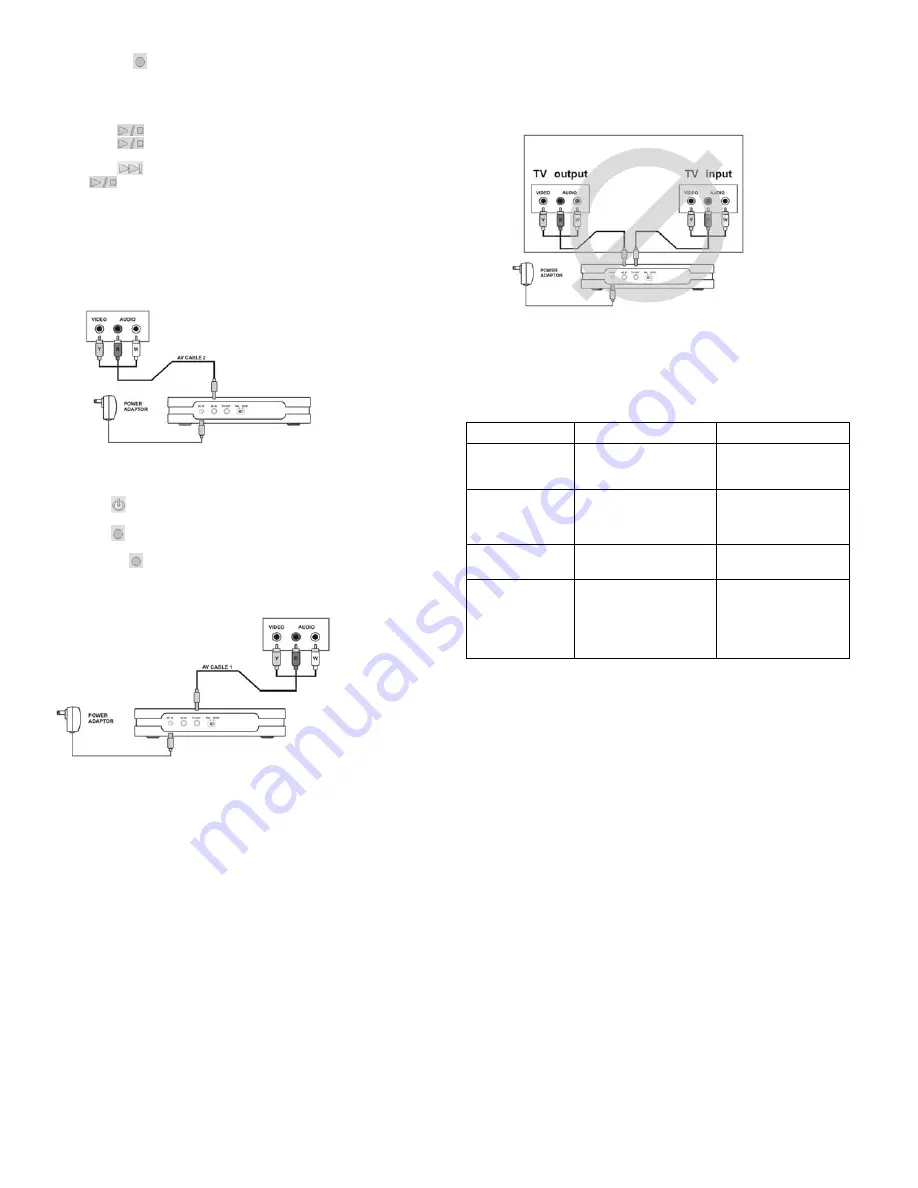
Do not plug both TV input and output together from one TV set.
4. Press
“
PLAY/STOP” button to enter the playback mode.
5. Press
“
PLAY/STOP” button again to play the movie, the green power
indicator LED will start blinking. Press it again to stop playing.
6. Press
“
NEXT” button to select the program you wish to view. Then press
“
” to play the recording.
7.
Another way to view your recordings is to view it on your computer. You will need to
use a card reader or a device that can read the SD card when connected to the
computer to play your videos. (Make sure software programs are installed before
viewing videos on your computer. Refer to software section 3 below for more
information).
Note:
It will take longer for bigger files to load so please expect a delay when viewing.
2.4 Using the video converter to record T.V. programs
TV source/output
3. Using the software CD
Insert the Arcsoft CD and install MediaImpression by selecting “Install MediaImpression”.
Note:
You must have MediaImpression in order to view, organize, and edit your videos recorded.
4. Troubleshooting
Problem Cause
Solution
Showing ‘No Space’
in monitor.
1. SD/SDHC card is not
inserted.
2. SD/SDHC card is not
formatted.
Insert a SD/SDHC card;
Format the SD/SDHC card.
No video is saved
when pressing, the
record button.
1. SD/SDHC card is write
protected.
2. No video signal input.
Unlock the write-protect on
SD/SDHC card;
Check and plug the
video-in socket.
Monitor is not
displayed normally.
Not on correct format:
NTSC/PAL
system.
Switch the format system
to the correct one.
Cannot play the
video on the
computer.
Appropriate software is not
on the computer.
Install the software that
comes with the CD –
Arcsoft MediaImpression.
Install MediaImpression
onto the computer.
Compatible with Windows
XP/Vista only.
1.
Connect “AV CABLE 2” in to the INPUT jack on the backside of the converter. Then
plug the colored prongs from “AV CABLE 2” to the OUTPUT section on the TV or
other TV signal source.
2.
Plug the AC/DC adapter to an outlet and “DC IN” jack.
3. Press
“
POWER” button to turn on the video converter.
4.
Turn the TV on and select the channel or program you wish to record.
5. Press “
REC/STOP” button to start recording. The red record LED indicator will
start blinking.
6. Press the “
REC/STOP” button again to stop recording.
To view your recordings that are saved:
TV input
System requirements:
Windows: XP/Vista (Windows XP with SP2 or Vista is recommended)
Intel® Pentium® 41.6 GHz or equivalent AMD Athlon
512 MB RAM (1GB recommended)
300 MB free hard drive space for program installation
1024 x 768 pixels, 16-bit color monitor or higher
NVIDIA Geforce MX440 or above, AMD(ATI) Radeon 9200 or above
Microsoft Windows Media Player 9 or above is required for ASF/WMA/WMV full support (Windows Media Player
10 (or above) is recommended.)
Internet Explorer 6.0 SP1 or above
7.
Connect the video converter to the TV by plugging in “AV CABLE 1” in to the
OUTPUT jack on the backside of the converter. Then plug the colored prongs from
“AV CABLE 1” to the INPUT section on the TV.
AM-TVR100-AGB-VPS-R4


