background image

13

Troubleshooting

6 720 680 078 (2012/12)

4. Error code and “

” symbol will not clear from remote

• Error codes cannot be reset by using the remote. All errors 

must be cleared by using the reset button 

 on the water 

heater's control panel.

• If an error code is gen erated immediately after the 

installation of the remote control transceiver PCB, ensure 
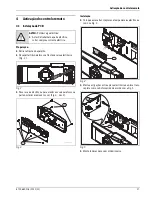
that the two large electrical connectors (Fig. 5 ) on the main 
PCB are properly seated.

• Error code may not be resettable. Consult water heater's 

installation manual.

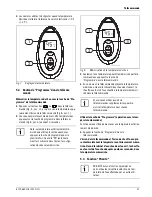
5. Remote will not memorize desired temperature setting

▶ Verify that the remote control "program" button is 

depressed until the remote display reads "Pr".

6. Priority "

" symbol will not clear

▶ Verify no hot water is being used when trying to clear 

"priority" function.

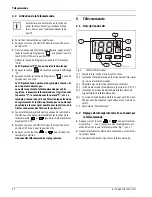
▶ With no hot water running, press and hold the “

” or 

” buttons for 5 seconds on the locked out device 

(remote or water heater) until the "

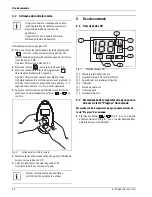
" symbol (Fig.6, 

Pos. 6) disappears.

▶ Do not use any hot water for at least 5 minutes. The priority 

function should automatically clear after this time period.

Large amounts of metal or concrete in the 
structure may have a blocking effect on the 
remote's signal. This may alter the maximum 
distance allowable from the water heater.
▶ Move within direct line of sight of the 

water heater to see if signal will 
reconnect.

Memorization of a selected temperature only 
saves to the device on which it was originally 
programmed. To retrieve a memorized 
temperature setting, you must use the 
device with which it was programmed.

Summary of Contents for 7 709 003 736

Page 1: ...llation Instructions 7 709 003 736 7 709 003 737 7 709 003 747 7 709 003 756 7 736 500 569 Remote Control 6720606990 00 1JS it 2 en 8 es 14 fr 20 pt 26 ua 32 pl 39 tr 46 ru 52 nl 58 6 720 680 078 2012 12 DIV ...

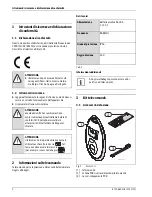
Page 2: ...ionali 3 Kit telecomando 3 1 Accessori in dotazione Fig 1 Accessori 1 Telecomando 2 Scheda PCB ricetrasmittente del telecomando 3 Cavo di collegamento PCB ATTENZIONE il telecomando può essere utilizzato solo neiseguentiPaesi Italia Francia Germa nia Belgio Olanda Spagna e Portogallo ATTENZIONE eventuali modifiche o cambiamenti non espressamenteapprovatidallamarcaturadi conformità CE potrebbero inv...

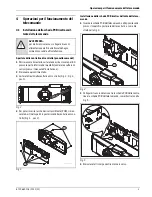
Page 3: ... 1 Fig 2 Per poter inserire la scheda ricetrasmittente PCB rimuo verele6vitidalcoperchioposterioredellacentralinadicon trollo Fig 3 pos 2 Fig 3 Installazione della scheda PCB ricetrasmittente del teleco mando Inserire lascheda PCBdeltelecomando nell appositasede presso il coperchio posteriore della centralina come illu strato nella Fig 4 Fig 4 Collegare il cavo in dotazione tra la scheda PCB della...

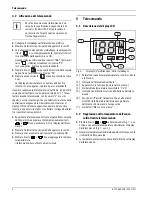
Page 4: ...o dell apparecchio e premere contemporaneamente i tasti e fino a visualizzare 00 sul display del teleco mando Premere l interruttore principale dell apparecchio su OFF Premere ora nuovamente per riportarlo in posizione ON Premere il tasto o fino a raggiungere la tempera tura desiderata Il telecomando è ora attivato e memorizzato 5 Telecomando 5 1 Descrizione del display LCD Fig 6 Display LCD multi...

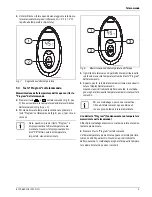
Page 5: ...mando A questo punto la temperatura memorizzata viene visualiz zata sul display del telecomando Quando si aprirà il rubinetto dell acqua calda lo scaldaba gno erogherà l acqua alla temperatura memorizzata sul tele comando Uso del tasto Program funzionamento con temperatura memorizzata nel telecomando Affinché lo scaldabagno funzioni con la temperatura preceden temente memorizzata Premere il tasto ...

Page 6: ...alazioni di guasti Iltelecomandoèmunitodiunsistemadisegnalazionediguasti Eventuali guasti provenienti dallo scaldabagno verranno visua lizzati sul display LCD sotto forma di codici di errore Fig 6 pos 1 e con il simbolo di blocco di sicurezza Fig 6 pos 7 Iltelecomandofunzioneràsolodopoaverpremutoiltastodi riarmo sullo scaldabagno ed aver eliminato l errore Consultare il manuale di installazione de...

Page 7: ...eliminatitramite il tele comando Tuttiicodicidierrorevannoeliminatipremendoil tasto di riarmo sul pannello di comando dello scalda bagno Qualora dovesse apparire un codice di errore subito dopo averinseritonellacentralinadicomandolaschedaPCBrice trasmittente del telecomando accertarsi che i due connet tori elettrici siano correttamente inseriti nella scheda PCB principale È possibile che un codice...

Page 8: ...ol data Remote control for temperature adjustment of water heaters Technical Data Further Information CAUTION Any changes or modifications not expressly approved by the party responsible for compliance could void the user s authority to operate the equipment CAUTION theremotecontroliswaterresistantandcan also be used in the shower Nevertheless it is not waterproof and must notbeimmersedinwater for...

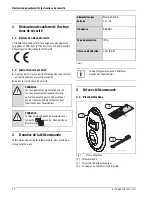
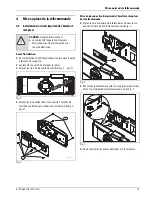
Page 9: ...over Lift front cover upward and remove Remove the three screws from the control unit Fig 2 pos 1 Fig 2 Remove the 6 screws from the back cover of the control unit to access the electronic board PCB Fig 3 pos 2 Fig 3 Remote control transceiver PCB installation Place the remote control PCB in the back cover of the control unit as shown in Fig 4 Fig 4 WARNING Electrical discharge For safety reasons ...

Page 10: ...and simultaneously press remote control buttons and until the numbers 00 is shown on the remote control LCD Press ON OFF button on the appliance to OFF position and then back ON Press buttons or to reach desired temperature New remote control is programmed 5 Remote control 5 1 Description of the LCD Fig 6 Multifunctional LCD 1 Displays temperature error codes and functions 2 Remote control in oper...

Page 11: ...pply hot water after a few seconds at the memorized temperature 5 4 Priority function Theremotecontroldoesnothaveadefaulttemperaturesetting and therefore has no default Priority function The priority will be attributed automatically by the first user who selects or memorizes on the remote control or on the heater s control panel a temperature for subsequent use e g a shower Then when the hot water...

Page 12: ...s of the remote control Do not use abrasive or solvent based detergents 6 3 Troubleshooting 1 No display on remote control Check for weak or dead batteries Remote control in sleep mode Simply press any button on the remote to bring up the display 2 Remote control will not activate no number with rotating digit Ensure that you are standing directly in front of the water heater when attempting to ac...

Page 13: ...ads Pr 6 Priority symbol will not clear Verify no hot water is being used when trying to clear priority function With no hot water running press and hold the or buttons for 5 seconds on the locked out device remote or water heater until the symbol Fig 6 Pos 6 disappears Do not use any hot water for at least 5 minutes The priority function should automatically clear after this time period Large amo...

Page 14: ...e la temperatura de los calentadores de agua Datos técnicos 3 Kit del mando a distancia 3 1 Componentes que se facilitan Fig 1 Componentes 1 Mando a distancia 2 Circuito Impreso PCB del transmisor receptor para el mando a distancia 3 Cable de conexión del PCB ATENCIÓN Todo cambio o modificación que no haya sido expresamente aprobado por la parte responsable del cumplimiento podría invali darlaauto...

Page 15: ... en la parte posterior de la cubiertadelaunidaddecontrolparapoderteneraccesoala tarjeta electrónica PCB Fig 3 pos 2 Fig 3 Instalación del Circuito Impreso PCB del transmisor receptor Coloque elPCBpara elmandoa distancia enla cubierta pos terior de la unidad de control tal como se muestra en la Fig 4 Fig 4 Conecte el cable que se suministra entre el PCB principal y el PCB del mando a distancia tal ...

Page 16: ...ando adistancia yhasta quesemuestre el mensaje 00 en la pantalla LCD del mando a distancia En la tecla ON OFF del aparato seleccione la opción OFF para retornar a la opción ON Presione las teclas o para alcanzar la tempera tura deseada Ha programado un nuevo mando a distancia 5 Mando a distancia 5 1 Descripción de la pantalla LCD Fig 6 Pantalla LCD multifuncional 1 Muestra la temperatura mensaje d...

Page 17: ...las tempera turas almacenadas en la memoria Cuando el grifo de agua caliente esté abierto el calentador de agua suministrará agua a la temperatura que haya sido prefijada en el mando a distancia Utilización de la tecla Programar utilización con tempera tura prefijada Parautilizar elequipocon unatemperatura almacenada previa mente en la memoria Presione la tecla Programar del mando a distancia En l...

Page 18: ...e el signo Pr aparezca en la pantalla del mando a distancia Utilice el agua caliente dentro de los dos minutos siguientes a la creación de una prioridad 5 5 Mensajes de error Esteaparatodisponedeunsistemademensajesdeerror Todo errorquegenereelcalentadorapareceráindicadomedianteun código de error que se mostrará en la pantalla Fig 7 pos 1 y unsímbolo que indicará un bloqueo de seguridad Fig 7 pos 7...

Page 19: ...y el símbolo no desaparecen de la pantalla del mando a distancia Los códigos de error no pueden eliminarse mediante el mando a distancia Todos los errores deben eliminarse utili zando el botón de reinicio situado en el panel de con trol del calentador Sisegenerauncódigodeerrorinmediatamentedespuésde la instalación del PCB del transmisor receptor asegúrese de que los dos conectores eléctricos grand...

Page 20: ...r la température des chauffe eau Données techniques 3 Kit avec télécommande 3 1 Pièces détachées Fig 1 Pièces détachées 1 Télécommande 2 Circuit de l émetteur récepteur 3 Connexion en câble du circuit imprimé PRUDENCE Les changements et modifications qui ne sont pas expressément approuvés par la partie responsable pour le dispositif peut annuler l autorisation de l utilisateur pour fonctionner ave...

Page 21: ...rrière de l unité de contrôle pour accéder au circuit imprimé Fig 3 pos 2 Fig 3 Mise en place du circuit imprimé de l émetteur récepteur de la télécommande Placez le circuit imprimé de la télécommande dans le cou vercle à l arrière de l unité de contrôle selon Fig 4 Fig 4 Raccordez le câble fourni entre le circuit imprimé principal et le circuit imprimé de la télécommande selon Fig 5 Fig 5 Remonte...

Page 22: ...t les touches de la télécommande et jusqu à le LCD de la télécom mande affiche 00 Appuyez sur la touche ON OFF dans le dispositif pour la position OFF et puis pour la position ON Appuyez sur les touches ou pour atteindre la température désirée Une nouvelle télécommande est programmée 5 Télécommande 5 1 Description du LCD Fig 6 LCD multifonctionnel 1 Température codes d erreurs et fonctions 2 Indic...

Page 23: ...haude est ouvert le chauffe eau fournit l eau chaude à la température mémori sée dans la télécommande Utiliser la touche de Programme opération avec la tem pérature mémorisée Fonctionneravecl équipementavecunetempératureantérieu rement mémorisée Appuyez la touche de Programme dans la télécommande L écran de la télécommande et l écran du chauffe eau pré sentent maintenant la température antérieurem...

Page 24: ...écommande Vous pouvez utiliser l eau chaude deux minutes après avoir obtenu la priorité 5 5 Messages d erreur Ce dispositif a un système de messages d erreur Toutes les erreurs gérées par le chauffe eau seront présentées par un coded erreurdansl écran Illustration6 pos 1 et parunsym bole qui indique un dispositif de sécurité Illustration 6 pos 7 La télécommande ne fonctionnera qu après avoir été a...

Page 25: ...de contrôle du chauffe eau Si un code d erreur apparait immédiatement après l installa tion du circuit imprimé de l émetteur récepteur de la télé commande assurez vous que les deux grandes prises électriques du circuit imprimé principal sont correctement installées Le code des erreurs peut ne pas être réglable Consultez le codedeserreursdanslanoticed installationduchauffe eau pour d autres dépanna...

Page 26: ...s ao comando Comando para o controlo e regulação da temperatura à distân cia para aparelhos WTD AME Dados técnicos 3 Acessório do controlo remoto 3 1 Material que se anexa Fig 1 Componentes 1 Controlo remoto 2 PCB 3 Cabo de ligação ao PCB CUIDADO Qualquermodificaçãonãoaprovada pelofa bricante pode anular ascondições de garan tia CUIDADO O comando pode ser utilizado debaixo do chuveiro no entanto n...

Page 27: ...er aos seis parafusos na parte posterior e remove los ver Fig 3 pos 2 Fig 3 Instalação Coloqueaplacatransceptoranatampadacaixaelectrónica como na Fig 4 Fig 4 Efectue as ligações entre a placa electrónica e a placa trans ceptora com o cabo fornecido de acordo com a Fig 5 Fig 5 Monte todas as peças em ordem inversa AVISO Por descarga eléctrica Antes de trabalhar na parte eléctrica cortar sempre a co...

Page 28: ...o controlo remoto ManterasteclaspressionadasatéqueopainelLCDdeixede piscar e surja a indicação 00 Colocar o interruptor principal na posição OFF O controlo remoto encontra se activado 5 Uso do comando 5 1 Descrição do LCD Fig 7 Multifunctional LCD 1 Temperatura Código de erros 2 Sinalizador de uso de controlo remoto 3 Aparelho em uso queimador ligado 4 Unidades 5 Estado das baterias 6 Uso bloquead...

Page 29: ...rogramação O painel LCD mostra a temperatura préviamente memori zada passando esta a ser a temperatura de saída de água quente 5 4 Função Prioridade Por defeito o aparelho não tem prioridade atribuída A prioridade é atribuída ao primeiro utilizador a selecionar uma temperatura Nos visores dos restantes utilizadores surge o símbolo O utilizador com prioridade pode sempre alterar a seleção ini Cada ...

Page 30: ...stituir as pilhas gastas por novas respeitando a polari dade Volte a fechar o controlo remoto assegurando que os para fusos se encontram bem apertados Precauções na utilização das pilhas Nãocoloqueaspilhasusadasnolixo Entregue asnoslocais de recolha selectiva existentes para a sua reciclagem Não reutilizar pilhas usadas Utilizar pilhas só do tipo indicado 6 2 Limpeza Para limpar qualquer parte do ...

Page 31: ...mando especialmente as ligações entre a placa electrónica e a placa transceptora Algunserrosnãopodemresolvidospeloutilizador Consulte o manual de instalação do aparelho ou a assistência técnica 5 Controlo remoto não memoriza a temperatura requerida Pressione a tecla program até aparecer a mensagem Pr 6 Simbolo persiste no LCD Verifiquesenãoestánenhumatorneirade águaquente com a função priority sel...

Page 32: ...ійного керування Пульт дистанційного керування ДК для регулювання температури водогрійних колонок Технічні дані Додаткова інформація OБEPEЖHO Внесення у виріб будь яких змін або модифікацій без безпосереднього ухвалення сторони що відповідає за дотримання вимог нормативів може позбавити користувача права експлуатувати обладнання OБEPEЖHO Пульт дистанційного керування вологозахищений та припускає к...

Page 33: ...ідготовка до встановлення Відгвинтітьдвагвинтизхрестоподібнимшліцомвнижній задній частині кожуха Потягніть кожух на себе і вгору та зніміть його Відгвинтіть три гвинти на електронному блоці Рис 2 поз 1 Рис 2 Відгвинтіть 6 гвинтів на задній кришці електронного блока для отримання доступу до електронної друкованої плати Рис 3 поз 2 Рис 3 ПОПEPEДЖEHHЯ Електричний струм Зарадибезпекивідключітьводогрій...

Page 34: ...давача дистанційного керування Встановіть плату дистанційного керування в задню кришку електронного блоку як зображено на Рис 4 Рис 4 Підключітьпровід щовходитьдокомплектупостачання до основної плати та плати дистанційного керування як зображено на Рис 5 Рис 5 Зберіть всі деталі у зворотному до зняття порядку ...

Page 35: ...о натисніть кнопки та на пульті ДК поки на дисплеї пульта ДК не з явиться значення температури Натисніть вимикач щоб вимкнути апарат а потів знов увімкнути його Натисніть кнопку чи щоб обрати потрібну температуру Новий пульт ДК зареєстровано у апараті 5 Пульт ДК 5 1 Опис рідко кришталевого дисплею Рис 6 Багатофункціональний РКД 1 Відображує температуру коди несправностей та функції 2 Індикація Пул...

Page 36: ...де відображатися занесена до пам яті температура Після відкриття крана водогрійна колонка почне постачати гарячу воду температура якої дорівнює занесеному пультом ДК в пам ять значенню Користування кнопкою Program вибір занесеної в пам ять температури Щоб колонка використовувала попередньо занесену в пам ять температуру Натисніть кнопку програмування Program на пульті ДК На дисплеї пульта ДК і на ...

Page 37: ... Почніть користуватися гарячою водою протягом двох хвилин після отримання пріоритету 5 5 Повідомлення про помилки На цьому пристрої передбачено систему повідомлень про помилки Про будь які помилки в роботі колонки електронний блок повідомляє у вигляді коду що з являється на дисплеї Рис 6 поз 1 а також символом що означає блокування у цілях безпеки Рис 6 поз 7 Пульт дистанційного керування розпочне...

Page 38: ...юючи радіоперешкоди 4 Неможливо стерти код помилки та символ з пульта ДК Коди помилок неможливо стрети за допомогою пульта ДК Всі помилки можливо очистити використовуючи кнопку перезапуску на панелі керування водогрійної колонки Якщо код помилки з явився безпосередньо після встановлення плати дистанційного керування переконайтеся що два великих електричних роз єми Рис 5 на головній платі надійно п...

Page 39: ... WTD 27 AME Dane techniczne Pozostałe informacje 3 Zestaw zdalnego sterowania 3 1 Części zestawu Rys 1 Części 1 Pilot 2 Urządzenie nadawczo odbiorcze zdalnego sterowania PCB 3 Przewód PCB OSTROŻNOŚĆ Zmiany lub modyfikacje które nie zostaną wyrażnie zatwierdzone przez podmiot odpowiedzialny za zapewnienie zgodności z przepisami mogą spowodować odebranie użytkownikowi prawa do użytkowania urządzenia...

Page 40: ...lnej aby uzyskać dostęp do płyty elektronicznej PCB Rys 3 poz 2 Rys 3 Instalacja urządzenia nadawczo odbiorczego zdalnego sterowania PCB Umieśćurządzenienadawczo odbiorczePCBztyłupokrywy jednostki kontrolnej jak pokazano na Rys 4 poz 1 Rys 4 Podłącz przewód znajdujący się w zestawie pomiędzy płytą główną podgrzewacza 3 a urządzeniem nadawczo odbiorczym zdalnego sterowania PCB 2 jak pokazano na Rys...

Page 41: ...awi się wskażnik temperatury Na urządzeniu wciśnij przycisk ON OFF w pozycji OFF a następnie ponownie w pozycji ON Abyuzyskaćżądanątemperaturę wciśnijprzyciski lub Urządzenie sterujące zostało zaprogramowane 5 Pilot zdalnego sterowania 5 1 Opis wyświetlacza ciekłokrystalicznego Rys 6 Wielofunkcyjny wyświetlacz ciekłokrystaliczny 1 Wyświetla temperaturę kody błędów i funkcje 2 Komunikat Pilot dział...

Page 42: ...atura W tym momencie na wyświetlaczu pilota zdalnego sterowania pojawi się zapamiętana temperatura Gdy kurek ciepłej wody zostanie otwarty podgrzewacz wody będzie dostarczał ciepłą wodę o temperaturze zapamiętanej na pilocie zdalnego sterowania Korzystanie z przycisku programowania praca z zapamiętaną temperaturą Aby uruchomić urządzenie z zapamiętaną wcześniej temperaturą Nacisnąć znajdujący się ...

Page 43: ...wciśniętej przycisk lub w celu wybrania żądanej temperatury Nacisnąć i przytrzymać w pozycji wciśniętej przycisk programowania aż na wyświetlaczu pilota zdalnego sterowania pojawi się symbol Pr Skorzystać z ciepłej wody w ciągu dwóch minut od uzyskania priorytetu 5 5 Komunikaty o błędach Urządzenie jest wyposażone w system komunikatów o błędach Wszelkiebłędygenerowane przez podgrzewaczbędą sygnali...

Page 44: ...ego sterowania 868 MHz i powoduje zakłócenia 4 Kod błędu i symbol nie znika z pilota zdalnego sterowania Nie można przy pomocy pilota zdalnego sterowania zresetować kodów błędów Wszystkie błędy muszą zostać skasowane przy pomocy przycisku resetującego znajdującego sięna panelusterowania podgrzewacza wody Gdy kod błędu zostaje wygenerowany bezpośrednio po zamontowaniu płytki drukowanej przekażnika ...

Page 45: ...cisnąć i przytrzymać przycisk lub przez 5 sekund na odblokowanym urządzeniu pilocie zdalnego sterowania lub podgrzewaczu wody aż do zniknięcia symbolu rys 6 poz 6 Nie używać ciepłej wody przez co najmniej 5 minut Po upływie tego okresu funkcja priorytetu powinna automatycznie zniknąć ...

Page 46: ...3 Uzaktan Kumanda Seti 3 1 Teslimat kapsamındaki parçalar Res 1 Parçalar 1 Uzaktan kumanda 2 Uzaktan kumanda PCB 3 PCB bağlantı kablosu DİKKAT Uygunluktan sorumlu tarafça açıkça onaylanmamış her türlü değişiklik veya tadilat kullanıcının ekipmanı kullanma yetkisini geçersiz kılabilir DİKKAT Uzaktan kumanda suya dayanıklıdır ve duş içinde de kullanılabilir Ancak su geçirmez değildir ve banyo küveti...

Page 47: ...e 1 Res 2 Elektronikkarta PCB erişmekiçinkumandaünitesininarka kapağından 6 vidayı sökün Resim3 madde 2 Res 3 Uzaktan kumanda PCB montajı Uzaktan kumanda PCB montajı Resim4 te gösterildiği gibi yerleştirin Res 4 Verilen kabloyu ana PCB ve uzaktan kumanda PCB arasına Resim5 te gösterildiği gibi bağlayın Res 5 Tüm parçaları ters sırayla yeniden takın İKAZ Elektriksel deşarj Güvenlik nedenleriyle mon...

Page 48: ...ık değeri uzaktan kumanda LCD panelinde gösterilene kadar aynı anda uzaktan kumanda ve düğmelerine basın Cihaz üzerindeki AÇMA KAPAMA düğmesini basarak kapatın ve ardından tekrar açın Istenen sıcaklığa erişmek için veya düğmelerine basın Yeni uzaktan kumanda programlanmıştır 5 Uzaktan kumanda 5 1 LCD nin tanıtımı Res 6 Çok fonksiyonlu LCD 1 Sıcaklığı hata kodlarını ve fonksiyonları görüntüler 2 Uz...

Page 49: ...ydedilen sıcaklıkta sıcak su gönderir Program düğmesi kullanılarak hafızaya alınan sıcaklık ile kullanım Ekipmanı daha önce hafızaya alınan sıcaklık ile kullanmak için Uzaktan kumanda üzerindeki Program düğmesine basın Uzaktan kumanda ekranı ve cihaz ekranı şimdi önceden hafızaya alınan sıcaklığı gösterecektir Sıcak su musluğu açıldığında su ısıtıcısı birkaç saniye sonra hafızaya alınan sıcaklıkta...

Page 50: ...tir şofbeninürettiğiher türlü sembol ekran üzerinde gözükecek bir hata kodu ile Resim6 madde 1 ve bir emniyet durdurması gösteren bir sembol ile belirtilir Resim6 madde 7 Uzaktan kumanda sadece ısıtıcı üzerindeki sıfırlama düğmesine basıldıktan ve hata silindikten sonra kullanılabilir hale gelir Hatanın tipini belirlemek için veya hata silinmezse cihazın montaj kılavuzuna başvurun 6 Arıza Giderme ...

Page 51: ...nmesi gerekir Uzaktan kumanda PCB sinin montajından hemen sonra bir hatakodununüretilmesidurumunda anaPCBüzerindekiiki büyük elektrik konektörünün Resim5 uygun şekilde oturduğundan emin olun Hata kodu sıfırlanamayan türde olabilir Cihazın montaj kılavuzuna başvurun 5 Uzaktan kumanda istenen sıcaklık ayarını hafızaya almıyor Uzaktan kumanda ekranında Pr görülene kadar program düğmesini basılı tutma...

Page 52: ...овых водонагревателей Технические данные Прочая информация 3 Комплект ПДУ 3 1 Комплект поставки Рис 1 Детали 1 ПДУ 2 Плата передатчика ПДУ 3 Соединительный кабель платы BHИMAHИE Внесение каких либо изменений или модификаций не одобренных явно организацией отвечающей за соответствие требованиям лишает пользователя права эксплуатации оборудования BHИMAHИE Пульт дистанционного управления ПДУ имеет вл...

Page 53: ...с 2 Отпустите шесть винтов на задней крышке блока управ ле ния для доступа к плате электронного блока Рис 3 поз 2 Рис 3 Установка платы передатчика ПДУ Установите плату ПДУ на задней крышке блока управления как показано на рис 4 Рис 4 Подсоедините кабель из комплекта поставки между главной платой и платой ПДУ как показано на рис 5 Рис 5 Соберите все детали в обратном порядке OCTOPOЖHO Електричний ...

Page 54: ...дов Держите ПДУ напротив панели управления нагревателя и одновременнонажимайтекнопки и пока на ЖК дисплее ПДУ не появится индикация температуры Нажмите кнопку Вкл выкл на приборе до показания Выкл а затем снова перейдите в положение Вкл Нажимайте кнопки или до достижения необходимой температуры Новый ПДУ запрограммирован 5 ПДУ 5 1 Описание дисплея Рис 6 Многофункциональный ЖК дисплей 1 Отображает ...

Page 55: ...пературы Здесь ПДУ будет отображать сохраненную температуру Если кран горячей воды открыт то водонагреватель будет подавать горячую воду имеющую сохраненную в ПДУ температуру Использование кнопки программирования работа с сохраненной температурой Для использования оборудования с ранее сохраненной температурой нажмите кнопку программирования на ПДУ На дисплееПДУи водонагревателя отображается ранее ...

Page 56: ...айте и удерживайте кнопку программирования пока на дисплее ПДУ не появится символ Pr Используйте горячую воду в течение двух минут с момента получения приоритета 5 5 Сообщения об ошибках В данном устройстве есть система сообщения об ошибках Любые возникающие в водонагревателе ошибки указываются кодом ошибки на дисплее Рис 6 поз 1 и символом указывающим на защитную блокировку Рис 6 поз 7 ПДУ сможет...

Page 57: ...ошибок нельзя сбросить с помощью ПДУ Все ошибки должны сбрасываться с помощью кнопки сброса на панели управления водонагревателя Если код ошибки появляется сразу после установки платы передатчика ПДУ убедитесь в том что два больших электрических соединителя Рис 5 на главной плате установлена правильно Код ошибки нельзя сбросить См инструкцию по установке нагревателя 5 В ПДУ не сохраняется выбранна...

Page 58: ...ng voor temperatuurregeling van geisers Technische gegevens Overige informatie VOORZICHTIG Alle wijzigingen niet uitdrukkelijk goedge keurd door de fabricant kunnen de garantie voorwaarden annuleren VOORZICHTIG De afstandsbediening is spatwaterwaterbe stendig en kan ook onder de douche be diend worden Doch de bediening is niet waterdicht en mag niet ondergedom peld worden bijvoorbeeld in de badkui...

Page 59: ...f de drie kruisschroeven aan de voorkant de stuur eenheid los Afb 2 Afb 2 Verwijder de 6 schroeven van het achterdeksel van de be dieningseenheid teneinde toegang te krijgen tot de print plaat Afb 3 nr 2 Afb 3 Installatie printplaat zender ontvanger afstandsbediening Plaats de printplaat van de zender ontvanger in het achter deksel van de bedieningseenheid zoals afgebeeld op Afb 4 Afb 4 WAARSCHUWI...

Page 60: ...erhaalde po gingen geen getal en veranderend cijfer aan controleer dan nogmaals de kabelaansluitingen Houd de afstandsbediening tegenover het bedieningspa neel van het toestel en druk gelijktijdig op de en toetsen van de afstandsbediening Houd deze toetsen ingedrukt tot op de display van de af standsbediening 00 wordt weergegeven ZetdeON OFFknopvanhetapparaatopOFFenvervolgens weer op ON Druk op de...

Page 61: ...ratuur in het geheugen opslaan Erkanslechtsééntemperatuurperafstandsbedieninginhet geheugen worden opgeslagen door de Program toets op de afstandsbediening te gebruiken De afstandsbediening geeft de opgeslagen temperatuur op het scherm aan Wanneer de warmwaterkraan wordt opengedraaid zal de geiser warm water geven op de in de afstandsbediening op geslagen temperatuur De Program toets gebruiken geb...

Page 62: ...ority werd verkregen 5 5 Foutmeldingen Dit apparaat bezit een foutmeldingssysteem Elke fout die de geiser veroorzaakt wordt met een foutcode op het scherm aan geduid Afb 6 nr 1 enmeteensymbooldateen veiligheids blokkering aanduidt Afb 6 nr 7 De afstandsbediening kanpasgebruikt worden na hetindrukken vanderesetknop op de geiser en nadat de fout werd opgelost Raadpleeg voor het bepalen van het type ...

Page 63: ...fstandsbediening zich binnen de maxima le afstand van 30 meter 98 ft bevindt Zorg ervoor dat er geen andere apparaten zoals een draad loze telefoon in gebruik zijn op een frequentie gelijkaardig aan die van de afstandsbediening 868 MHz en interferen tie veroorzaken 4 Foutcode en symbool verdwijnen niet van het scherm van de afstandsbediening Foutcodes kunnen niet worden gereset door de afstandsbe ...

Page 64: ...aterloopt de en toetsenophetuitgeschakeldetoestel afstandsbedieningof geiser gedurende 5 secondeningedrukt totdat het symbool Afb 6 nr 6 verdwijnt Gebruik gedurende minstens 5 minuten geen warm water De prioriteitsfunctie zou hierna vanzelf moeten uitgaan Het opslaan van een gekozen temperatuur kanalleengebeurenbijhetapparaatwaarop het oorspronkelijk werd geprogrammeerd Om een temperatuurinstellin...

Reviews: