background image

10

Press the 

Home/On/Off Button to turn the Kidizoom

®


Action Cam 180 

on. When turning the camera on for the first time, you will need to select 

the language. Press up or down on the 

D-Pad to select your desired 

language and press the 

OK Button to confirm. 

Next, you will need to set the date and time. Use the 

D-Pad to select 

the correct day, month, year, hour and minute. Press the 

OK Button to 

confirm.  

If you wish to change the language or date and time later, you can do so 

from the Settings Menu.

QUICK OPERATION GUIDE

Take Photos

Press the 

Camera Button to go to Camera Mode. In Camera Mode, 

press the 

OK Button or the Camera Button to take a photo. Press left 

or right on the 

D-Pad to select different photo effects.

Record Videos

Press the 

Video Button  to enter Video Mode. In Video Mode, press the 

OK Button or the Video Button to start or stop recording. Press left or 
right on the 

D-Pad to select different themes and effects.

Home Menu

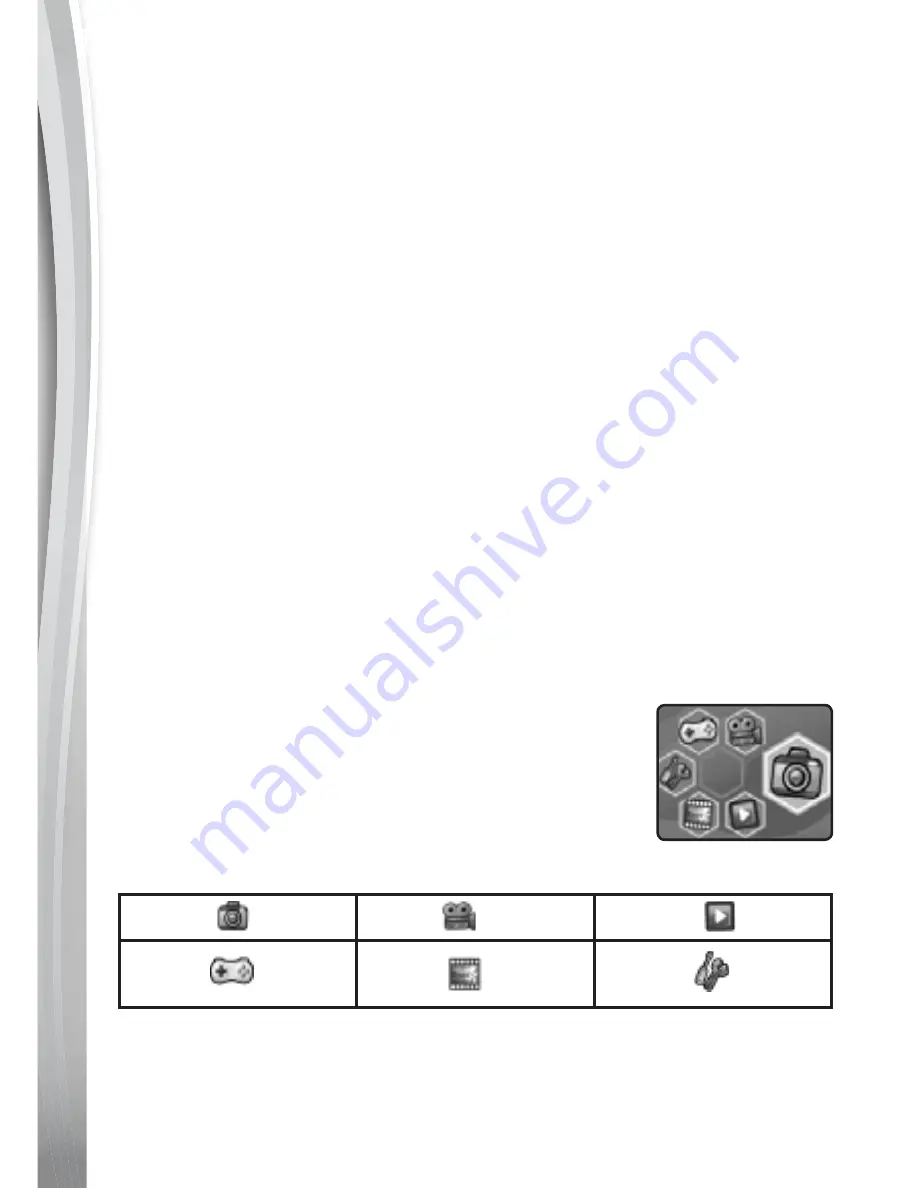
From the Home Menu, you can access all the 

activities on the 

Kidizoom

®


Action Cam 180. Press 

the 

Home Button to display the Home Menu, then 

press left or right on the 

D-Pad to select an activity, 

and press the 

OK Button to confirm. 

There are six activities in the Home Menu:

Camera 

Videos 

Playback 

Games 

Special

Videos 

Settings 

View Photos or Videos

Select the Playback icon in the Home Menu to view your photos and 

videos. The latest photo or video will be displayed on screen first. Press 

up or down on the 

D-Pad  to view the next or previous file. To delete the 

Summary of Contents for Kidizoom Action Cam 180

Page 1: ...91 003365 002 US Parent s Guide...

Page 2: ...y stunts tricks or any dangerous activities when using the camera When using the camera on a bicycle scooter skateboard or any other sports equipment obey all rules of the road signals and signs and s...

Page 3: ...s curit de votre enfant d barrassez vous de tous les produits d emballage tels que rubans adh sifs feuilles de plastique attaches tiquettes et vis d emballage Ils ne font pas partie du jouet The batt...

Page 4: ...o Camera Mode or to take a photo while in Camera Mode Video Button Press this button to switch to Video Mode or to start stop recording videos while in Video Mode Home On Off Button Press this button...

Page 5: ...CT SPECIFICATION Display 1 8 color LCD Photo Resolution 640 X 480 0 3 MP Language Multilingual US English UK English Deutsch Espa ol Fran ais Nederlands Video Resolution 640 X 480 available when using...

Page 6: ...s the actual capacity depends on the shooting environment The video length limit per file is 30 minutes or a file size no larger than 2 GB GETTING STARTED When you use Kidizoom Action Cam 180 for the...

Page 7: ...y turns off You may then disconnect your fully charged camera from the computer Note It will take approximately 3 hours to fully charge the battery The actual charging time depends on the charging cur...

Page 8: ...lead to them bursting causing a fire or chemical burns Please read the below precautions Do not disassemble Do not crush and do not expose the battery to any shock or force such as hammering dropping...

Page 9: ...he rubber cover and push the card once The microSD and microSDHC Logos are trademarks of SD 3C LCC Note If a memory card is inserted data stored in internal memory cannot be accessed from the camera u...

Page 10: ...ress left or right on the D Pad to select different photo effects Record Videos Press the Video Button to enter Video Mode In Video Mode press the OK Button or the Video Button to start or stop record...

Page 11: ...y marked with this symbol Two removable drives called VTech 5070 and VT SYSTEM will appear on your computer VTech 5070 is for storage of your data VT SYSTEM is for storage of system data and cannot be...

Page 12: ...trademarks of Apple Inc in the United States and other countries All other trademarks are the property of their respective owners ACTIVITIES Camera Press the Camera Button or select the Camera icon f...

Page 13: ...he Countdown icon will count down to the next photo Press the OK Button or Camera Button to stop recording otherwise recording will continue until the maximum number of time lapse photos is reached or...

Page 14: ...Self Timer Press up on the D Pad to access the Video Settings From here you can enable or disable the self timer Press the OK Button to confirm any changes When self timer is enabled there will be an...

Page 15: ...the D Pad to select between songs then press the OK Button to confirm and save your stop motion video Once the file is saved you can view it immediately or you can view it later from Playback mode No...

Page 16: ...nge It s time for a unicycle challenge Try your best to avoid all of the obstacles and collect as many stars as you can Jump and duck to stay safe Control Press the OK Button or up on the D Pad to mak...

Page 17: ...e region you are in If this is not set correctly you may see some flickering on the screen and on the photos and videos you take when in an indoor environment Note Please leave your Kidizoom Action Ca...

Page 18: ...ion Cam 180 does not contribute to any additional risks we do recommend that parents supervise their children while they play games If your child experiences dizziness altered vision disorientation or...

Page 19: ...wn writing data on the card and thus affect the video quality Cannot connect the camera to a computer 1 Check the connections on the micro USB cable between the camera and the computer and review the...

Page 20: ...and format it in either the FAT or FAT32 file systems before using it with your Kidizoom Action Cam 180 BATTERY DISPOSAL How to Take Out the Battery for Disposal CAUTION These steps must be carried o...

Page 21: ...both the positive and negative wires are detached 8 Separately cover each wire with electrical tape and handle the battery with care Note Do not pierce the battery pack with any sharp objects Do not a...

Page 22: ...ACTIon CAM 180 ACCESSORIES Waterproof Case Camera Button Strap Hook Case Body Buckle Tripod Bicycle Mount Screw Hole Strap Hook Mic Hole OK Button Buckle Handle Video Button O Ring Case Cover Home On...

Page 23: ...rting the camera into the Waterproof Case Open the case cover by pulling the Buckle Handle outwards as indicated by the arrow icon below After the handle is loosened the buckle can be opened Once the...

Page 24: ...it with a towel or other protection If the camera overheats it may automatically turn off or recording may malfunction To use the camera again leave it in a cool place for a while to allow its temper...

Page 25: ...ubstance is found on the case wash it off thoroughly using slightly warm water Wipe the inside of the case with a soft dry cloth Do not wash it with water Do not use any type of solvent such as alcoho...

Page 26: ...QUICK SETUP GUIDE Using the Bicycle Mount 1 Loosen both Adjustment Handles by turning them counterclockwise Note You do not need to completely unscrew them Bicycle Mount Adhesive Mount Mounting Attac...

Page 27: ...Tube of the bicycle Note It is recommended to mount the camera on the Head Tube of the bicycle instead of the Handle Bar as illustrated 5 Replace and tighten the Adjustment Handle by turning it clock...

Page 28: ...surface is rough the adhesive performance will be affected 3 Remove the protective cover of the adhesive surface and stick it on a clean flat smooth surface Note If the surface is not very flat or a...

Page 29: ...e screw of the Adhesive Flat Mount Tighten the screw on the Adhesive Flat Mount clockwise to affix the camera on the mount 7 Loosen the Angle Adjustment Handle and you can rotate the Angle Adjustment...

Page 30: ...into the groove behind the Strap Hook and then push it through Step 2 Feed the end of the strap up through the loop and pull it all the way through Step 3 Make sure the loop is securely tightened aro...

Page 31: ...ucts and encourage you to call our Consumer Services Department at 1 800 521 2010 in the U S or 1 877 352 8697 in Canada or by going to our website at vtechkids com and filling out our Contact Us form...

Page 32: ...OLLOWING TWO CONDITIONS 1 THIS DEVICE MAY NOT CAUSE HARMFUL INTERFERENCE AND 2 THIS DEVICE MUST ACCEPT ANY INTERFERENCE RECEIVED INCLUDING INTERFERENCE THAT MAY CAUSE UNDESIRED OPERATION CAN ICES 3 B...

Page 33: ...ling 1 800 521 2010 If the service representative is unable to resolve the issue you will be provided instructions on how to return the product and have it replaced under Warranty Return of the produc...

Page 34: ...Visit our website for more information about our products downloads resources and more vtechkids com 91 003365 002 TM 2017 VTech Holdings Limited All rights reserved Printed in China...

Reviews: