background image

8

Setup

Getting Started

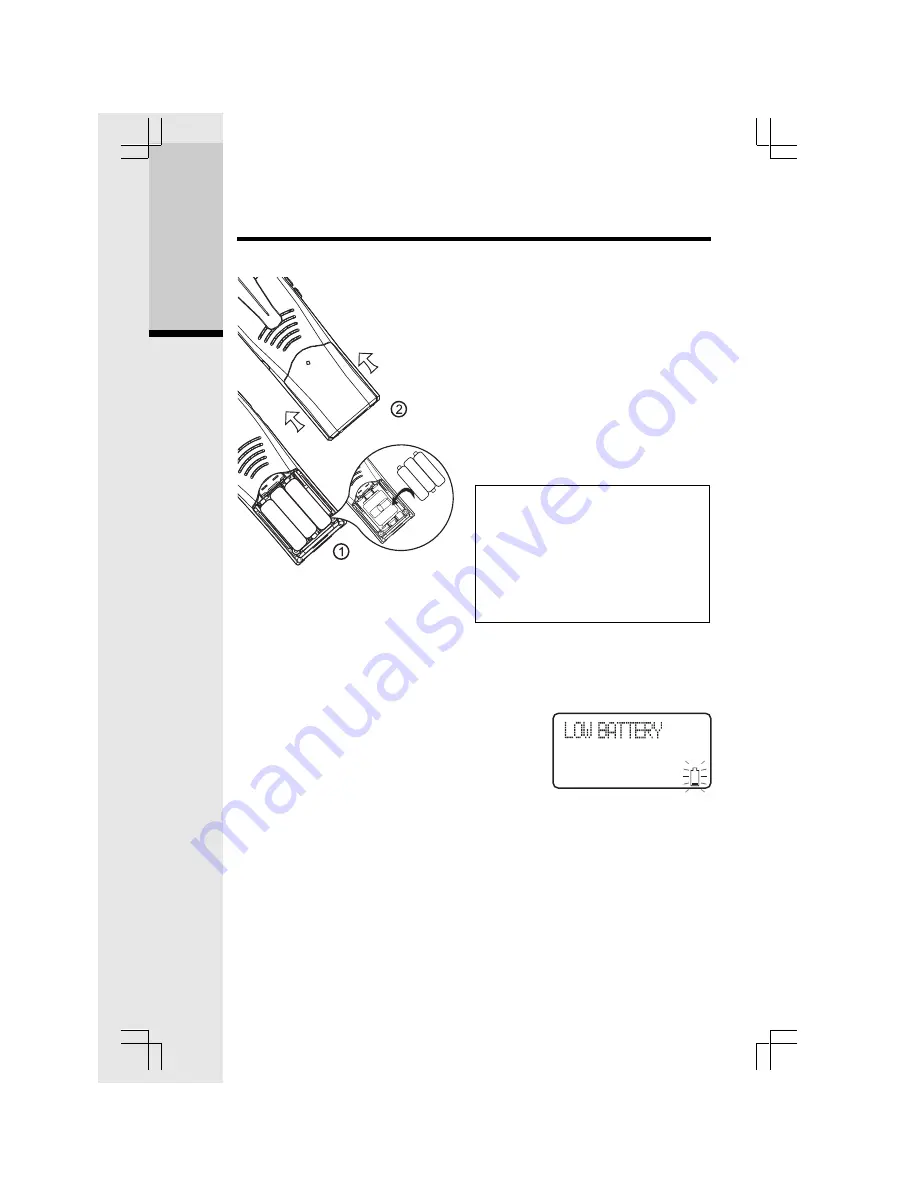
Installation of Battery Cells in Handset

Follow the steps below:
1. Place the new battery cells in the

Handset with the positive and
negative poles aligned in the
battery compartment.

2. Replace the battery compartment

cover by sliding it upwards.

3.   If the new battery cells are not already

charged, place the Handset in its
Charger or Base Unit, and allow it to
charge for 10-12 hours. After initial
charge, a maintenance charge of 8
hours should be sufficient.

WARNING: Alkaline batteries must

NOT be used in your ip 5850
cordless telephone. Use only the
batteries that came with your
phone, or contact our Customer
Support Center (contact informa-
tion on page 2) to order additional
batteries.

Charging of the Handset Battery Cells

The Handset of your cordless telephone is powered by rechargeable battery cells. It
charges automatically whenever the Handset is in its charger or Base Unit.
You should charge the battery pack for 10-12 hours when you first receive
your phone.
You will know the battery cells need charging when:

•   The low battery message is displayed:
•    The Handset seems completely dead, the LCD

is completely clear and does not activate when
you press the keys.

NOTE: When in LOW BATTERY mode, the keypad sounds, backlighting and
speakerphone features will not work. When your battery has been charged,
your features will return to their normal function.

IMPORTANT:

1. Do not dispose of battery cell in a fire, the cell may explode.
2. Do not open or mutilate the battery cell. Toxic substances may be released,

causing harm to eyes or skin.

3.  Exercise care in handling battery cell in order to prevent an accidental short

of the charge contacts, potentially causing the battery pack to overheat.

Summary of Contents for ip5852

Page 1: ...tall this product where the cord might be damaged by anyone walking on it 9 Never push objects of any kind into this product through the slots in the Handset and Base Unit as they may touch dangerous...

Page 2: ...f electric shock from lightning 14 Do not use this or any cordless telephone to report a gas leak in the vicinity of the leak VTECH COMMUNICATIONS INC CUSTOMER SERVICE 1 800 595 9511 In Canada VTech T...

Page 3: ...n advanced cordless telephone set capable of supporting two Handsets This manual is designed to familiarize you with this cordless telephone We strongly recommend you read the manual before using your...

Page 4: ...ting Bracket 8 Charger Wall Mounting Bracket 9 User s Manual 10 Battery Cells To purchase replacement battery cells call VTech Communications Inc at 1 800 595 9511 In Canada call VTech Telecommunicati...

Page 5: ...Volume Control 4 CID Scroll Down 5 On Flash 6 Dialing Keys 0 9 7 Redial Pause 8 Speakerphone 9 LCD Display 10 Select Menu 11 Phonebook Scroll Up 12 Headset Jack 2 5mm 13 Off Clear 14 Intercom 15 Mute...

Page 6: ...t 3 Change 4 Cradle Contacts 5 Menu 6 In Use LED 7 Charging LED 8 Page 9 Microphone 10 Volume Control 11 Repeat Slow 12 Skip Quick 13 Delete 14 Message Boxes PLAY STOP 15 Answering Machine Control On...

Page 7: ...t Charger 1 Plug the AC power adapter into an electrical outlet and the DC connector into the bottom of the Base Unit 2 Choose the location for your Handset Charger and plug its power supply into an e...

Page 8: ...t of your cordless telephone is powered by rechargeable battery cells It charges automatically whenever the Handset is in its charger or Base Unit You should charge the battery pack for 10 12 hours wh...

Page 9: ...hone equipment away from heat sources and sunlight 5 Avoid excessive moisture dust or extreme cold Getting Started 4 Do not dispose of this battery cell into household garbage Please refer to the info...

Page 10: ...to the jack at the bottom of the Base Unit and the other end to the wall jack 3 Line up the tabs on the wall mount adapters with the holes at the bottom of the Base Unit back of the Handset Charger S...

Page 11: ...cription Base LEDs LED Description IN USE CHARGING PLAY STOP 1 2 3 ON OFF On when the phone is off hook Flashes when an extension phone is off hook On when the Handset is charging in the cradle Flashe...

Page 12: ...your ip 5850 with services such as Call Waiting When you receive a call waiting signal simply press the ON FLASH key to switch to the new call Press ON FLASH again to switch back to the original call...

Page 13: ...d the screen will display Press INT or SPEAKER to answer the intercom call The screens will display Press INT or OFF on either Handset to end the call NOTE If the other Handset is out of range or on a...

Page 14: ...ercom call by pressing ON Intercom call link is established while the external call is still on hold HS1 may discuss the external call with HS2 When HS1 presses OFF the external call is then transferr...

Page 15: ...ry Press SEL With Phonebook selected press SEL again Press to select STORE Press SEL You will be prompted to ENTER NUMBER Use the dialing keys to enter the number you wish to store in the phonebook Pr...

Page 16: ...EVIEW in the first line press SEL again OR With the Handset idle press and the Hand set jumps directly into the phonebook review mode The first phonebook entry will be dis played Scroll through the ph...

Page 17: ...neces sary You can also press REDIAL PAUSE then or to scroll to the previously dialed number from redial list which you want to store in the phonebook Press SEL Press SEL to confirm the number and en...

Page 18: ...u do not subscribe to Caller ID services you can still use your ip 5850 and the other features it offers Due to regional incompatibilities Caller ID information may not be available for every call you...

Page 19: ...you will be prompted to EDIT NAME and the screen will show If the caller ID does not contain a number you will be prompted to EDIT NUMBER and the screen will show You will hear a confirmation tone the...

Page 20: ...ted Press DELETE key to delete the desired record A confirmation tone will sound and the previous Caller ID record will be displayed on the screen To delete all the Caller ID records press and hold th...

Page 21: ...firm the setting Ringer Tone From the idle OFF mode press SEL then or key to RINGERTONE Press SEL then you are prompted to choose INTERCOM CALL or OUTSIDE CALL Press or keys to select the desired opti...

Page 22: ...ge 15 Press SEL to confirm the setting Language preset to English From the idle OFF mode press SEL then or key to LANGUAGE Press SEL to select this option Press or keys to scroll from English to Frenc...

Page 23: ...l need to set the correct day and time at the Base 1 Press TIME SET The time and day will be announced followed by To set day and time press TIME SET Press TIME SET again The day will be announced 2 P...

Page 24: ...ent your callers will hear when the system answers a call the system comes set for normal answering with Announce Only turned off See Set Announce Only on page 26 to change your announcement selection...

Page 25: ...system will use the pre recorded announcement until you record a new one Answering System Feature Setup You can set up one feature at a time or you can set up a feature and then move on to set up anot...

Page 26: ...access features and functions of the answering system from a touch tone phone Choose a two digit number from 40 to 99 When Message Alert is turned on the Base beeps once every 10 seconds when new mes...

Page 27: ...steadily Press the PLAY STOP button for the mailbox you want to review The system announces the mailbox number the number of new messages and the number of old messages The system then plays only new...

Page 28: ...ll not hear incoming messages as they are received The system beeps three times when you reach the highest or lowest volume setting DeleteMessages NOTE Deleted messages cannot be recovered Delete a Sp...

Page 29: ...s Now recording speak towards the Base microphone The message window displays the length of your memo up to 99 seconds If you record longer memo 99 continues to flash until you finish 3 To stop record...

Page 30: ...w message number during message playback Indicates volume level selected when VOL or VOL is pressed Current Remote Access Code while setting Announce Only mode Displayed when any setting is changed to...

Page 31: ...the desired mailbox number 1 2 or 3 The system plays new messages If there are no new messages the system plays old messages Press 4 while message is playing press 4 twice to back up previous message...

Page 32: ...rubber flap on the cordless Handset The plug should fit securely Do not force the connection Headset Operation NOTE Whenever a compatible Headset is connected to the cordless Handset the microphone o...

Page 33: ...ugged into the same circuit as the Base Unit can sometimes cause interference Try to move the appliance or the Base Unit to another outlet You Get Noise Static Or AWeak SignalWhenYou are Away FromThe...

Page 34: ...ment If the unit does not seem to be responding normally then try to put the Handset in the cradle If it does not seem to respond do the following in the order listed 1 Disconnect the power to the Bas...

Page 35: ...ical storms Electrical storms can sometimes cause power surges harmful to electronic equipment For your own safety use caution when using electric appliances during storms Cleaning your telephone Your...

Page 36: ...t at VTech s option is your exclusive remedy You should expect the repair or replacement to take approximately 30 days How long is the limited warranty period The limited warranty period for the produ...

Page 37: ...ered by this limited warranty or proof of purchase does not meet the terms of this limited warranty VTech will notify you and will request that you authorize the cost of repair and return shipping cos...

Page 38: ...apply to you In no event shall VTech be liable for any indirect special incidental consequential or similar damages including but not limited to lost profits or revenue inability to use the product o...

Page 39: ...15 Warning Changes or modifications to this unit not expressly approved by the party responsible for compliance could void the user s authority to operate the equipment The equipment has been tested a...

Page 40: ...listed separately For equipment approved after that date the product identifier is preceded by US and a colon and the REN is encoded in the product identifier without a decimal point as the sixth and...

Page 41: ...uipped with a corded or cordless Handset it is hearing aid compatible 6 Programming testing of emergency numbers If this product has memory dialing locations you may choose to store police fire depart...

Page 42: ...able method of connection The customer should be aware that compliance with the above conditions may not prevent degradation of services in some situations Repairs to certified equipment should be mad...

Page 43: ...SIZE Handset 182mm length x 55mm width x 41mm height including antenna Base 179mm length x 114mm weigth x 67mm height Charger 79mm length x 76mm width x 45mm height WEIGHT Handset 146 grams excluding...

Page 44: ...ber of THE VTECH GROUP OF COMPANIES Distributed in the U S A by VTech Communications Inc Beaverton Oregon 97008 Distributed in Canada by VTech Telecommunications Canada Ltd 7671 Alderbridge Way Richmo...

Page 45: ...HandsetIcons 11 Handset LEDs 11 BaseLEDs 11 Handset Operation 12 Making Calls 12 Answering Calls 12 Flash Function 12 Redial Function 12 Mute Function 13 Intercom Call 13 Call Forward and CallTransfer...

Page 46: ...DeleteYour Announcement 25 Answering System Feature Setup 25 Feature Summary 26 Listen to Messages 27 Adjust PlaybackVolume 28 Delete Messages 28 Record a Memo 29 Call Screening 29 MessageWindow Disp...

Page 47: ......

Page 48: ......

Page 49: ......

Page 50: ......

Reviews: