background image

24

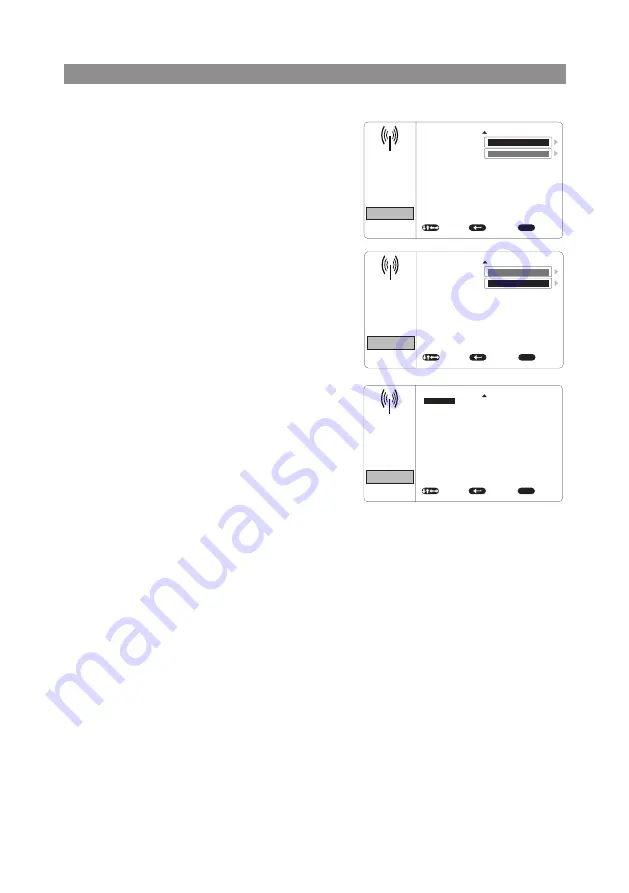
FMM MODULATION(ON/OFF)

This setting allows you to turn the FMM modulator 
ON or OFF.

FMM CHANNEL

This setting allows you to select the frequency. 
The unit has a 100 channel  built-in wireless 
FM Modulator. The FM Modulator can be set 
from 88.1MHz to 107.9MHz  in 0.2MHz steps, 
i.e.88.1,88.3,88.5,88.9,90.1 etc.

To choose an FM frequency for audio playback 
through your vehicle’s radio:

1. 

Use the 

p


q


t

 or 

u

 cursor buttons to select a 

frequency not used by a radio station in the area. 
Press OK to select the highlighted frequency. 
There are a total of 3 FM CHANNEL pages 
containing frequencies from 88.1 MHz to 107.9 
MHz in 0.2 MHz steps. To access the additional FM 
Channel pages, use the  

t

 or 

u

 cursor buttons to 

highlight the on screen left and right arrows and 
press OK. Once the frequency has been selected, 
tune the  vehicle’s radio to the selected frequency.

2. 

Press the DVD button to restore the remote 
control to DVD functions.

Note: 

The wireless FM modulator will perform well in 

most applications. However, in certain geographical 
areas the quality of the wireless signal may be less than 
optimal, resulting in static or strong local station bleed 
through. If this is a consistent problem, an FMDIRB 
(hard wired FM connection) can be installed by your 
dealer.

PICTURE

PICTURE

AUDIO

AUDIO

SYSTEM

SYSTEM

PLAYER

PLAYER

FMM

FMM

SELECT 

SELECT 

EXIT 

EXIT 

FM MODULATION

FM MODULATION 

FMM CHANNEL

FMM CHANNEL

MOVE 

MOVE 

MENU 

MENU 

ON

88.1MHZ

88.1MHZ

ON

PICTURE

AUDIO

SYSTEM

PLAYER

FMM

SELECT 

EXIT 

MOVE 

MENU 

91.1MHz

91.3MHz

91.5MHz

91.7MHz

91.9MHz

92.1MHz

92.3MHz

92.5MHz

92.7MHz

92.9MHz

93.1MHz

93.3MHz

93.5MHz

93.7MHz

93.9MHz

94.1MHz

94.3MHz

94.5MHz

94.7MHz

94.9MHz

95.1MHz

95.3MHz

95.5MHz

95.7MHz

95.9MHz

96.1MHz

96.3MHz

96.5MHz

96.7MHz

96.9MHz

88.1MHz

88.3MHz

88.5MHz

88.7MHz

88.9MHz

89.1MHz

89.3MHz

89.5MHz

89.7MHz

89.9MHz

90.1MHz

90.3MHz

90.5MHz

90.7MHz

90.9MHz

88.1MHz

PICTURE

PICTURE

AUDIO

AUDIO

SYSTEM

SYSTEM

PLAYER

PLAYER

FMM

FMM

SELECT 

SELECT 

EXIT 

EXIT 

FM MODULATION

FM MODULATION 

FMM CHANNEL

FMM CHANNEL

MOVE 

MOVE 

MENU 

MENU 

ON

88.1MHZ

88.1MHZ

ON

PICTURE

AUDIO

SYSTEM

PLAYER

FMM

SELECT 

EXIT 

MOVE 

MENU 

91.1MHz

91.3MHz

91.5MHz

91.7MHz

91.9MHz

92.1MHz

92.3MHz

92.5MHz

92.7MHz

92.9MHz

93.1MHz

93.3MHz

93.5MHz

93.7MHz

93.9MHz

94.1MHz

94.3MHz

94.5MHz

94.7MHz

94.9MHz

95.1MHz

95.3MHz

95.5MHz

95.7MHz

95.9MHz

96.1MHz

96.3MHz

96.5MHz

96.7MHz

96.9MHz

88.1MHz

88.3MHz

88.5MHz

88.7MHz

88.9MHz

89.1MHz

89.3MHz

89.5MHz

89.7MHz

89.9MHz

90.1MHz

90.3MHz

90.5MHz

90.7MHz

90.9MHz

88.1MHz

   System Menu Setting and Adjustments(Continued)

Summary of Contents for Movies to Go AMVXMTG13

Page 1: ...AMVXMTG13 VXMTG13 13 3 Overhead LCD Monitor With Built In DVD Player Owner s Manual ...

Page 2: ......

Page 3: ...fully closed position when not in use Before putting on headphones always adjust the volume setting to the lowest position Remember to leave the dome light switch in the off or auto positions when the vehicle is unattended as the dome lights if left on can drain the vehicle s battery Do not put pressure on the screen Caution children to avoid touching or scratching the screen as it may become dirt...

Page 4: ...pment Note Installation options vary see the individual owner s manuals for each component in your system to obtain a full understanding of each component s operation For safety reasons when changing video media it is recommended that the vehicle is not in motion and that you do not allow children to unfasten seat belts to change video media or make any adjustments to the system System adjustments...

Page 5: ...ide view 9 Remote Control Operation 10 Remote Control Functions 11 Turning the unit on or off 15 Source menu 16 System Menu Setting and Adjustments 18 Playing DVD 25 DVD Basics 26 Playing USB and MP3 Discs 27 HDMI Basics 28 HDMI Devices 29 USB Input Charging 30 Troubleshooting 31 Specifications 32 Warranty 33 ...

Page 6: ...USB 2 0 Port User Accessible with Media Playback and Charging support HDMI Input On Screen Display OSD for control of picture quality and functions Full function remote control Plays DVD CD and MP3 discs 100 Channel Wireless FM Modulator Dual Channel IR Transmitter M1 M2 Operation for when 2 systems are installed in 1 Vehicle so that IR Headphone Audio and Remote Control operation is independent F...

Page 7: ...f a disc or pause a disc 3 DOWN Previous Button Short press to select the source mode and system menu pages Long press to select previous chapter or track during play the DVD 4 MENU Select Button This button is used to display and select options on the system menu 5 UP NEXT Button Short press to select the source mode and system menu pages Long press to select next chapter or track during play the...

Page 8: ...CT Button This button is used for ejecting a disc from the disc compartment 8 Dome Lights Provides additional interior illumination 9 Infrared Transmitter Remote Sensor IR Transmitter is used to broadcast audio signal to wireless IR headphones IR Sensor is used to receive signals from the remote control 10 Screen Release Push this button to release the screen from the locked position 11 Ventilatio...

Page 9: ...contains a battery Note The USB input supplies up to 2A of charging current Samsung Mobile Devices up to 500mA It is recommended to connect the device to a vehicle power outlet for full charging capabilities 4 HDMI INPUT For connection of devices with HDMI outputs Note Requires an HDMI enabled device and the appropriate adapter cable for that device Contact your HDMI device supplier for the adapte...

Page 10: ...tion Battery Replacement 1 Remove the battery cover 2 Insert two AAA batteries into the battery holder Be sure to observe the correct polarity 3 Reinstall the battery cover back into the Remote Control until it locks in place ...

Page 11: ...11 Remote Control Functions ...

Page 12: ...llows the user to access the system menu Press the p or q cursor buttons to select PICTURE AUDIO SYSTEM PLAYER FMM 7 CURSOR pqt u Use the cursor buttons to access menu selections on the screen 8 OK Used to execute a selected setting or menu option 9 DISC MENU In DVD mode press once to access the Root Menu and then press again to resume to previous screen 10 DISPLAY Press once to display current di...

Page 13: ...BTITLE Press to display and select the subtitle language in DVD mode Each time this button is pressed the subtitle language changes Pressing the button will also turn the subtitles off Note The type and number of subtitle languages vary from disc to disc 20 ZOOM Press this button to enlarge or decrease the picture size when playing a DVD disc Press ZOOM button DVD Player performs 1 Time Enlarges t...

Page 14: ...g of the disc Note For MP3 or photo mode press twice to return to Audio Photo Video option menu 28 SETUP No function on this model User can use the system to select the function may need 29 MUTE Press this button to mute the audio for the wireless FM Modulator IR headphones and audio output Pressing the button again restores the audio to the previously set level 30 TV Mode Select Switches certain ...

Page 15: ...Press the power button on the unit or the remote control to turn the system on and off When in use the internal backlighting will illuminate the controls 4 After the unit has been turned on and is displaying a picture adjust the viewing angle by pivoting the screen to optimize the picture quality 5 Remember to turn the unit off and pivot the LCD screen to the locked position when not in use Power ...

Page 16: ...iles AV An external video source such as a video game system or other audio video devices can be connected to the AV input This AV input connection is performed when the unit is installed Turn the video source component on with its power button or remote control and it is now ready to play the audio and video signals from the source connected to the AV input AUX An external video source such as a ...

Page 17: ...our smart device You can also use this input to connect a SmartTV Stick such as a ROKU Amazon FireTV or Chromecast device these devices may require Wi Fi Hotspot access to stream content which is not included with this system Notes This source requires an HDMI enabled device and a special HDMI adapter Contact your HDMI device supplier for the adapter Phone functionality phone calls texting etc may...

Page 18: ...he system menu cursor button to the icon side of the setup page Then repeat steps 2 through 5 PICTURE AUDIO Setup SYSTEM Setup PLAYER Setup FMM Setup PICTURE PICTURE PICTURE AUDIO AUDIO AUDIO SYSTEM SYSTEM SYSTEM PLAYER PLAYER PLAYER FMM FMM FMM ADJUST ADJUST ADJUST EXIT EXIT EXIT BRIGHTNESS LANGUAGE TV SYSTEM CONTRAST DEFAULT DVD SCREEN SAVER COLOR MONITOR MODE ASPECT RATIO PASSWORD SETUP TINT RE...

Page 19: ...T COLOR TINT MOVE 16 16 0 MENU 16 PICTURE AUDIO SYSTEM PLAYER FMM ADJUST EXIT BRIGHTNESS CONTRAST COLOR TINT MOVE 16 0 MENU 16 16 PICTURE AUDIO SYSTEM PLAYER FMM ADJUST EXIT BRIGHTNESS CONTRAST COLOR TINT MOVE 0 MENU 16 16 16 PICTURE AUDIO SYSTEM PLAYER FMM ADJUST EXIT BRIGHTNESS CONTRAST COLOR TINT MOVE MENU 16 16 16 0 7 If without a Remote control user can use the local key to select the functio...

Page 20: ...SCREEN SAVER MONITOR MODE ASPECT RATIO PASSWORD SETUP RESET RATING LAST MEMORY AUDIO LANGUAGE MOVE MOVE MOVE MENU MENU MENU PICTURE AUDIO SYSTEM PLAYER FMM ADJUST EXIT IRT MOVE MENU L R ON ENGLISH NTSC ADULT ON ON ON M1 16 9 ENGLISH PICTURE AUDIO SYSTEM PLAYER FMM FMM PICTURE AUDIO SYSTEM PLAYER FMM System Menu Setting and Adjustments Continued PICTURE PICTURE AUDIO AUDIO SYSTEM SYSTEM SYSTEM PLAY...

Page 21: ...UP TINT RESET RATING LAST MEMORY AUDIO LANGUAGE MOVE MOVE MOVE 16 16 16 0 MENU MENU MENU PICTURE AUDIO SYSTEM PLAYER FMM ADJUST EXIT IRT MOVE MENU L R ON ENGLISH NTSC ADULT ON ON ON M1 16 9 ENGLISH PICTURE AUDIO SYSTEM PLAYER FMM PICTURE AUDIO SYSTEM PLAYER FMM PICTURE AUDIO SYSTEM PLAYER FMM PICTURE PICTURE PICTURE PICTURE PICTURE PICTURE AUDIO AUDIO AUDIO AUDIO AUDIO AUDIO SYSTEM SYSTEM SYSTEM S...

Page 22: ...play After the password is entered press the OK button on the remote control PICTURE PICTURE PICTURE PICTURE PICTURE PICTURE PICTURE PICTURE AUDIO AUDIO AUDIO AUDIO AUDIO AUDIO AUDIO AUDIO SYSTEM SYSTEM SYSTEM SYSTEM SYSTEM SYSTEM SYSTEM SYSTEM PLAYER PLAYER PLAYER PLAYER PLAYER PLAYER PLAYER PLAYER FMM FMM FMM FMM FMM FMM FMM FMM ADJUST ADJUST ADJUST ADJUST EXIT EXIT EXIT EXIT TV SYSTEM TV SYSTEM...

Page 23: ...UDIO AUDIO AUDIO AUDIO AUDIO AUDIO SYSTEM SYSTEM SYSTEM SYSTEM SYSTEM SYSTEM SYSTEM SYSTEM PLAYER PLAYER PLAYER PLAYER PLAYER PLAYER PLAYER PLAYER FMM FMM FMM FMM FMM FMM FMM FMM ADJUST ADJUST ADJUST ADJUST ADJUST ADJUST ADJUST ADJUST EXIT EXIT EXIT EXIT EXIT EXIT EXIT EXIT TV SYSTEM TV SYSTEM TV SYSTEM TV SYSTEM SUBTITLEGLANGUAGE SUBTITLEGLANGUAGE TV SYSTEM TV SYSTEM SCREEN SAVER SCREEN SAVER SCR...

Page 24: ...AYER FMM SELECT EXIT MOVE MENU 91 1MHz 91 3MHz 91 5MHz 91 7MHz 91 9MHz 92 1MHz 92 3MHz 92 5MHz 92 7MHz 92 9MHz 93 1MHz 93 3MHz 93 5MHz 93 7MHz 93 9MHz 94 1MHz 94 3MHz 94 5MHz 94 7MHz 94 9MHz 95 1MHz 95 3MHz 95 5MHz 95 7MHz 95 9MHz 96 1MHz 96 3MHz 96 5MHz 96 7MHz 96 9MHz 88 1MHz 88 3MHz 88 5MHz 88 7MHz 88 9MHz 89 1MHz 89 3MHz 89 5MHz 89 7MHz 89 9MHz 90 1MHz 90 3MHz 90 5MHz 90 7MHz 90 9MHz 88 1MHz P...

Page 25: ...tically The track number and the elapsed time of the disc are displayed Selecting a Track Selection of a specific track is accomplished by using the numbers keys Press the number key corresponding to the desired track and the player will implement the selection Press the previous button 9 to return to the previous chapter or track Press the next button to skip to the next chapter or track Using th...

Page 26: ...da Region 2 Japan Europe South Africa Middle East Greenland Region 3 S Korea Taiwan Hong Kong Parts of South East Asia Region 4 Australia New Zealand Latin America including Mexico Region 5 Eastern Europe Russia India Africa Region 6 China Playing USB Devices To play a USB device change the source to USB and plug a USB device into the USB port When a USB device is inserted into the player the navi...

Page 27: ...dio CD quality song can be compressed into MP3 format with very little loss of quality while taking up much less space CD R discs that have MP3 format files can be played on the DVD player The DVD player plays the songs in the order they were burned on to the disc Selecting Folders and Songs When an MP3 disc is loaded in the player the navigation menu will appear on the screen automatically and a ...

Page 28: ...tTV Stick when using these devices as a media source Smartphones and Tablets For Apple products go to the Apple Store or enter the following link into your web browser to find the adapter required for your device Different models require different adapters http support apple com kb ht4108 See the following links for other smartphone and tablet manufacturers Samsung Multimedia adapter http www sams...

Page 29: ... FireTV Stick streaming device www amazon com and search for FireTV Stick Chromecast media streaming device www google com and search for Chromecast Roku HDMI streaming device http www roku com products compare HDMI Devices ...

Page 30: ...portable device when the unit is turned OFF The USB port will charge a portable device in the following modes DVD USB Not recommended AV AUX HDMI It will not charge in USB mode For Apple Android Mobile It will charge at up to 2 Amps of charging current For Samsung Mobile It will charge at up to 500mA of charging current USB Inputs Charging ...

Page 31: ...into the appropriate jacks If you are using the 2 channel IR headphones make sure you turn on the IR headphone power make sure the correct channel A or B is selected If the FM Modulator is ON make sure proper frequency has been selected Cannot advance through a movie Most discs prohibit advancing through the opening credits and warning information that appear at the beginning of movies The icon ap...

Page 32: ...Display System Video Output Power Source Dimension L x W x H TFT Active Matrix LCD 1920 RGB X3 x 1080 6 220 800 32 113º F 0 45º C 4 149º F 10 65º C 20 000 Hours NTSC PAL AUTO 1 0Vp p 75 ohms 12VDC 375mm x 330mm x 82 9mm 14 8in x 13 0in x 3 3in Specifications subject to change without notice Specifications ...

Page 33: ... any product or part thereof which in the opinion of the Company has suffered or been damaged through alteration improper installation mishandling misuse neglect accident or by removal or defacement of the factory serial number bar code label s THE EXTENT O F T H E CO M PA N Y S L I A B I L I T Y U N D E R T H I S WA R R A N T Y I S L I M I T E D TO T H E R E PA I R O R R E P L A C E M E N T P R O...

Page 34: ......

Page 35: ......

Page 36: ... 2021 Voxx Electronics Corp 2351 J Lawson Blvd Orlando FL 32824 700 116 www voxxelectronics com ...

Reviews: