background image

Voxtrack GPS850 Quick Start Guide


7

Installing the GPS850 in your car 


Please note that the device must be mounted in the vehicle such that is does not interfere with 
the driver’s view or operation of the vehicle’s controls.  The device must also not be mounted in 

the deployment area of the vehicle’s airbags (if fitted).  This device must be installed in 
accordance with all applicable local laws.  


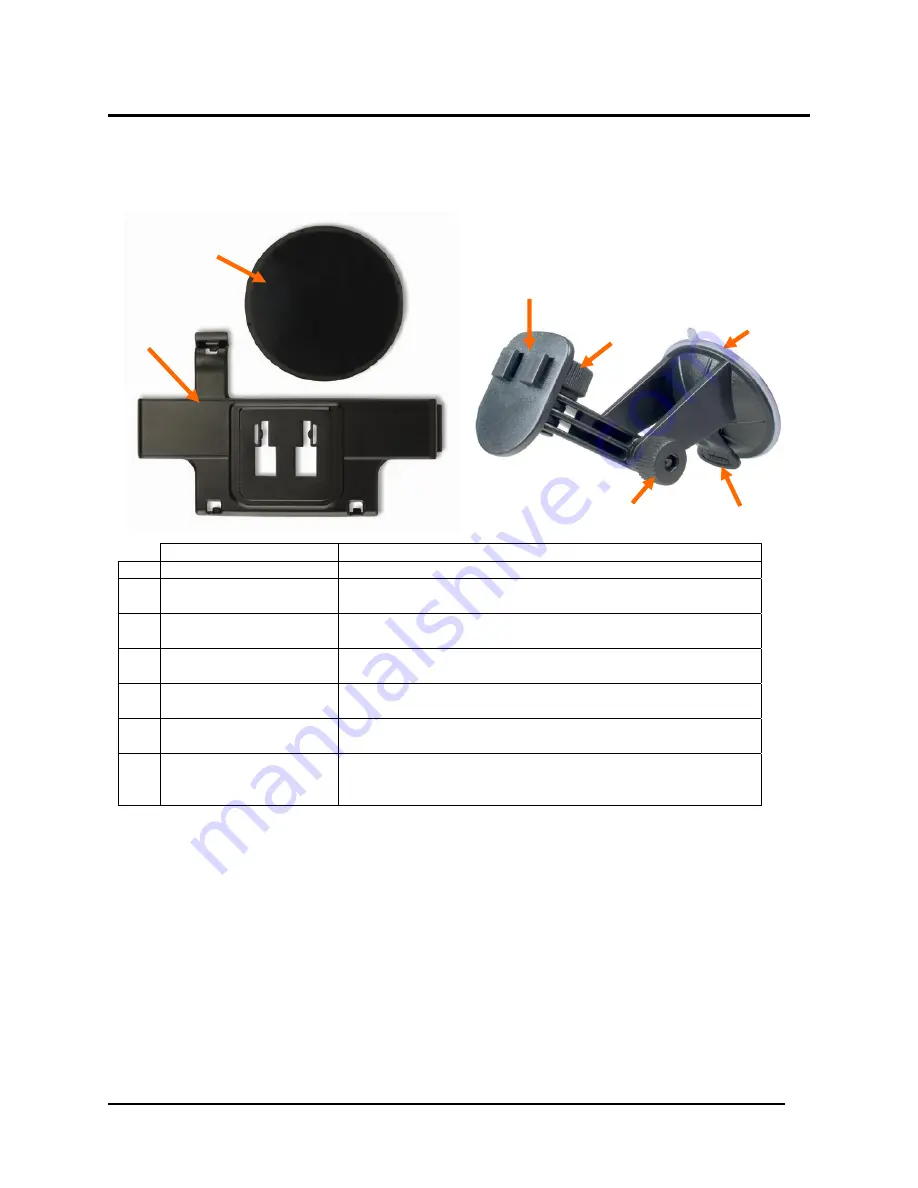
Item Description 

Cradle Tabs 

Used to connect cradle to suction mount bracket. 

2 Left-Right 

Adjustment 

Screw 

Loosen to allow left and right angle adjustment of 
suction mount bracket.  Tighten once angle is correct. 

3 Up-Down 

Adjustment 

Screw 

Loosen to allow up and down angle adjustment of 

suction mount bracket.  Tighten once angle is correct. 

Suction Mount Lever 

Use to fix / release the suction mount from the 

windscreen. 

Suction Cup 

Mounts against windscreen.  Ensure both suction cup 
and windscreen are clean before mounting. 

Cradle 

Holds the GPS850 device.  Connects to bracket via the 

tabs. 

Dash Mounting Plate 

For use when windscreen mounting is not an option.  

Adhesive sticks the plate to the dashboard then suction 
cup can be mounted to the plate. 


1.


To assemble your car holder kit first attach the cradle to the suction-mount bracket. To 

complete this start by orientating the bracket such that the lever at the base is facing 
downwards.  Place the cradle onto the bracket ensuring that the two tabs on the bracket 

align with the holes in the cradle. Slide the cradle downwards until it is securely in place. 


2.


Place the car holder kit in a suitable location on your windscreen ensuring that the lever 
at the base of the bracket is switched such that it is away from the glass.  The area of the 
windscreen where the bracket is to be mounted should be cleaned with an alcohol based 

cleaner prior to attaching the bracket.  The best location for the device is usually at the 
bottom of the windscreen in the centre of the vehicle.  


3.


Whilst firmly pressing the bracket against the glass, push the lever back into place 

against the base of the bracket.  Once fitted, pull gently on the bracket to check that the 
suction mount is secure.  


CAUTION:

 Do not place any force on the cradle itself as it can be easily broken. 

o

n

q

s

r

p

t

Summary of Contents for Voxtrack GPS850

Page 1: ...Voxtrack GPS850 Quick Start Guide ...

Page 2: ...e to upgrades and enhancements the actual product appearance screen images and operation is subject to change without notice The manufacturer and or its affiliates bear no responsibility for errors or discrepancies in information contained within this document Actual product images and screen shots may vary from those depicted herein ...

Page 3: ...oting 21 Resetting the device 21 My GPS850 wont turn on 21 My position on the map isn t being updated 21 My GPS850 doesn t seem to hold charge 22 My GPS850 keeps saying Signal too low 22 8 Frequently Asked Questions FAQ 23 How does GPS work 23 Why are the maps not up to date 23 How do I update my maps or load overseas maps 24 Can the GPS850 warn me about school zones 24 Do the maps have truck rout...

Page 4: ...tion Software User s Manual included with your device Controls Item Description 1 Internal GPS Antenna Receives signals from GPS satellites to determine location Must have clear view of the sky and be pointing upwards in order to work correctly 2 Power Button Slide upward to turn unit on or off 3 SD MMC Card Slot SD card contains the navigation software and maps The card must remain in the unit wh...

Page 5: ... 6 Charger Connector Plug in the supplied charger to charge the device Device should be connected to cigarette lighter charger whenever in use in the vehicle 7 Earphone Jack 3 5mm stereo jack used to connect headphones or FM transmitter to use as alternative to internal speaker 8 Microphone Internal microphone for use with hands free functionality 9 Touch screen Used as the display as well as inpu...

Page 6: ...bottom is turned on and that the charger is connected Calibrating the touch screen When you first turn on the GPS850 or whenever you switch off the battery switch on the bottom of the device you will see the following touch screen calibration display To calibrate the touch screen carefully press on the centre of the black cross with your finger or blunt pencil The cross will move from the centre o...

Page 7: ...e For use when windscreen mounting is not an option Adhesive sticks the plate to the dashboard then suction cup can be mounted to the plate 1 To assemble your car holder kit first attach the cradle to the suction mount bracket To complete this start by orientating the bracket such that the lever at the base is facing downwards Place the cradle onto the bracket ensuring that the two tabs on the bra...

Page 8: ...signal Obstacles such as car ports bridges tunnels and buildings will affect the navigation device s ability to obtain an accurate signal Do not be alarmed if the map displays your current location in another city when you first turn the unit on your position will be automatically updated once reliable GPS signal is acquired It is best to move your vehicle to a clear and open area free from obstac...

Page 9: ...rmation regarding the navigation software System Button Opens the device settings menu Use this button set up your GPS850 Entertainment Button Opens the Entertainment Menu Use this menu to access the Video Player MP3 Player and Photo Viewer features of this device See section 6 of this manual for more details on these features Hands free Button Opens the Hands free menu Use this menu to setup your...

Page 10: ... be set to Never for AC power setting to avoid the backlight turning off during your journey in the car Language Changes the language for the main menus if other languages are installed Note This does not change the language of the menus or voice prompts in the navigation software This button will be disabled if English is the only language installed for the main menus Battery Shows the current st...

Page 11: ... destination Please refer to the Software User s Guide for detailed information on all the features of the navigation software Map Description When you first start the Destinator navigation software the Main Map screen appears You can use the icons displayed on this screen to plan and view your route Figure 1 Map Screen Your current location in Vehicle Mode Pedestrian Mode Your last known location...

Page 12: ...ton that displays the remaining travel distance and travel time estimated time of arrival and speed and altitude and street name and address number When you have calculated a route the Directions bar displays information about your next turn Click this bar for a complete list of turn by turn directions Destinator Menus You can press the Menu button from the Main Map screen to display the Destinati...

Page 13: ...he street name of the desired destination Select the street once it appears in the list by tapping on it or tap if it is already highlighted If your desired street name is not found it may in fact be in a neighbouring suburb Press the Mode button and select the Street City option to enter the street name first and then select which suburb is the correct one for your destination Note To navigate to...

Page 14: ...e route is being calculated a message will be displayed on screen The calculation time will vary depending on route length and complexity number of turns etc Do not be alarmed if the Calculating route message is displayed for upwards of 30 seconds for long or complex routes As you drive Destinator provides you with turn by turn voice and visual directions letting you know when your next turn is co...

Page 15: ...art the device search 5 The unit will now scan for Bluetooth enabled phones within range and display the message Searching available phones Please wait Once the scan is finished you will see a list of phones in range Select your phone from the list If your phone is not in the list check that it has Bluetooth enabled and that it is in discoverable mode 6 The GPS will attempt a connection to your ph...

Page 16: ...ap Yes button To reject tap No Whilst on a call you will see three icons at the top of the screen Use these as follows Decrease the volume of the speaker Increase the volume of the speaker End the current call NOTE If you are in an application such as navigation or music player and you accept an incoming call the audio from the application will be muted so that the audio from the call may be heard...

Page 17: ...r any video files NOTE You will have to exit the navigation software before removing the SD card containing the maps Tap to begin playback of current song Tap to stop playback Tap to skip to previous next video clip Tap to toggle repeat mode on off Tap to switch to full screen playback Tap to open browse menu This will allow you to search through directories on SD card for videos Tap to close the ...

Page 18: ...ic files NOTE You will have to exit the navigation software before removing the SD card containing the maps Tap to begin playback of current song Tap to stop playback Tap to skip to previous next song Tap to toggle repeat mode on off Tap to toggle random shuffle mode on off Tap to open browse menu This will allow you to search through directories on SD card for songs Tap to close the music player ...

Page 19: ...lideshow When you first start the Picture Viewer your GPS850 will automatically scan the inserted SD memory card for images and display a menu for you to browse through folders to select the images you wish to view NOTE You will have to exit the navigation software before removing the SD card containing the maps Go up one folder level Go to Slide Show view Displays the previous next page of images...

Page 20: ...Voxtrack GPS850 Quick Start Guide 20 View Full Screen slide show Rotates the picture Zoom In Out Selects the previous next picture Go Back to Browse menu ...

Page 21: ... connected to the charger whenever in the vehicle to ensure that your GPS850 is always adequately charged My position on the map isn t being updated The primary cause for your position to not be updated on the map is the GPS receiver does not have adequate signal from the satellites Low signal can be easily identified by the voice prompt Signal too low and the triangle representing your position h...

Page 22: ...e signal level being transmitted from the GPS satellites is extremely low and although the GPS850 is fitted with a highly sensitive antenna it is still essential that the unit has a clear view of as much of the sky as possible If your unit continually loses signal check the installation location in the car It may be necessary to use an optional external antenna to achieve better signal reception i...

Page 23: ... and represents that on an image of the map data The software then uses complex algorithms to calculate the best way to get from your current location to your destination within the bounds of the map data i e staying on the roads rather than a straight line There are a number of resources online that further explain how GPS technology works One simplified explanation is available from http electro...

Page 24: ...me about school zones Currently school zones are not supported by the GPS850 as a warning Most schools are included in the Points of Interest and can be made visible on the map however there is currently no option for an audible alert when approaching a school zone Do the maps have truck routes for high or heavy vehicles No Bridge heights and heavy vehicle road restrictions are not currently suppo...

Page 25: ... typically be traveling at higher speeds even though your actual distance covered may be greater Conversely the Short option will calculate the route based on the shortest distance between you and your destination This route will typically involve more turns and traveling through lower grade suburban roads and hence will often take longer with respect to time For most users Quick is the preferred ...

Page 26: ...are advised of the possibility of such damages losses or expenses The access by any user to any hyperlinks to internet resources mentioned in the present documentation are at the user s own risk and the content accuracy opinions expressed and other links provided by these resources are not investigated verified monitored or endorsed by the manufacturer Updates to software and hardware components a...

Reviews: