background image


4.  Turn on the appliance: plug the cord into the power socket which corresponds to the voltage of 

the appliance and press the on/off switch pedal. The appliance will start working. (Fig 7) 

5.  Cord  rewinding:  hold  the  plug  and  pull  out  the  cord;  press  the  cord  rewinding  pedal  and  the 

power cord will be drawn in. (Fig 8) 


                      1 

    3 

    4 


                  5 

6                                      7                                        8 


MAINTENANCE 

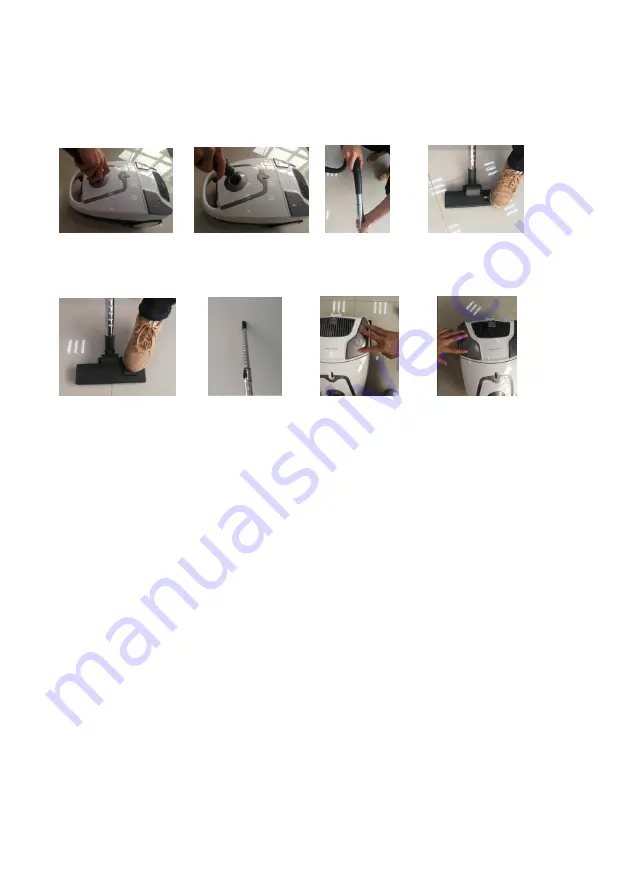
1.  Change  the  dust  bag:  when  the  wind  indicator  turns  to  be  red,  it  is  time  to  clean  the  dust  or 

replace with a new bag. (Fig1) 

Open the front cover by clipping. (Fig 2) 

Take out the bag holder and then remove the full dust bag. (Fig 3) 

2.  Exchange the outlet filter: clip down and remove the outlet cover by hands for exchange of filter. 

(Fig 4,5) 

3.


The motor protection filter should be removed and rinsed once a year, and can use it after dry. If 

the filter is damage, it should be replaced with the new one. (Fig 6)


Summary of Contents for SL-4518

Page 1: ...GBR SRB SL 4518 OPERATING INSTRUCTIONS VACUUM CLEANER UPUTSTVO ZA UPOTREBU USISIVAČ ...

Page 2: ...GBR INSTRUCTION MANUAL VACUUM CLEANER MODEL SL 4518 Please save and read this instruction manual carefully before use ...

Page 3: ...upervision or instruction concerning use of the appliance in a safe way and understand the hazards involved Children shall not play with the appliance Cleaning and user maintenance shall not be made by children without supervision 5 For the first operation it is advisable to read the manual carefully before hand and keep it properly for future use 6 Before the first operation make sure the dust cu...

Page 4: ...rd rewinding pedal 6 Speed control button 7 ON OFF switch pedal 8 Big wheel ACCESSORIES A set of hose accessories an extendible tube a floor brush an integrated brush and nozzle Operation methods 1 Attach the hose accessories insert the hose end into the hose socket at the front cover and then hook it Fig1 Remove the hose accessories press the adaptors at both side of the hose end and then pull th...

Page 5: ...4 5 6 7 8 MAINTENANCE 1 Change the dust bag when the wind indicator turns to be red it is time to clean the dust or replace with a new bag Fig1 Open the front cover by clipping Fig 2 Take out the bag holder and then remove the full dust bag Fig 3 2 Exchange the outlet filter clip down and remove the outlet cover by hands for exchange of filter Fig 4 5 3 The motor protection filter should be remove...

Page 6: ...6 DISPOSAL Environmental Protection Waste electrical production should not be disposed of with household waste Please recycle where facilities exist Check with your Local Authority or retailer for recycling advice ...

Page 7: ...SRB UPUTSTVO ZA UPOTREBU USISIVAČ MODEL SL 4518 Pažljivo pročitajte ovo uputstvo pre korišćenja i sačuvajte ga za kasniju upotrebu ...

Page 8: ...uk ije u vezi sa korišćenje ure aja na bezbe an način kao i ako razu eju opasnosti o kojih ože oći De a se ne s eju igrati s ure aje Čišćenje i korisničko o ržavanje ne s eju obavljati deca bez nadzora 5 Pažljivo pročitajte uputstvo pre prve upotrebe i sačuvajte ga za bu uću upotrebu 6 Pre prve upotrebe proverite a Ii je rezervoar za prašinu ispravno postavljen 7 Vo ite računa o napajanju koje ora...

Page 9: ...n za čišćenje u o aćinstvu 1 Ručka sa siste o za zaključavanje 2 Prednji poklopac 3 In ikator punog rezervoara za prašinu 4 Zadnji poklopac 5 Pedala za automatsko namotavanje kabla 6 Taster za kontrolu brzine 7 Pe ala za uključivanje isključivanje 8 Veliki točak DODACI Set o ataka za revo proširena ev četka za čišćenje po a integrisana četka i usisni dodatak Način rada 1 Pričvrstite o atak za revo...

Page 10: ...7 5 Na otavanje kabla isključite kabl iz utični e pritisnite pe alu za na otavanje kabla i kabl će biti uvučen Slika 8 1 2 3 4 5 6 7 8 ODRŽAVANJE 1 Pro ena kese za prašinu ka a in ikator punog rezervoara počne a svetli rveno vre e je a očistite vreću za prašinu ili za enite novo Slika1 Otvorite prednji poklopac Slika 2 Izvu ite ržač vreće za prašinu a zati izva ite punu vreću Slika 3 2 Zamena filt...

Page 11: ...ta životne sredine Elektronski otpad ne sme se odlagati zaje no sa otpa o iz o aćinstva Re iklirajte na esti a pre vi eni za ovu vrstu otpa a Raspitajte se ko vaših opštinskih vlasti ili ko pro av a o re ikliranju ove vrste otpa a ...

Reviews: