background image

4/8/16DVR Quick Start Guide 

VOOK


premium DVR


5


4.1  Accessing the DVR menus 
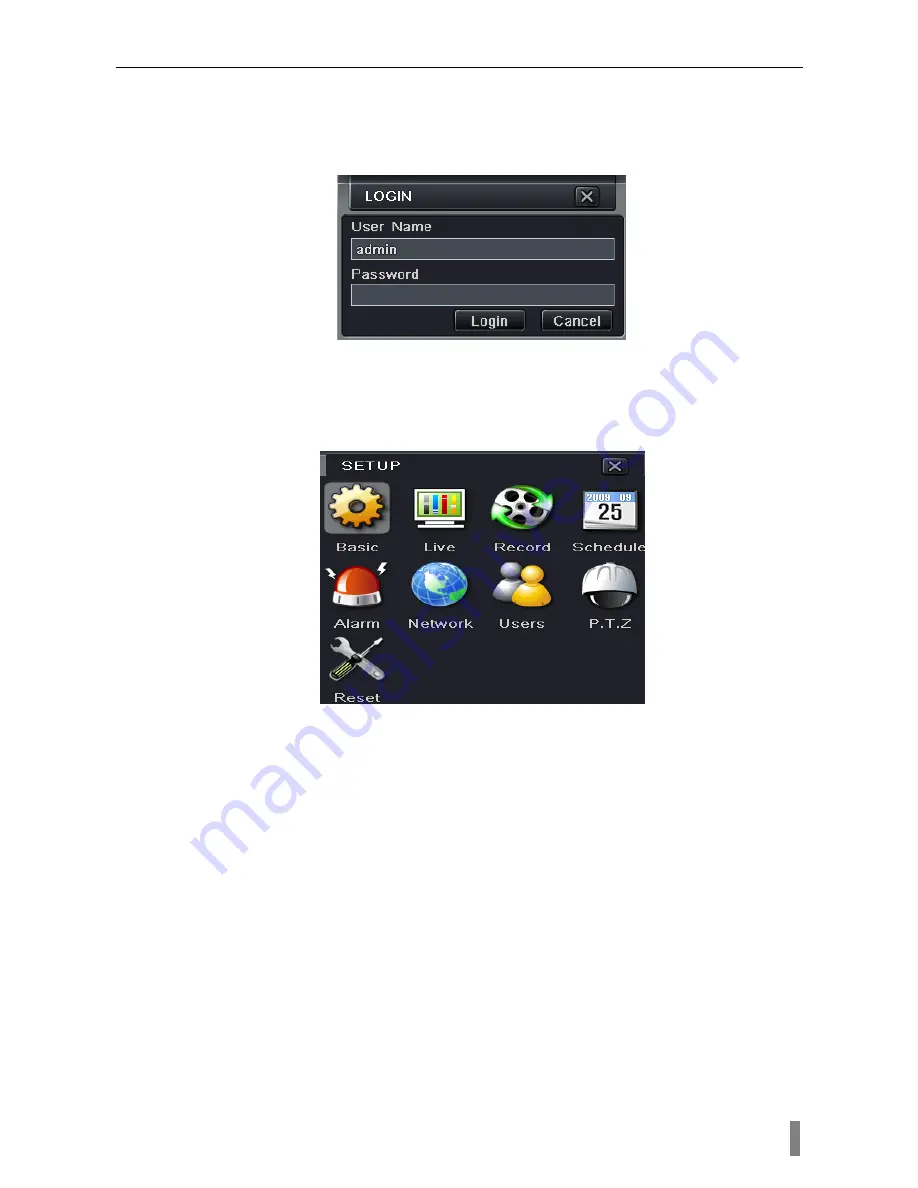
4.1.1   Login 

Press the MENU button which will bring the LOGIN dialogue box and enter 
the user name: admin and password: 123456 


Fig 4.1 Login 

4.1.2   Main menu setup   

Click right mouse, or press ENTER button on the front panel can enter into 
the main menu. Menu-System refer to Fig 4.2 


Fig 4-2 Main menu setup 

Basic configuration: user can set video system, menu language, audio, time 
and authorization check. 

Live configuration

User can set name/time display, picture color and hide 

cameras. 

Record configuration

User can set record quality, frame rate, resolution, time 

stamp and recycle. 

Schedule configuration: users can set schedule for timer, motion detection, 
and sensor alarm respectively. 

Alarm configuration: users can set sensor type, alarm trigger and buzzer 
alarm. 

Network configuration: Users enable network function, and configure IP 
address, DDNS, transmission video parameters here. 

User configuration: Administrator can add, delete users, and change their 
authorization 

PTZ configuration: users can set protocol, baud rate, address, presets and 

Summary of Contents for VDT2304SE

Page 1: ...VOOK VOOK premium DVR 1 QUICK START GUIDE VDT2304SE VDT2308SE VDT2316SE...

Page 2: ...calculate HDD capacity according to the recording setting Please refer to Appendix B Calculate Recording Capacity Step1 Unscrew and Open the top cover Step2 Connect the power and data cables Place th...

Page 3: ...ect to keyboard 11 1 ch relay output Connect to external alarm 12 5 V and Grounding 13 Connect to external sensor1 4 14 4 CH Audio input 2 2 Rear view for 8 ch DVR Fig 2 2 Rear view for 8 ch DVR 1 Vid...

Page 4: ...tton near the power port in the rear panel Step2 the device will be loaded and the power indicator will display blue Step3 before start a WIZZARD window will be pop up and show some information about...

Page 5: ...d authorization check Live configuration User can set name time display picture color and hide cameras Record configuration User can set record quality frame rate resolution time stamp and recycle Sch...

Page 6: ...e click again to stop 4 2 2 Schedule Recording Enter into main menu schedule configuration refer to Fig 4 3 Users can set different schedule time for every day in one week If user wants a special sche...

Page 7: ...menu Alarm configuration sensor alarm record refer to Fig 4 6 enable Detection first setup the device type Fig 4 6 sensor alarm record Enter into Trigger configuration select alarm out and recording...

Page 8: ...n day the date will show highlight Select a date press Search button click the time grid to set the play start time or input play record time manually The selected time match the blue grid Click Play...

Page 9: ...orts backup by USB Flash and USB HDD Enter into Backup interface refer to Fig 4 10 set the start end time select channels click Search button the searched data will be displayed in the data backup lis...

Page 10: ...2 Access DVR on WAN Input IP address Subnet Gateway If using DHCP please enable DHCP in both the DVR and router Enter Video to set network video parameters like resolution frame rate etc Forward IP ad...

Page 11: ...ame need apply for a domain name in a DDNS server supported by the DVR or router Then add to the DVR or router Open IE browser input IP address or dynamic domain name and enter If HTTP port is not 80...

Reviews: