Vook VDT2304FD Quick Start Manual Download Page 8

4/8/16DVR Quick Start Guide 

VOOK


premium DVR


8


settings. 

4.3  Playback 

This unit supports live record playback, time  search and event search. It 
displays full or 4 screens in playback.   
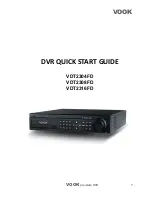
4.3.1   Live playback 

Click Play

button to playback the record. Refer to Figure4-7. User can do 

concrete operation by click the buttons on screen. 


Fig 4-7 live playback 
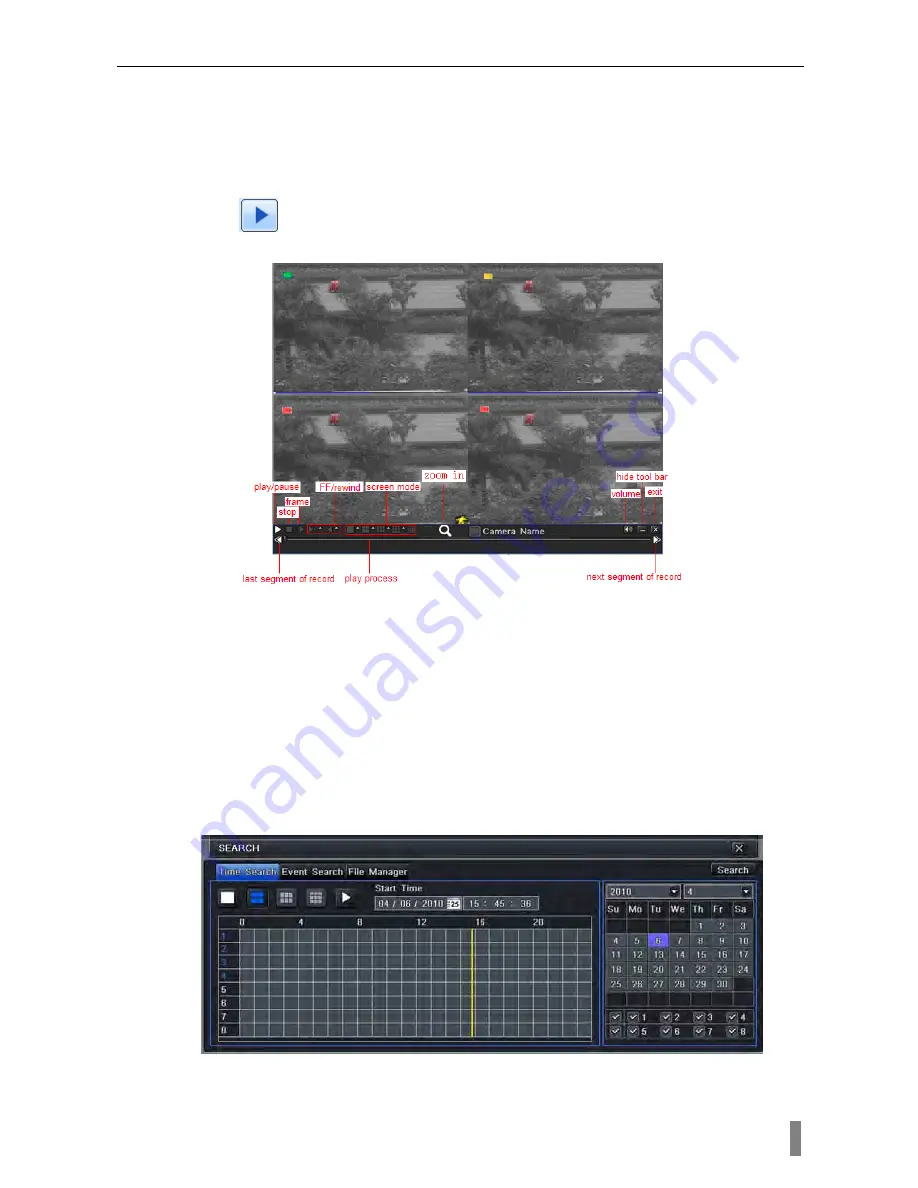
 

4.3.2   Time search 

Enter into Search configuration, select Time search. If it recorded in a certain 
day, the date will show highlight.   

Select a date, press Search button, click the time grid to set the play start time 
or input play record time manually. The selected time match the blue grid. 

Click Play button. It will play from the time point where user set. 

Click the relative buttons on the screen to do fast forward/rewind, pause, stop, 
and change the screen mode and re-search. 


Fig 4-8 time search 

4.3.3   Event search   

Summary of Contents for VDT2304FD

Page 1: ...VOOK VOOK premium DVR 1 DVR QUICK START GUIDE VDT2304FD VDT2308FD VDT2316FD...

Page 2: ...ding setting Please refer to Appendix B Calculate Recording Capacity STEP1 Unscrew and Open the top cover STEP2 Connect the power and data cables Place the HDD onto the bottom case as below Fig 1 1 Co...

Page 3: ...as an AUX output channel by channel Only video display no menu show 9 MIC IN talk 10 VGA output connect to monitor 11 connect to USB mouse 12 Network port 13 Connect to external sensor1 4 14 4ch rela...

Page 4: ...1 16 3 Loop out for outputting 1 16ch image independently 4 Connect to monitor as an AUX output channel by channel Only video display no menu show 5 16 CH Audio input 6 Audio output connect to the so...

Page 5: ...without menu display please check up whether other device has menu display firstly or long press ESC key to wait for login dialog box to appear Long press ESC key can switch the output between BNC and...

Page 6: ...er need to install and format a HDD and set all the recording parameters before recording There are four kinds of record modes 4 2 1 Manual Recording User can press REC button on the front panel after...

Page 7: ...rst Fig 4 4 Motion detection interface Enter Motion detection area refer to Fig 4 5 to set Sensitivity and Detection area Fig 4 5 motion detection area setup 4 2 4Alarm Recording Enter into main menu...

Page 8: ...4 7 live playback 4 3 2 Time search Enter into Search configuration select Time search If it recorded in a certain day the date will show highlight Select a date press Search button click the time gri...

Page 9: ...ly Double click a video file to playback Fig 4 9 Event search 4 4 Back up This unit supports backup by built in SATA DVD Writer with USB Flash and USB HDD Install DVD Writer refer to Chapter1 2 enter...

Page 10: ...rd correctly the default user name is admin and the password is 123456 and enter It will show the remote picture Note If the ActiveX cannot be downloaded or installed please refer to Appendix A Q7 in...

Page 11: ...connection succeeds The following steps are the same as STEP4 7 of the connection way above If users want to utilize dynamic domain name need apply for a domain name in a DDNS server supported by the...

Reviews: