05 During your trip
Refueling
05
212
Opening/closing the fuel filler door
The fuel filler door is located on the right rear
fender (indicated by an arrow beside the fuel
tank symbol on the information display
)
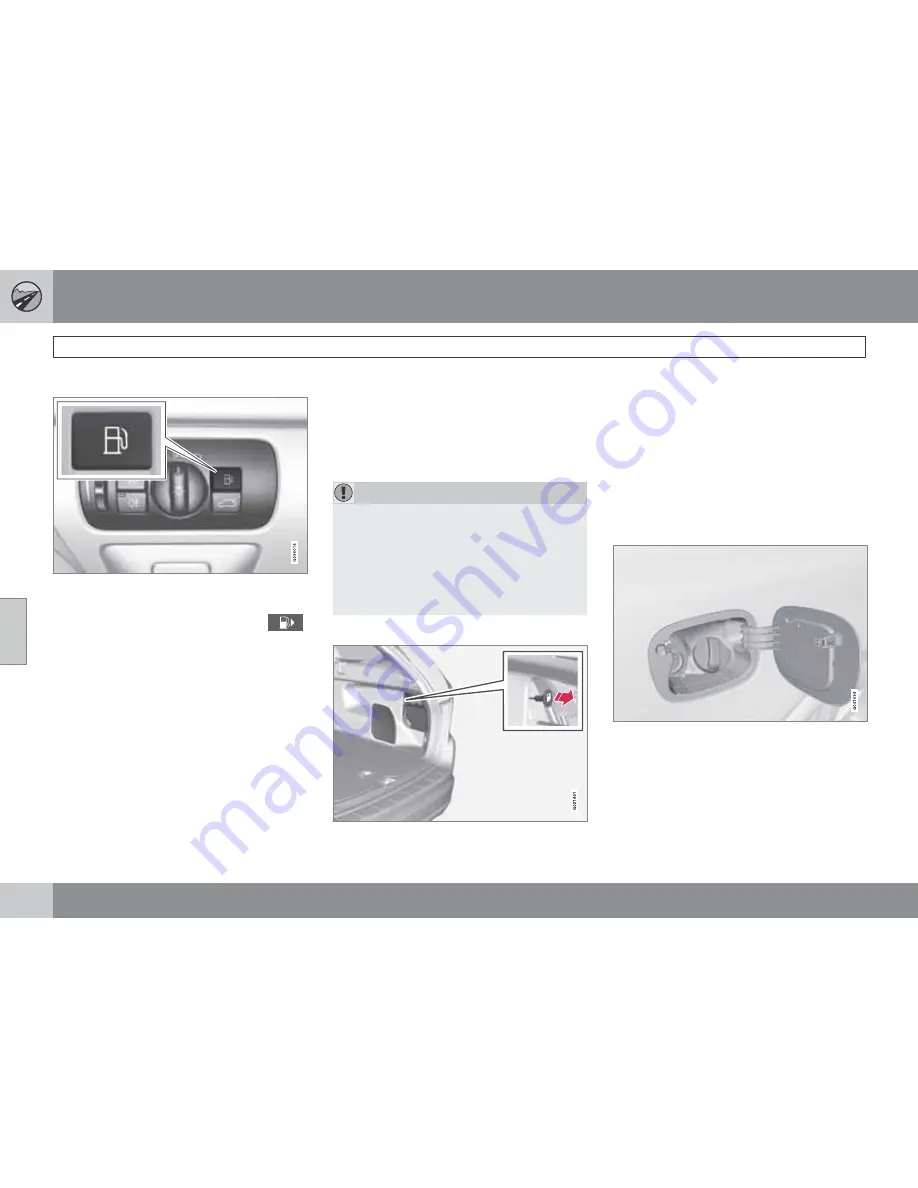
With the ignition switched off, press the button
on the lighting panel to unlock the fuel filler
door. Please note that the fuel filler door will
remain unlocked until the vehicle begins to
move forward. An audible click will be heard
when the fuel filler door relocks.
•
If you intend to leave your vehicle while it
is being refueled, this feature enables you
to lock the doors/tailgate while leaving the
fuel filler door unlocked.
•
You can also keep the vehicle locked if you
remain inside it during refueling. The cen-
tral locking button does not lock the fuel
filler door.
•
Be sure the fuel filler door is not obstructed
and is completely closed after refueling.
•
Open the fuel filler cap slowly during hot
weather.
Close the fuel filler door by pressing it a click
indicates that it is closed.
CAUTION
•
Avoid spilling gasoline during refueling.
In addition to causing damage to the
environment, gasolines containing
alcohol can cause damage to painted
surfaces, which may not be covered
under the New Vehicle Limited War-
ranty.
Manually opening the fuel filler door
If necessary, the fuel filler door can be opened
manually:
1.
Open the side hatch in the cargo compart-
ment (on the same side as the fuel filler
door).
2.
Grasp the green cord with a handle.
3.
Gently pull the cord straight rearward until
the fuel filler door clicks open.
Opening/closing the fuel cap
Fuel vapor expands in hot weather. Open the
filler cap slowly.
After refueling, close the fuel filler cap by turn-
ing it clockwise until it clicks into place.
Summary of Contents for XC60 2009
Page 1: ...VOLVO XC60 Owner s Manual Web Edition...
Page 2: ......
Page 7: ...Contents 7...
Page 15: ...01 SAFETY...
Page 53: ...01 Safety 01 53...
Page 54: ...54 Remote key and key blade 56 Keyless drive 63 Locks 66 Alarm 68...
Page 55: ...02 LOCKS AND ALARM...
Page 71: ...02 Locks and alarm 02 71...
Page 73: ...03 YOUR DRIVING ENVIRONMENT...
Page 74: ...03 Your driving environment Instruments and controls 03 74 Instrument overview...
Page 123: ...04 COMFORT AND DRIVING PLEASURE...
Page 200: ...04 Comfort and driving pleasure Passenger compartment convenience 04 200 Storage spaces...
Page 205: ...05 DURING YOUR TRIP...
Page 225: ...05 During your trip 05 225...
Page 227: ...06 MAINTENANCE AND SPECIFICATIONS...
Page 250: ...06 Maintenance and specifications Fuses 06 250 Engine compartment...
Page 284: ...06 Maintenance and specifications Label information 06 284 Location of labels...
Page 302: ...07 Index 07 302...
Page 303: ......
Page 304: ...Kdakd 8Vg 8dgedgVi dc IE JH6 8VcVYV 6I Eg ciZY c HlZYZc iZWdg 8deng i Kdakd 8Vg 8dgedgVi dc...

