Volvo VR100 Operating Instructions Manual Download Page 62

52

Compact Disc (CD) Player
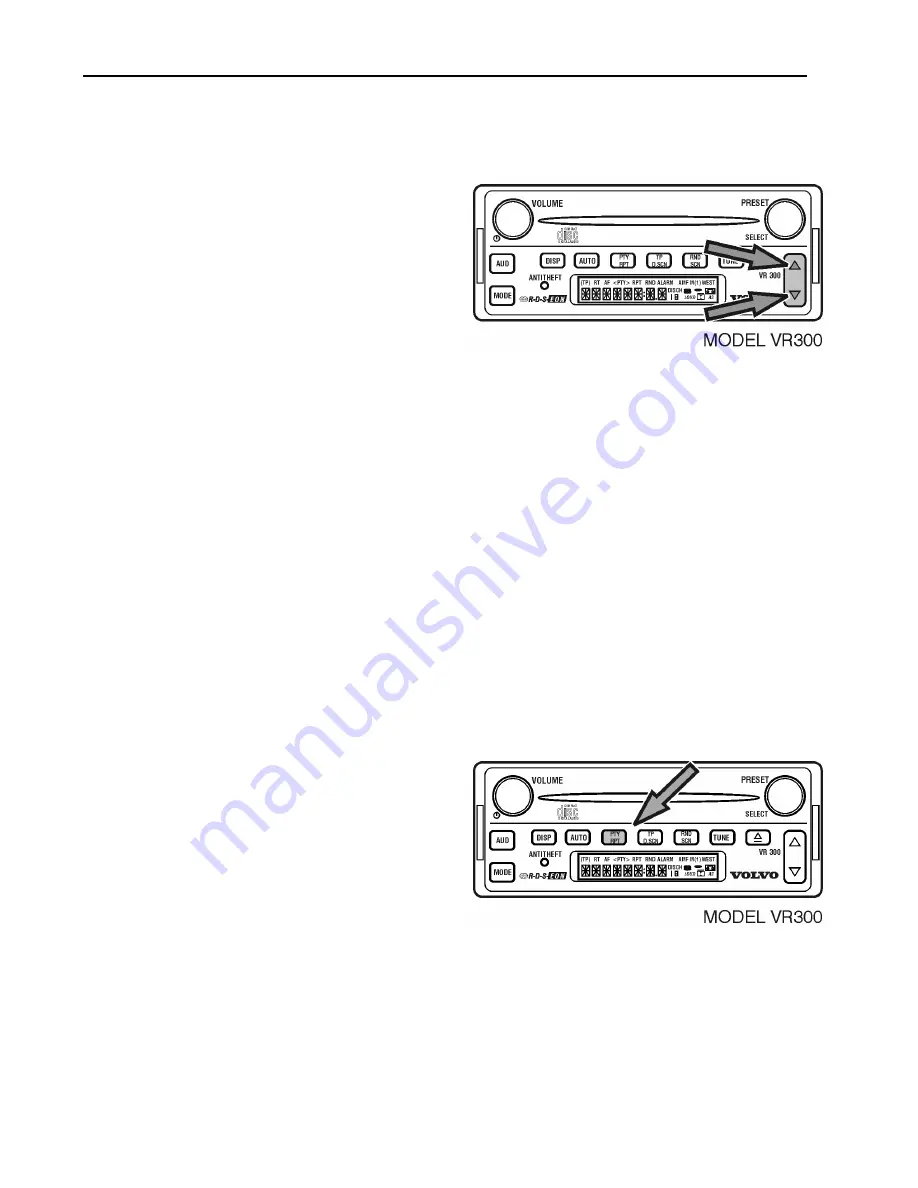
Fast Forward

To activate Fast Forward;

Press and hold the UP/DOWN rocker buttons
to FAST FORWARD. After 3 seconds, the
CD begins to fast forward until the rocker
button is released. The elapsed time is
displayed while the CD fast forwards.

Note: Because the audio disc is played at
a faster rate when fast forwarding, you will
be able to hear the audio but the quality will
not be normal.

Fast Reverse

To activate Fast Reverse; Press and hold
the UP/DOWN rocker buttons to FAST
REVERSE.

After 3 seconds, the CD begins to fast
reverse until the rocker button is released.
The elapsed time is displayed while the CD
reverses.

Note: Because the audio disc is played at a
faster rate when fast reversing, you will be
able to hear the audio but the quality will not
be normal.

Repeat Play Function

To repeat the current track;

Press the PTY/RPT button till RPT is
displayed. This repeats current track.

Press the same button to cancel REPEAT.

Summary of Contents for VR100

Page 1: ... 100 TP RT AF PTY RPT RND ALARM AMF M 1 WEST LOUD AS DISCH DISP AUTO TUNE LOUD TP PTY R D S R D S EON ANTITHEFT ANTITHEFT VR100 PRESET VOLUME AUD MODE SELECT VR 200 TP RT AF PTY RPT RND ALARM AMF M 1 WEST LOUD AS DISCH DISP TUNE R D S R D S EON DOLBY DNR AUTO PTY RPT TP D SCN RND SCN ANTITHEFT PRESET VOLUME AUD MODE SELECT VR 300 TP RT AF PTY RPT RND ALARM AMF M 1 WEST LOUD AS DISCH DISP AUTO TUNE...

Page 2: ......

Page 3: ...stomer The manual contains important usage and instructional information The National Highway Traffic Safety Administration NHTSA and Volvo Trucks North America Inc should be informed immediately if you believe that the vehicle has a defect that could cause a crash injury or death Contact NHTSA by calling the Auto Safety Hotline at 1 800 424 9393 or 1 888 327 4236 Send written complaints to NHTSA ...

Page 4: ......

Page 5: ... 200 VR 300 and VR 400 9 Alarm Clock ON OFF Snooze 11 Alarm Volume 12 One Hour Timer 12 Audio Controls 13 Audio Controls 13 Volume Control 13 Balance Control 14 Fade Control 15 Treble Control 16 Bass Control 17 Midrange Control Model VR 400 only 18 Loudness VR 100 Only 18 2 or 4 Speaker Select 19 Room Simulation Model VR 400 Only 20 Speed Dependent Volume Model VR 400 with Steering Wheel Controls ...

Page 6: ...7 Preset Scan VR 200 VR 300 and VR 400 37 Auto Store Presets 38 Emergency Broadcast Alert 39 Using the Cassette Player 40 Cassette Select 40 Cassette Tightening and Error Detection VR 200 and VR 400 40 Change Cassette Side 41 Stop and Eject 42 Pause Model VR 100 Only 42 Fast Forward Rewind 43 Radio Monitor Function 44 Next Music Search VR 200 and VR 400 45 Previous Music Search VR 200 and VR 400 4...

Page 7: ...ct 54 Repeat Track Function 54 Repeat CD Function 55 Random Track Function 55 Random CD Track Function 57 Scan Tracks Function 58 Scan CDs Function 59 Infrared Remote 60 Infrared Remote Accessory 60 Power ON OFF 60 Volume 60 Mute 60 Radio Select 61 Radio Tune 61 Radio Seek 61 Radio Presets 61 Cassette Select 61 CD Select Single Intergrated CD 62 Track Select 62 CD Changer Select 62 CD Select 62 St...

Page 8: ...3 Cassette FastForward Rewind 64 CD Track Select 64 CD Select 64 Additional Inputs Outputs 65 Additional Inputs Outputs 65 Switched Auxiliary Outputs 65 Low Level Audio Outputs 65 Auxiliary Audio Input 66 Index 69 ...

Page 9: ...d throughout this manual Note A note defines an operating procedure practice condition etc which is essential to the proper operation of the vehicle CAUTION A caution label directs the operator s attention to unsafe practices where personal injury is not likely but property damage could occur The caution label is a black type on a white background with a black border ...

Page 10: ......

Page 11: ... reference only and may differ slightly from the actual vehicle however key components of the radio are represented as accurately as possible Volvo Trucks North America Inc reserves the right to make changes at any time or to change specifications or design without notice and without incurring obligation Icons ICONS MEANING AUD AUDIO AUTO AUTOMATIC DISP DISPLAY PTY RPT PROGRAM TYPE FUNCTION REPEAT...

Page 12: ...rnal CD changer capability Model VR 300 1 Din AM FM CD player with external CD changer capability Model VR 400 2 Din AM FM Logic Cassette CD player with external CD changer capability In addition to the front panel controls for these radios most models can also be controlled using an optional remote wireless control or optional steering wheel mounted controls ...

Page 13: ... ashtray can be removed 2 There is a copy in the spare fuse bag which is inside the owner s information package provided from the factory Retain this code for future reference Vehicles built after March 3 2003 The security code is located on an adhesive label underneath the ashtray on top of the ashtray bracket Vehicles built before March 3 2003 The security code is located in the spare fuse bag w...

Page 14: ...er Turn SELECT to scroll to fourth number Press SELECT to select number If the code is entered correctly the radio will switch to the last active mode i e FM CD etc and is ready to use If the code is entered incorrectly you can try 2 more times After 3 incorrect entries the radio will display LOCK Note The radio can NOT be manually turned off it remains ON with a lock code message Note To unlock c...

Page 15: ... RDS Program Type Function PTY display language turn the radio OFF 1 Press and hold TP for 2 seconds 2 Turn SELECT to scroll through available languages English Español Français in US selected frequency bands After the desired language is displayed for 5 seconds the setting is saved and the display returns to the default ...

Page 16: ...old DISP for 3 seconds until the current country frequency band is displayed Press MODE to scroll through available bands AMERICAS EUROPE AUSTRALI JAPAN ARGENTIN SAUDI The selected band will be saved after 5 seconds Note When a new country is selected all preset stations from the previous country are erased Display Illumination All of the radio controls are illuminated for nighttime viewing Dimmin...

Page 17: ...dcast the DISP button may need to be pressed several times to see the time of day Setting the Clock 12 or 24 Hour Format You can select either a 12 hour or 24 hour style time display To change the time format Press and hold the SELECT button until 12 24 is displayed The number shown after 12 24 indicates which format is selected 12 hour or 24 hour To change this number press the SELECT knob After ...

Page 18: ...e SELECT button for 3 seconds Turn the SELECT button to show TIMESET Press the SELECT button Turn the SELECT button to the correct hour Press SELECT until minutes flash Turn the SELECT button to correct minutes After 5 seconds the setting is saved and the display returns to the default ...

Page 19: ...arm clock Press and hold SELECT for 3 seconds Turn the SELECT button to show ASET Turn the SELECT button to the correct hour If the radio is set to the 12 hour format AM or PM is also displayed After AM or PM is chosen then ALARM N or Y is displayed Press Y to set alarm or N if you do not want to set alarm ...

Page 20: ...he hour Press the SELECT button until minutes flash Turn the SELECT button to change minutes After 5 seconds the setting is saved and the display returns to the default Note If the radio is in the 12 hour format make sure the setting correctly shows AM or PM ...

Page 21: ... displayed If the radio is on when the alarm time is reached a beeping alarm sounds and the alarm time is shown If the radio is OFF when the alarm time is reached the last radio mode turns ON In either case if you press any of the radio buttons while the alarm is going OFF the alarm snoozes for 9 minutes After 9 minutes the alarm turns ON again and remains ON until snooze is activated or the alarm...

Page 22: ... to increase or decrease the volume of the alarm After 5 seconds the setting is saved and the display returns to the default One Hour Timer The radio can be set to play for one hour after which it will automatically turn off To turn the radio ON for another hour with the ignition OFF press the VOLUME knob After 1 hour of play the radio will turn OFF To turn the radio ON for another hour press the ...

Page 23: ... Volume Control While listening in any mode turn the VOLUME knob to adjust volume If you are currently adjusting the sound quality of the radio e g BASS TREB BAL FADE 1 Press the AUD button until VOL is displayed then 2 Turn the VOLUME knob to adjust volume Dynamic Distortion Limiting Dynamic Distortion Limiting automatically limits the audio distortion level caused by playing the radio too loud T...

Page 24: ...Controls Balance Control To adjust the left right balance 1 Press AUD repeatedly to display BAL 2 Turn VOLUME to adjust Balance OR Turn SELECT to adjust BALANCE After 5 seconds the display returns to the default ...

Page 25: ...To adjust fade control Press AUD repeatedly to display FADE Turn VOLUME to adjust sound between front and back speakers OR Turn SELECT to adjust sound between front and back speakers After 5 seconds the display returns to the default ...

Page 26: ...Controls Treble Control To adjust treble control Press AUD repeatedly to display TREB Turn VOLUME to adjust TREBLE W3005831 OR Turn SELECT knob to adjust TREBLE After 5 seconds the display returns to the default ...

Page 27: ...io Controls 17 Bass Control To adjust bass control Press AUD repeatedly to display BASS Turn VOLUME to adjust BASS W3005831 OR Turn SELECT to adjust BASS After 5 seconds the display returns to the default ...

Page 28: ... the display returns to the default Loudness VR 100 Only The Loudness feature boosts the low bass frequency response at low volume levels improving the sound quality The amount of boost automatically increases as volume is increased Press the LOUD button to turn ON The LOUD icon is displayed Press again to turn OFF All other models have an Auto Loudness function This feature cannot be turned ON or...

Page 29: ...ed To change this selection Press the SELECT knob for 3 seconds to display 12 24 Turn the SELECT knob to display SPKR Press SELECT to choose 2 or 4 When the 2 speaker option is chosen the rear speakers are disabled and the fade adjust setting does not function After 5 seconds the setting is saved and the display returns to the default ...

Page 30: ... talk radio because it filters much of the noise and moves the audio image forward LIVE Simulates the acoustics of live musical performance in a larger room AUDITORIUM The same effect as LIVE but more pronounced giving the feeling of an even larger room ARENA Creates the effect of being in a large arena DRIVER L or DRIVER R The sound from the driver side front speaker is delayed with respect to th...

Page 31: ...effect To change the degree of effect from 0 minimum to 15 maximum for the selected simulation 1 Press AUD to scroll RSIM to change the degree of effect 2 Turn the VOLUME knob to increase or decrease effect OR 3 Turn the SELECT knob to increase or decrease effect After 5 seconds the setting is saved and the display returns to default as indicated on the display ...

Page 32: ...an automatically adjust the volume based on your vehicles speed turning the volume up as you travel faster and down as you travel slower This adjustment helps the radio to be heard over vehicle and road noise To turn Speed Dependent Volume ON Press and hold SELECT to display 12 24 Turn SELECT to display SCV ...

Page 33: ...s SELECT to choose level of volume change to N off l low setting 2 medium setting or 3 high setting Note The volume change is heard only while the vehicle is moving but may not be noticeable due to the changes in road noise ...

Page 34: ... Updates are more frequent during severe weather Most NOAA weather stations broadcast 24 hours a day NOAA broadcasts on 7 channels In some areas more than one broadcast may be available Select the broadcast location closest to your location for the best reception Note The Weather Band option is only available when the country chosen is Americas See the Country Frequency Selection section Note Seve...

Page 35: ...the SELECT returns to its default function Seek The radio can automatically seek stations finding and stopping on the next station that exceeds the sensitivity level set To seek for a station in any tuner mode AM FM or WX the next higher or lower station on the current band Briefly press the UP DOWN arrows to SEEK The radio mutes as it searches for the next station with a strong signal When it fin...

Page 36: ...nals To adjust this sensitivity Press and hold SELECT to display 12 24 Turn SELECT to display SEEK Press SELECT to scroll between 2 min and 2 max After selecting SEEK the VOLUME knob can be rotated to scroll between the settings After 5 seconds the setting is saved and the display returns to the default The 2 setting will stop only on very strong signals The 2 setting will stop on weaker signals ...

Page 37: ...returns to the original volume After 5 seconds the audio mutes again and the radio continues the scan To stop the scan press the UP DOWN rocker button If no station is found in 2 passes through the band the scan will stop at the starting frequency RDS Radio Data System Features RDS transmits additional information encoded on an FM stations regular signal The RDS feature works only with FM broadcas...

Page 38: ...AF feature ON while in the FM mode 1 Press and hold TUNE for 3 seconds to display AF ON or AF OFF OR 2 Press the UP DOWN rocker button Note AF networks are common in Europe but rare in the US Traffic Program TP When the Traffic Program feature is turned on and a traffic announcement is received the radio will automatically interrupt the current mode to broadcast traffic condition announcements tha...

Page 39: ... no stations networks being received that broadcast traffic information This can also occur if the TP function is enabled but the radio travels out of the broadcast area for the station network that was broadcasting the traffic information Traffic Announcement Volume The volume of all traffic announcements can be reduced or increased by adjusting the volume while an announcement is being heard Whe...

Page 40: ... Jazz Sports Country etc 1 Press PTY to display PTY icon 2 Turn SELECT to scroll through available selections 3 Press UP DOWN arrows to SEEK or SCAN If a selection is not made within 10 seconds no PTY is saved and the radio returns to the default Note The PTY button may not function in all areas ...

Page 41: ...9 TOP 40 TOP_40 40_HIT_P 40_PRLES 10 COUNTRY MUSIC COUNTRY COUNTRY COUNTRY 11 OLDIES MUSIC OLDIES OLDIES OLDIES 12 SOFT SOFT SOFT MUS_SUAV 13 NOSTALGIA NOSTALGIA BIG_BAND NOSTALGIA 14 JAZZ MUSIC JAZZ JAZZ JAZZ 15 CLASSICAL CLASSICL CLASSIC CLASICOS 16 R B R AND B R AND B CONTMPOR 17 SOFT R B SOFT R B SOFT R B CONT_SUA 18 LANGUAGE LANGUAGE LANGUE IDIOMA 19 RELIGIOUS MUSIC REL_MUSC MUS_REL MUS_REL 2...

Page 42: ...m type then press and hold the PTY button for 2 seconds while the desired PTY is selected until is displayed and the chosen PTY icon is enclosed in brackets To cancel the interrupt press the PTY button and then rotate the SELECT knob to display the PTY designated by the Press and hold the PTY button for 2 seconds until is no longer displayed Note An RDS interrupt can not interrupt another RDS inte...

Page 43: ...rcials With this function off the radio will not switch to a network with similar programming To turn this function on or off press and hold the SELECT knob until 12 24 is displayed Then turn the SELECT knob until ACPT VAR is displayed You can choose from the following options To look for identical and similar stations choose ACPT VAR in US or REG OFF in Europe To look for only identical stations ...

Page 44: ...contest information etc Messages are available when the RT icon RT is displayed To view the messages press the DISP button until TEXT is displayed After 3 seconds the first line of the message is displayed After 2 seconds the next line of the message is automatically shown To scroll through the message at a faster pace press the DISP button Three seconds after the last line of text is displayed or...

Page 45: ...ature is active the radio will automatically interrupt the current programming to broadcast news programming To enable a news interrupt while in FM mode Press NEWS to enable a news interrupt Press the up or down arrows to SEEK news programming Press NEWS again to turn OFF ...

Page 46: ...s different bands Model VR 100 has 12 FM 12 AM and 6 WX preset channels All other models have 18 FM 12 AM and 6 WX preset channels To store a station as a preset tune to the desired station Push and release SELECT until STORE and a flashing preset number display Turn SELECT to change preset number Push SELECT to store station at that number STORE is cleared from the display and the preset number s...

Page 47: ...200 VR 300 and VR 400 The preset stations can be scanned through in each of the bands To Scan through presets Press RND SCN to display PSCN and begin scanning presets While scanning the radio pauses for approximately 5 seconds on each preset To stop the scan Press RND SCN again The scan continues until it is stopped Note When scanning through presets the radio will only stop on presets where the s...

Page 48: ...will stop after 18 stations 12 for Model VR 100 are found and stored If there are not enough strong stations to fill the presets the stations discovered will be duplicated until all memory locations are filled If no stations are found Auto Store will automatically cancel Press the AUTO button at any time to cancel the Auto Store function Note When Auto Store is turned off the presets that were sav...

Page 49: ...dcast is being heard When the next Emergency Broadcast is received the volume will automatically increase to this volume When the broadcast is over the radio will return to the previous volume setting of whatever radio mode was playing The Emergency Broadcast volume setting will be saved for all future announcements until it is adjusted again Note The volume cannot be adjusted lower than the minim...

Page 50: ...mode Cassette Tightening and Error Detection VR 200 and VR 400 Each time a cassette is inserted into the radio the player automatically checks for a loosely wound tape and tightens it before playing The player also detects tapes that are too tightly wound or broken If a tightly wound or bad tape is detected BAD TAPE is displayed and the tape is ejected The Cassette Tightening and Error Detection f...

Page 51: ...0 To play the opposite side of a playing cassette press the RW and FF buttons at the same time Model VR 200 and VR 400 Note Illustration used here is VR 400 however the instruction applies to both VR 200 and VR 400 To play the opposite side of a playing cassette Press SELECT For all models with cassette the cassette is automatically reversed when it reaches the end of a side ...

Page 52: ...eject the cassette when the radio is in another mode press the EJECT button Model VR 100 To eject the cassette press the EJECT button The tape is ejected and radio mode is activated Tapes can be ejected while the ignition is OFF Pause Model VR 100 Only Model VR 100 To pause a playing cassette Press the SELECT knob until MUTE is displayed To begin playing the cassette again Press the SELECT knob ag...

Page 53: ...el VR 200 and VR 400 To activate Fast Forward Press the Fast Forward button until FWD is displayed The activate Rewind Press the Rewind button until REV To cancel Fast Forward or Rewind Press the same button Note If the Radio Monitor is ON a different station can be searched while the cassette is in Fast Forward or Rewind mode While SEEKING the display shows FWS or REV along with the frequency num...

Page 54: ...ows the radio to be heard while fast forwarding or rewinding a cassette To turn Radio Monitor ON or OFF Press SELECT for 3 seconds to display 12 4 Turn to display MONI Press SELECT change between ON and OFF After 5 seconds the selection is saved and the display returns to the default ...

Page 55: ...ng of the next selection To fast forward to the next blank space on the cassette Press the UP DOWN arrow to display NEXT 1 To fast forward past several blank spaces Press the UP DOWN arrow repeatedly The number on the display shows how many blank spaces will be skipped If the end of the side is reached during a Next Music Search the cassette direction changes and begins to play the opposite side ...

Page 56: ...atedly If the beginning of the side is reached during a Previous Music Search the cassette begins to play at the beginning of the current side Note If the current selection has been playing for less than 8 seconds pressing the UP DOWN rocker button will fast rewind to the blank space before the previous selection Canceling a Next Previous Music Search To cancel a music search Press the UP DOWN arr...

Page 57: ...l reduce background noise on tapes that were recorded with this technology To turn on or turn off Dolby B type noise reduction press the button with the double D logo The double D icon will display while the noise reduction is on Manufactured under a license from Dolby Laboratories Dolby and the double D symbol are trademarks of Dolby Laboratories ...

Page 58: ...s with the cleaning cassette Cleaning cassettes should be replaced regularly Note The cleaning cassette is not included with your radio and must be purchased separately DO NOT touch the cassette head with magnetic or hard objects DO NOT lubricate the player mechanism Do not use cassettes that are longer than 90 minutes C 90 Longer cassettes like C 120 tend to have thinner tape that may stretch or ...

Page 59: ...use Cassette Clean Indicator The tape player will alert you that it should be cleaned by displaying the message TP CLEAN After the player is cleaned Press AUD for 5 seconds to clear display CLN RST is displayed for 3 seconds The display returns to the default If you experience poor sound quality from your cassette player try playing a different cassette tape to see if the tape or tape player is at...

Page 60: ...ess and hold the UP DOWN arrow untill CD is displayed Press the UP DOWN rocker button If you select the CD mode while no CD is loaded the radio displays NO CD and returns to FM mode CD Eject Press the EJECT button to eject a CD from the player CDs can be ejected even when the ignition is off If a CD is ejected but not removed within approximately 15 seconds the CD automatically reloads but does no...

Page 61: ...ast track is reached the player starts over at track 1 and continues to go up Previous Track to skip backward to the beginning of the current track Turn SELECT counter clockwise Continue turning the knob The player continues to move backward through previous tracks Once track 1 is reached the player skips to the last highest numbered track and continues to go down Note If the track has played for ...

Page 62: ... but the quality will not be normal Fast Reverse To activate Fast Reverse Press and hold the UP DOWN rocker buttons to FAST REVERSE After 3 seconds the CD begins to fast reverse until the rocker button is released The elapsed time is displayed while the CD reverses Note Because the audio disc is played at a faster rate when fast reversing you will be able to hear the audio but the quality will not...

Page 63: ...in to cancel function Scan Tracks Function CD Player The Scan Tracks function plays the first 10 seconds of each track in order To activate this function Press the RND SCN button till SCN is displayed To cancel scan 1 Press SELECT OR 2 Press and hold RND SCN button OR 1 Press MODE OR 2 Press and hold the UP DOWN rocker buttons ...

Page 64: ...ridge has not been inserted into the changer the radio displays NO CDX and return to the previous mode CD Select To select a CD in the changer 1 Press MODE until CD is displayed 2 Press the UP DOWN rocker buttons The CD number on the display changes to match the number of the CD selected and the CD begins playing Repeat Track Function To replay the current track Press PTY RPT once to REPEAT curren...

Page 65: ... the current CD Press PTY RPT twice The RPT icon and the flashing CDX icon RPT are displayed To cancel REPEAT Press MODE or PTY RPT once Random Track Function To play chosen tracks randomly on the current CD Press and hold SELECT until 12 24 is displayed ...

Page 66: ...nger Turn SELECT button to display RND SCN Press SELECT to choose 1 After 5 seconds the selection is saved Press RND SCN to activate function W3005846 The RND icon is displayed To cancel this function Press RND SCN again ...

Page 67: ...7 Random CD Track Function To play chosen tracks randomly from all CDs Press and hold SELECT until 12 24 is displayed Turn SELECT button to display RND Press SELECT to choose 6 After 5 seconds the selection is saved W3005849 ...

Page 68: ...unction Scan Tracks Function The Scan Tracks function plays the first 10 seconds of each track on the current CD To activate this function 1 Press SELECT 2 Press until RND SCN until SCN T is displayed To cancel this function Press and hold the same button OR 1 Press MODE OR 2 Press and hold the UP DOWN rocker button ...

Page 69: ...tion The Scan CDs function plays the first 10 seconds of the first track of each CD in the changer To activate this function Press and hold TP D SCN button until DISCSCAN is displayed To cancel this function Press and hold the same button ...

Page 70: ...OFF 2 Radio Preset 3 Volume Control 4 Cassette CD Select 5 MUTE button 6 CD Changer Select 7 Radio Band Select 8 Mode Volume Press the button to raise the volume or press the _ button to lower the volume VOL is displayed with the number that represents the volume level Mute Press the MUTE button to mute any mode MUTE is displayed To cancel the mute press the MUTE button again While muted CDs and c...

Page 71: ...o stop the tune Radio Seek Press the top or bottom of the SEEK button to seek the next station The audio mutes as the radio searches for and stops on the next station with a strong signal After finding a station the audio returns to the original volume Note Seek will cancel if no signal is strong enough for the radio to recognize it Radio Presets To listen to the preset stations choose the desired...

Page 72: ...eases depending on how many times the button is pressed CD Changer Select Press the CD changer button until the CD changer symbol and track number are displayed The last selected CD and track begin to play and the track number DISC icon and the CD number are displayed CD Select To choose another CD press the CD changer button until the desired CD number is displayed You can also press and hold the...

Page 73: ...ber that represents the volume level Radio Manual Tune While in the radio mode press the or button for 1 second to activate a slow tune Press the or button for 3 seconds to activate a fast tune Radio Seek Press the or button for less than 1 second to activate a Seek The audio mutes The radio searches and stops on the next station with a strong signal and the audio returns to the original volume Th...

Page 74: ...press the same button or CD Track Select While in CD mode press the or button to choose the desired track The track number on the display will increase or decrease depending on how many times the button is pressed CD Select While in CDX changer mode press and hold the and buttons at the same time until the desired CD number is displayed The numbers will increase without stopping until the button i...

Page 75: ...uts SAOs are available to power or control external devices such as a power antenna external amplifier or rear seat audio Model VR 100 has a single SAO All other Models have 3 SAOs Low Level Audio Outputs All radios except Model VR 100 have single ended connections for low level audio outputs for the right front left front right rear and left rear audio signals An optional amplifier is typically u...

Page 76: ...y selected by the telephone or navigation unit when properly connected through the control lines When either external audio source is selected the radio will display EX AUDIO along with any appropriate icons The radio audio functions can be adjusted in the same way as they are in other modes To override Auxiliary Audio mode Press and hold MODE for 5 seconds The radio returns to the previous operat...

Page 77: ...y shows Nav X where X is either L for left or R for the right speaker To change between the left and right speaker selection press the SELECT knob Phone audio can be directed to either the front or all 4 speakers To select the speakers for phone audio press and hold the SELECT knob for more than 3 seconds The display will show 12 24_XX Then rotate the SELECT knob through the various options until ...

Page 78: ......

Page 79: ...act Disc CD Player 50 Country Frequency Selection 6 D Display Illumination 6 Displaying the Time 7 Dolby Noise Reduction 47 Dynamic Distortion Limiting 13 E Emergency Broadcast Alert 39 Emergency Broadcast Volume 39 F Fade Control 15 G General Information 1 I Infrared Remote 60 L Language 5 Lock 3 Lock Code message See Security Code3 Loudness 18 Low Level Audio Outputs 65 M Midrange Control 18 Mut...

Page 80: ... Alarm Clock 9 Setting the Clock 7 Setting Time of Day 8 Speaker Select 2 or 4 19 Speed Dependent Volume VR 400 22 Steering Wheel Controls 63 Stop and Eject 42 Switched Auxiliary Outputs 65 System Overview 2 T Tape Player Care 48 Track Select Infrared Remote 62 Traffic Announcement Volume 29 Traffic Program TP 28 Treble Control 16 Tune 25 Tuning the Radio 24 U Using the Cassette Player 40 Using th...

Page 81: ......

Page 82: ......

Page 83: ......

Page 84: ... America Inc P O Box 26115 Greensboro NC 27402 6115 Volvo Trucks Canada Ltd 5600A Cancross Court Mississauga Ontario L5R 3E9 http www volvotrucks volvo com PV776 20 183276 USA 07 2003 Volvo Trucks North America Inc 2003 ...

Reviews: