background image

Group 21 Engine Body

94

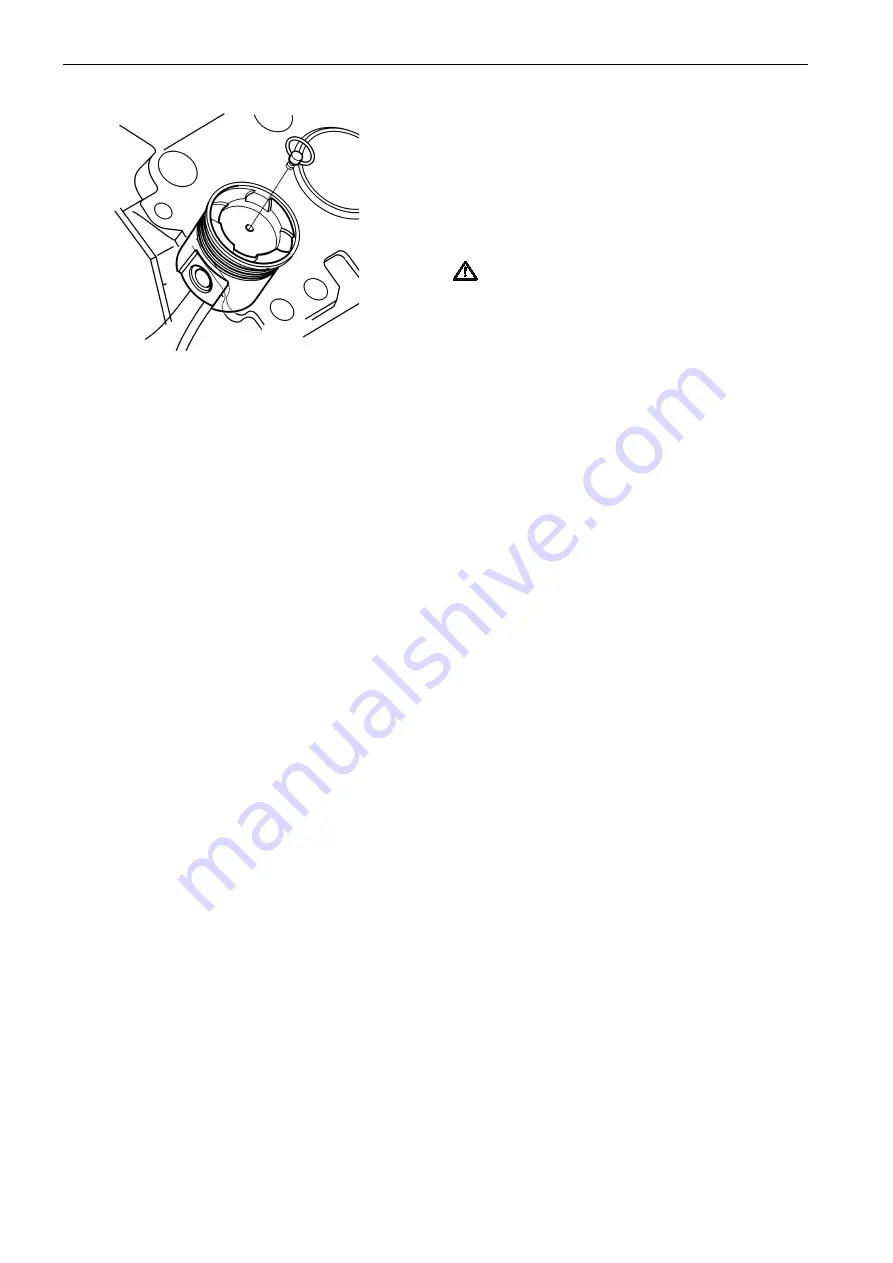
Using the Piston remover

1.

Turn the crankshaft to bring the piston assembly
to 50° after top dead center for the left bank.

2.

Attach the Piston remover to the top of the piston.
Grip the handle of the remover, then lift the piston
and the connecting rod off the liner.

 IMPORTANT!

Do not damage the piston when

you pull it out from the cylinder liner. Do not let
it hit the connecting rod with its skirt. Support
the connecting rod to avoid the cylinder liner
bore from scratching.

Removing the piston ring

Use the Piston ring tool to remove I the piston rings.

Removing piston pins

1.

Use the Ring pliers to remove the snap rings.

2.

Remove the piston pin to separate the piston
from the connecting rod.

3.

If it is difficult to pull out the pin, heat the piston
with a piston heater or in hot water to expand the
pin bore.

Plus d'informations sur : www.dbmoteurs.fr

Summary of Contents for D65A MS

Page 1: ...Workshop Manual H 2 0 D65A MS D65A MT Plus d informations sur www dbmoteurs fr ...

Page 2: ...Plus d informations sur www dbmoteurs fr ...

Page 3: ...gears and Camshaft Disassembly 117 Inspection and Repair 120 Reassembly 124 Crankcase Crankshaft and Main bearings Disassembly 128 Inspection and Repair 130 Reassembly 137 Group 22 Lubrication system Oil Pump and Safety Valve Disassembly 139 Inspection 140 Reassembly 142 Oil Filter Relief Valve Left Cooler and Thermostat Disassembly 143 Inspection 144 Reassembly 145 Right Side Oil Cooler and Oil T...

Page 4: ...ly 191 Thermostats 193 Heat Exchanger 194 Raw Water Pump Disassembly 195 Inspection 196 Reassembly 197 Group 30 Electrical System Starter Disassembly 200 Inspection and Repair 203 Reassembly 207 Alternator Disassembly 210 Inspection and repair 211 Reassembly 211 2003 AB VOLVO PENTA All rights reserved Content subject to change without notice Printed on environmentally friendly paper Plus d informa...

Page 5: ...gine However some proce dures e g certain adjustments require the en gine to be running Approaching an engine that is running is a safety risk Remember that loose clothes or long hair can fasten in rotating parts and cause severe injury A careless movement or dropped tool while working in the vicinity of an engine that is run ning can in the worst case lead to injury Ob serve caution with hot surf...

Page 6: ...s a very high pressure and pene trating force The fuel can penetrate deeply into bodily tissue and cause serious injury Risk of blood poisoning All fuels as well as many chemicals are inflam mable Make sure no naked flames or sparks can cause ignition Petrol certain thinners and hydrogen from batteries are extremely inflam mable and explosive when mixed with air Smoking is prohibited Ventilate wel...

Page 7: ...ent is used one to handle the equipment and one to make sure that com ponents are not damaged When working on board a boat always make sure in advance that there is sufficient space to allow dismantling in situ without the risk of personal injury or materi al damage WARNING The components in the electrical system and fuel system on Volvo Penta prod ucts are designed and manufactured to mini mise t...

Page 8: ... legible If you find any letter or picture illegible in a label remove soil from the label or replace it 2 Clean the label with cloth and water or cleanser Do not use organic solvent or gasoline this would dissolve the label s adhesive and cause the label to fall off 3 If any label is damaged lost or illegible replace it When replacing a label make sure the new label is identical to the old one Fo...

Page 9: ... legible If you find any letter or picture illegible in a label remove soil from the label or replace it 2 Clean the label with cloth and water or cleanser Do not use organic solvent or gasoline this would dissolve the label s adhesive and cause the label to fall off 3 If any label is damaged lost or illegible replace it When replacing a label make sure the new label is identical to the old one Fo...

Page 10: ...he use of non genuine Volvo Penta spare parts for the product in question will not be reg ulated by the warranty undertakings of Volvo Penta Certified engines For service and repair on an engine certificated for any area where exhaust emissions are regulated by law the following is important Certification means that an engine type is inspected and approved by the authorities The engine manufacture...

Page 11: ...ain elementary precautions and common sense can prevent most risks arising A clean workplace and en gine eliminates much of the danger of injury and malfunction It is of the greatest importance that no dirt or foreign particles get into the fuel system cooling system lubrication system intake system turbocharger bearings and seals when they are being worked on The result can be mal function or a s...

Page 12: ...ed as wet in text drawings and tables When so indicated apply engine oil to the threaded por tion of the fastener Unless indicated as wet the tightening torque should be dry Terms used in this manual Before you read this manual note that the following special terms are used in dimensional and other specifications Assembly standard Indicates the dimension of a part the dimension to be attained at t...

Page 13: ... technical data NOTE Pay attention to the marks on assemblies components and parts for positions or directions Put on your own marks if necessary to aid reassembly NOTE Carefully check each part for faults during removal or cleaning Signs of abnormal wear will tell if parts or assemblies are functioning improperly NOTE Use assembly bins to keep the parts in order of removal and lay down disassembl...

Page 14: ...p O rings Use an O ring guide to install an O ring over stepped parts splines threads or key way to prevent damage to the ring Apply a smear of grease to the O ring be fore installation 1 Check the seal lip for damage and be sure to po sition correctly in the housing 2 Apply a smear of grease to the surface of the oil seal to be fitted into the housing bore 3 Use an oil seal driver shown to guide ...

Page 15: ...roperly Drive each spring pin into position to hold it in place after later installation of parts has been completed Bearings 1 When installing a rolling bearing be sure to push the inner or outer race by which the bearing is fit ted Be sure to use a bearing driver like the one shown 2 Whenever possible use a press to minimize shock to the bearing and to assure proper instal lation Plus d informat...

Page 16: ...lever 6 Governor 7 Stop solenoid 8 Oil dipstick 9 Fuel feed pump 10 Oil filler cap 11 Fresh water pump 12 Lifting eye 13 Intake air silencer 14 Turbocharger 15 Alternator 16 Oil filters 17 Engine oil drain pipe 18 Starter motor 19 Manual speed control knob Presentation D65A MS Plus d informations sur www dbmoteurs fr ...

Page 17: ...op lever 6 Governor 7 Stop solenoid 8 Oil dipstick 9 Fuel feed pump 10 Oil filler cap 11 Fresh water pump 12 Lifting eye 13 Intake air silencer 14 Turbocharger 15 Heat exchanger 16 Oil filters 17 Starter motor 18 Engine oil drain pipe 19 Sea water pump 20 Alternator 21 Manual speed control knob Plus d informations sur www dbmoteurs fr ...

Page 18: ...ion or generator This infor mation must always be used as a reference when ordering service and spare parts Engine Product designation Serial and basic engine number Product number Certification IMO Decal part No Approval No Transmission Generator Product designation Serial number Product number Plus d informations sur www dbmoteurs fr ...

Page 19: ...e main parts Cylinder liner type Wet type Piston rings Compression rings pcs 2 Oil ring w expander pcs 1 Valve timing when warm Inlet valve open BTDC 37 Inlet valve close ABDC 44 Exhaust valve open BBDC 57 Exhaust valve close ATDC 24 Engine support method 4 point support Fuel system Fuel JIS K2204 TYPE 1 TYPE 2 TYPE 3 ASTM D975 No 1 D No 2 D BS2869 CLASS A1 CLASS A2 DIN51601 DIESEL FUEL ISO8217 DM...

Page 20: ...ston valve type Opening press MPa kgf cm psi 0 51 0 02 5 2 0 2 73 97 2 84 Oil cooler Type Water cooled multi plate type housed in the crankcase Full flow oil filter Type Paper element changeover type spin on Oil thermostat Type Wax type Valve opening temp C F 80 to 84 176 to 183 2 Cooling system Cooling type Water cooled forced circulation Coolant capacity whole engine liter U S gal MS 170 44 9 MT...

Page 21: ...ion mesh type Pinion shift Reduction type Output V kW 24 7 5 No of starters 2 No of pinion tooth ring gear tooth 15 182 Alternator Type 3 Phase alternating generator Internal IC regulator Manufacturer Mitsubishi Electric Output V A 24 35 Rated generated min 1 5000 at 27V 35A Regulated voltrage V 28 5 0 5 Drive belt type V belt Outside circumference mm in 1000 39 4 Plus d informations sur www dbmot...

Page 22: ...2 mm 0 8 in clearance valve side cold Nominal Value Inlet valve opens 2 5 BTDC 2 crank angle Inlet valve closes 13 ABDC 2 crank angle Exh valve opens 26 BBDC 2 crank angle Exh valve closes 10 5 BTDC 2 crank angle NOTE Values are only for checking valve timing and are different from the actual ones Valve clearance cold mm in Inlet valves Standard Clearance 0 6 0 024 Exhaust valves Standard Clearanc...

Page 23: ...rgin D mm in Nominal Value 3 0 0 12 Assembly Standard 2 8 3 2 0 110 to 0 126 NOTE Refacing permissible up to 2 5 0 098 Cylinder head bore and valve seat diameter mm in Nominal Value Ø60 2 36 Assembly Standard 0 070 0 130 0 00276 0 00512 NOTE minus indicates interference Valve push rods Deflection mm in Assembly Standard 0 5 0 020 maximum Service Limit 0 5 0 020 Valve springs Free length A mm in As...

Page 24: ...eter mm in Nominal Value Ø170 6 69 Assembly Standard 170 000 to 170 040 6 69290 to 6 69447 Repair Limit 170 200 6 70078 Service Limit 170 500 6 71259 Roundness mm in Assembly Standard 0 02 0 0008 or less Cylindricity mm in Assembly Standard 0 02 0 0008 or less Squareness of flange lower face to liner center line mm in Assembly Standard 0 03 0 0012 or less Protrusion of cylinder liner at flange mm ...

Page 25: ...e general value can be obtained at the cylinder bore Gaps Oil ring mm in Assembly Standard 0 3 to 0 45 0 012 to 0 018 Service Limit 2 0 0 079 NOTE If gauge is not available the general value can be obtained at the cylinder bore Piston pins Diameter mm in Nominal Value Ø70 2 76 Assembly Standard 69 987 to 70 000 2 75539 to 2 75590 Service Limit 69 970 2 75472 Connecting rods Bushing inside diameter...

Page 26: ...7 Assembly Standard 3 347 to 3 360 0 13177 to 0 13228 Service Limit 3 305 0 13012 Thickness of center 1 00 0 0394 mm in Nominal Value 3 500 0 13780 Assembly Standard 3 472 to 3 485 0 13669 to 0 13720 Service Limit 3 430 0 13504 NOTE Replace bearings if worn down to service limit Regrind crankpins and use undersize bearings if necessary Oil pump drive Cover bearing journal inside diameter mm in Nom...

Page 27: ...Value Ø100 3 94 Assembly Standard 99 985 100 000 3 93642 3 93701 Bearing Inside diameter mm in Nominal Value Ø45 1 77 Assembly Standard 44 988 to 45 000 1 77118 to 1 77165 Bearing Inside diameter mm in Nominal Value Ø50 1 97 Assembly Standard 49 988 to 50 000 1 96803 to 1 96850 Drive shaft bearing journal diameter mm in Nominal Value Ø45 1 77 Assembly Standard 45 002 to 45 013 1 77173 to 1 77216 D...

Page 28: ... 49 900 1 96456 Idle gear end play mm in Assembly Standard 0 2 to 0 4 0 008 to 0 016 Service Limit 0 6 0 024 Timing gears Backlash mm in Assembly Standard 0 12 to 0 18 0 0047 to 0 0071 Repair Limit 0 30 0 0118 Service Limit 0 50 0 0197 Idle gear shaft bushing inside diameter mm in Nominal Value Ø65 2 56 Assembly Standard 65 000 to 65 030 2 55906 to 2 56024 Service Limit 65 060 2 56142 Idle gear sh...

Page 29: ...nal Value 8 0 3 Assembly Standard 0 10 to 0 25 0 0039 to 0 0098 Service Limit 0 40 0 0157 NOTE Replace thrust bearing if necessary Crankshaft Crankpin diameter mm in Nominal Value Ø125 4 92 Assembly Standard 0 050 0 070 0 00197 0 00276 Repair Limit 0 110 0 00433 Crankpin journal diameter mm in Nominal Value Ø170 6 69 Assembly Standard 0 060 0 080 0 00236 0 00315 Repair Limit 0 110 0 00433 Journal ...

Page 30: ...eyond service limit Thickness of center 0 25 0 0098 mm in Nominal Value 4 625 0 18209 Assembly Standard 4 592 to 4 605 0 18079 to 0 18130 Service Limit 4 550 0 17913 NOTE Replace bearings if worn down to service limit Regrind crankpins and use undersize bearings if worn beyond service limit Thickness of center 0 50 0 0197 mm in Nominal Value 4 750 0 18701 Assembly Standard 4 717 to 4 730 0 18571 t...

Page 31: ...Service Limit Ø18 050 0 71063 Bearing length mm in Service Limit 17 440 0 68661 Shaft journal diameter mm in Nominal Value 18 0 709 Service Limit 17 996 0 70850 Shaft deflection mm in Service Limit 0 015 0 00059 Ring gap clearance mm in Standard Clearance 0 05 to 0 25 0 00197 to 0 00984 Shaft turbine wheel and turbine housing clearance mm in Standard Clearance 0 29 to 0 91 0 01142 to 0 03583 Shaft...

Page 32: ... Shaft end play mm in Assembly Standard 0 075 to 0 135 0 00295 to 0 00531 Turbine backplate and turbine wheel clearance mm in Standard Clearance 0 55 to 1 15 0 02165 to 0 05315 Turbocharger TD15 Inside diameter of bearing fitted housing section mm in Nominal Value Ø34 1 34 Service Limit 34 016 1 33921 Bearing outside diameter mm in Service Limit 33 882 1 33393 Bearing inside diameter mm in Service...

Page 33: ...earance 0 040 to 0 116 0 00157 to 0 00457 Clearance 0 21 0 0083 NOTE Remove the cover packing width of 0 04 0 0016 for mesurement Shaft diameter Drive shaft mm in Nominal Value Ø30 1 18 Assembly Standard 29 887 to 29 000 1 17665 to1 17717 Service Limit 29 840 1 17480 Shaft diameter Drive shaft mm in Nominal Value Ø30 1 18 Assembly Standard 29 947 to 29 960 1 17901 to 1 17953 Service Limit 29 900 1...

Page 34: ...040 4 33090 to 4 33227 NOTE Same as the bearing cover Bearing Outside diameter mm in Nominal value Ø120 4 72 Assembly Standard 119 985 to 120 000 4 72381 to 4 72441 Bearing Outside diameter mm in Nominal value Ø110 4 33 Assembly Standard 109 985 to 110 000 4 33012 to 4 33071 Bearing Inside diameter mm in Nominal value Ø55 2 17 Assembly Standard 54 985 to 55 000 2 16476 to 2 16535 Bearing Inside di...

Page 35: ...mp seals Repair Limit Replace if water leaks Bearing Repair Limit Replace if worn excessively Holder bearing bore inside diameter mm in Nominal value Ø110 4 33 Assembly Standard 109 995 to 110 030 4 33050 to 4 33188 Service Limit 110 030 4 33188 Bearing Outside diameter mm in Nominal value Ø110 4 33 Assembly Standard 109 985 to 110 000 4 33011 to 4 3307 Bearing Inside diameter mm in Nominal value ...

Page 36: ... 0 2 0 00787 Outside diameter at contact surface of camshaft oil seal mm in Nominal value Ø35 1 378 Assembly Standard 34 963 to 34 938 1 37649 to 1 37551 Service Limit 34 800 1 37001 Camshaft deflection mm in Assembly Standard 0 05 0 00197 Repair Limit 0 15 0 00591 Plunger Spring mm in Free length A mm in Assembly Standard 70 8 2 787 Perpendicularity B mm in Service Limit 1 8 0 071 Length under te...

Page 37: ...tions 30 strokes or less Feed pump feed rate pump at 600 rpm Assembly Standard 900 cm3 54 9 cu in 15 sec PSG governor drive Diameter of case bore drive shaft side bearing section mm in Nominal Value 52 2 05 Assembly Standard 51 988 52 018 2 04677 2 04795 Drive shaft side bearing Outside diameter mm in Nominal Value 52 2 05 Assembly Standard 51 987 52 000 2 04673 2 04742 Inside diameter mm in Nomin...

Page 38: ...ndard 21 22 0 83 0 87 Service Limit 13 0 51 Tension of brush springs N kgf lbf Nominal Value 44 13 4 5 10 Assembly Standard 39 23 49 03 4 0 5 0 9 11 Service Limit 39 23 4 0 9 maximum Armature shaft diameter rear mm in Nominal Value Ø14 0 55 Assembly Standard 13 941 13 968 0 54886 0 54992 Repair Limit Ø10 0 25 0 39 0 0098 Armature shaft diameter front mm in Nominal Value Ø25 0 98 Assembly Standard ...

Page 39: ...Clearance between shaft and metal End play of armature mm in Assembly Standard 0 3 to 0 7 0 012 to 0 028 End play of pinion shaft mm in Assembly Standard 0 2 to 0 8 0 008 to 0 031 Alternator Output current 27 V 2500 rpm At 2500 rpm Assembly Standard 30 A or higher when cold At 5000 rpm Assembly Standard 35 A or higher when hot Regulator adjusting voltage alternator at 5000 rpm load at 5 A or lower...

Page 40: ... 1 5 539 55 398 a Balance weight 22 x 1 5 490 50 362 Viscous damper 22 x 1 5 490 50 362 Ring gears 10 x 1 25 59 6 43 Rear idler shaft 20 x 1 25 392 40 289 Rear idler shaft nuts 18 x 1 5 196 20 145 Front gear case 12 x 1 25 59 6 43 Front gear case 16 x 1 5 216 22 159 Front plate 12 x 1 25 59 6 43 Front idler shaft 12 x 1 25 108 11 80 Front idler gear thrust plate 10 x 1 25 29 3 22 Exhaust manifold ...

Page 41: ... 5 7 5 47 54 Injection pipes 18 x 1 5 49 69 5 7 36 51 Fuel filter air vent plug 7 8 9 8 0 8 1 0 5 8 7 2 Fuel rack control lever 8 x 1 25 25 2 5 18 b Governor drivecase 12 x 1 25 108 11 80 Starter 12 x 1 25 59 6 43 Turbocharger compressor wheel nut 11 x 1 0 TD13 f g h Turbocharger V clamp 7 8 9 8 0 8 1 0 5 8 7 2 TD13 g a Wet apply lubrication oil to the threads of the nut and bolt b 2 step tighteni...

Page 42: ...amper 22 x 1 5 490 50 362 Ring gears 10 x 1 25 59 6 43 Rear plate 12 x 1 25 108 11 80 Rear plate 16 x 1 5 216 22 159 Rear idler shaft 20 x 1 25 392 40 289 Rear idler shaft nuts 18 x 1 5 196 20 145 Front gear case 12 x 1 25 59 6 43 Front gear case 16 x 1 5 216 22 159 Front plate 12 x 1 25 59 6 43 Front idler shaft 12 x 1 25 108 11 80 Front idler gear thrust plate 10 x 1 25 29 3 22 Exhaust manifold ...

Page 43: ... nozzle set screw 10 x 1 5 34 44 3 5 4 5 25 33 Injection nozzle inlet connector 16 x 1 5 64 74 6 5 7 5 47 54 Injection pipes 18 x 1 5 49 69 5 7 36 51 Fuel filter air vent plug 7 8 9 8 0 8 1 0 5 8 7 2 Fuel rack control lever 8 x 1 25 25 2 5 18 b Governor drivecase 12 x 1 25 108 11 80 Starter 12 x 1 25 59 6 43 Turbocharger compressor wheel nut 1 2 x 20 TD15UNF f i Turbocharger turbine housing 10 x 1...

Page 44: ... 5 8 42 102 10 4 75 M14 x 2 0 55 x 0 079 93 9 5 69 167 17 0 123 M16 x 2 0 63 x 0 079 139 14 2 103 251 25 6 185 M18 x 2 5 0 71 x 0 098 194 19 8 143 350 35 7 258 M20 x 2 5 0 79 x 0 098 272 27 7 200 489 49 9 361 M22 x 2 5 0 87 x 0 098 363 37 0 268 653 66 6 482 M24 x 3 0 94 x 0 12 468 47 7 345 843 86 0 622 M27 x 3 1 06 x 0 12 686 70 0 506 1236 126 0 911 Standard eyebolts Thread Strength classification...

Page 45: ...0 M27 x 1 5 1 06 x 0 059 157 16 116 150 M30 x 1 5 1 18 x 0 059 196 20 145 180 M30 x 1 5 1 18 x 0 059 196 20 145 200 M33 x 1 5 1 30 x 0 059 245 25 181 220 M36 x 1 5 1 42 x 0 059 294 30 217 254 Dry High pressure fuel injection pipes Cap nut size Strength classification diameter x pitch mm in Nm kpm lbf ft M12 x 1 5 0 49 x 0 059 39 5 4 0 5 29 3 6 M14 x 1 5 0 55 x 0 059 49 5 5 0 5 36 3 6 M18 x 1 5 0 7...

Page 46: ...ont gear case and timing gear case Sealant refer to parts catalogue Oil Seals Lubricant Engine oil How to use Coat lip of each oil seal Drive case Sealant refer to parts catalogue How to use Apply to flange surface Cylinder head gasket Sealant refer to parts catalogue How to use Apply around tappet chambers Lubrication system Oil pump Cover and case Sealant refer to parts catalogue How to use Coat...

Page 47: ...pring pusher 885410 Valve guide remover 885413 Valve guide and seal installer 885386 Valve lapper 885452 Ring pliers 885425 Cylinder liner remover 885414 Piston ring tool 885396 Idler bushing puller 885443 Piston installer 885420 Connection rod bushing installer Plus d informations sur www dbmoteurs fr ...

Page 48: ...erpump shaft pulley nut 885447 Tool for lifting piston 885446 Waterpump pliers 885424 Impeller remover 885455 To remove oil and water pump plate and flywheel 885451 Nozzle tester 885439 To remove and install snap ring 885441 To remove and install snap ring 885428 Injection coupling gauge Plus d informations sur www dbmoteurs fr ...

Page 49: ...l seal 885430 Valve seat cutter shaft 885431 Valve seat cutter 885448 Liner pusher 885429 Bolt for liner pusher 885432 Spacer for liner pusher head bolt 885450 To measure crankcase counter bore depth 885449 To tighten cylinder head bolts Plus d informations sur www dbmoteurs fr ...

Page 50: ...related to the need of an engine overhaul B and G are more likely to be affected substan tially by Injection volume of the fuel injection pump Fuel injection timing Wear of injection pump plunger Fitting of the injection nozzle Condition of equipment battery starter or alternator Testing the compression pressure Measure the compression pressure at regular inter vals to obtain correct data If the c...

Page 51: ... some clearance If the timing mark 1 8 is aligned with the pointer either the No 1 or No 8 piston is at top dead cen ter on the compression stroke Adjust valve height IMPORTANT Clearance between valve yoke and rotator should be min 1 5 mm 0 059 in If not interference will occur and cause the valve cones to get out of place If clearance is less than 1 5 mm 0 059 in after valve adjustment consult yo...

Page 52: ...ection sequence turning the engine with each cylin der piston at top dead center on compression stroke Firing order 1 9 6 14 2 10 4 12 8 16 3 11 7 15 5 13 Example After checking and adjusting the cylinder No 1 turn the engine 60 and check and adjust the cylinder No 12 Cylinder No 1 9 6 14 2 10 4 12 8 16 3 11 7 15 5 13 Timing 0 60 90 150 180 240 270 330 360 420 450 510 540 600 630 690 Adjust valve ...

Page 53: ...ut a socket to the hexagonal end of the shaft and turn the shaft with a ratchet handle for turn ing 4 After turning the engine pull the shaft back to the RUN position secure the shaft with the locking device and tighten the plate bolts Make sure the plate is secured properly WARNING Before starting the engine make sure the turning gear is in the RUN position and is locked Plus d informations sur w...

Page 54: ...in the left filter bleed position and loosen the left air vent plug 2 Turn the priming pump plunger counterclockwise to unlock the mechanism 3 Move the plunger up and down until fuel free of air flows out then tighten the air vent plug 4 Put the fuel filter switching cock in the neutral po sition and repeat the procedure with the other fuel filter Plus d informations sur www dbmoteurs fr ...

Page 55: ...pressure in the priming pump 4 Tighten the priming pump cap by hand until the tightening force increases normally this occurs after approximately 70 to 90 degrees Mark this position on the priming pum 5 Tighten the priming pump cap an additional 120 to150 degrees using a wrench IMPORTANT If the priming pump cap is tight ened too much more than 240 degrees in to tal the top of the pump might be dam...

Page 56: ...nder have some clearance If these valves have no clearance turn the engine once again to align the timing mark 1 8 NOTE Do not mix the No 1 cylinder with No 8 When the piston for the No 1 cylinder is in the above mentioned position its inlet and exhaust valve are seated presenting some clearance 3 Turn back the engine approximately 60 degrees and turn it in the normal direction slowly until the sp...

Page 57: ...stroke 2 Loosen the bolts C for the fuel injection pump coupling 3 Turn the coupling flywheel until the timing mark B on the coupling flywheel aligns with the pointer A on the fuel injection pump 4 Tighten the one nut for fuel injection pump cou pling Turn the engine to tighten the other side nut 5 Turn the engine two turns to recheck the injec tion timing for verification Plus d informations sur ...

Page 58: ...d control lever is in idling po sition measure engine rpm 2 If idling speed is out of the specified range reset with the adjust screw 1 Check and adjust no load max speed setting 1 Move speed control lever to max speed mea sure engine rpm 2 If max speed is out of the specified range reset with the governor set bolt 2 3 Manually change the engine speed to test the governor response its ability to s...

Page 59: ... tension of belt properly 4 While maintaining this condition tighten lock nut and the mounting bracket bolts 5 Set the front belt cover properly Alternator 1 Remove the V belt cover 2 Loosen the mounting bolts 1 of the alternator and the adjusting rod 2 3 Loosen the upper and lower side lock nuts 3 of the adjusting rod NOTE Turn the nut below the adjusting rod to the left to tighten 4 Set the tens...

Page 60: ...iately stop the engine and investigate the cause 1 Lubricating oil pressure should be 0 49 to 0 64 Mpa 5 to 6 5 kgf cm2 71 to 92 psi at rated speed or over 0 20 to 0 29 Mpa 2 to 3 kgf cm2 28 to 43 psi at idling speed 2 Coolant temperature should be 71 to 85 C 165 top 185 F 3 Check for leakage of oil coolant fuel especially oil pipe connections for turbocharger lubrication 4 Knocking should die awa...

Page 61: ...U S gals Whole engine WARNING Hot engine oil can cause personal injury if it contacts the skin Be careful when draining the oil Engine Auxiliaries Removal Removing the belt cover and tension pulley 1 Remove the front belt cover 1 and 2 2 Loosen the adjusting bolt of the tension pulley 3 then remove the V belts 3 Unscrew each mounting bolt of the tension pul ley then remove the tension pulley Remov...

Page 62: ...g bolts and remove it Raw water pump weight approx 35 kg 77 2 lb 4 Remove the pump bracket 13 5 Remove the bracket 14 6 Remove the pipe stays 15 and 16 Removing the thermostats 1 Remove the coupling 1 2 Remove the bypass pipes 2 and 3 3 Remove the right and left hand thermostat hous ings 4 4 Remove the thermo brackets 5 and 6 Plus d informations sur www dbmoteurs fr ...

Page 63: ...haust manifolds 1 Remove the couplings 1 and flexible joints 2 2 Remove the exhaust manifolds 3 to 4 3 Remove the exhaust connectors 5 4 Remove the exhaust manifolds 6 to 13 5 Remove the manifolds stay 14 to 18 NOTE When reinstalling manifold gaskets make sure the MANIFOLD indication on each gasket faces the mainfold side Plus d informations sur www dbmoteurs fr ...

Page 64: ...t pipe joints 7 then remove seal rings 8 4 Remove the turbocharger brackets 9 and 10 5 Remove the exhaust pipe 11 6 Remove the exhaust pipe brackets 12 Removing the turbochargers and the exhaust pipe 1 Remove the turbocharger oil pipes 1 Oil pipe 2 Oil pipe 3 Oil pipe 4 Drain connector Plus d informations sur www dbmoteurs fr ...

Page 65: ...lide the air cooler element 8 towards the front and re move Air cooler element weight approx 60 kg 132 lb 6 Remove the plates 9 and 10 at the front med rear 7 Slide the air cooler case 11 towards the front and remove 8 Using thread 4 locations M8 x 1 25 mm 0 31 x 0 049 in on the air cooler element slide the air cooler element 12 towards the front and remove 9 Remove the plates 13 and 14 at the fro...

Page 66: ...3 Remove the govenor 3 Removing the speed control 1 Remove the lock nut from the governor lever 1 to disconnect th econtrol cable 2 from the gover nor lover 2 Remove the control bracket 3 and the speed control knob as a set Removing the oil pump 1 Remove the connection stay 1 from the oil pipe located under the oil pump 2 Unscrew the oil pump mounting bolts then re move the oil pump 2 Weight appro...

Page 67: ...pumps 2 Remove the R H link 2 and the L H link 3 3 Remove the link lever 4 and the R H lever 5 on the right side 4 Remove the link lever 6 and the L H lever 7 on the left side 5 Remove the spring 8 and the L H lever 9 6 Remove each bearing cover 10 on both right and left side 7 Remove the the snap ring 11 the pipe 12 and the control shaft 13 8 Remove the R H lever bracket 14 and the L H lever brac...

Page 68: ...pe clamp 3 Pipe seat 4 Pipe clamp 5 Pipe clamp 6 Clamp 7 Clamp 8 No 1 injection pipe 9 No 2 injection pipe 10 No 3 injection pipe 11 No 4 injection pipe 12 No 5 injection pipe 19 No 12 injection pipe 20 No 13 injection pipe 21 No 14 injection pipe 22 No 15 injection pipe 23 No 16 injection pipe WARNING Cover the openings of the injection pump the nozzle inlet connector and the injec tion pipe to p...

Page 69: ...moving the fuel leak off pipes right and left hand 1 Remove clips and dismount fuel leak off pipes 1 Flexible pipe 2 Clamp 3 Seat 4 Clamp 5 8 Fuel pipe 6 7 Fuel leak off pipe 9 Leak pipe Plus d informations sur www dbmoteurs fr ...

Page 70: ...er and fuel pipes right and left hand 1 Remove clamps and clips and dismount fuel pipes 1 Clamp 2 Seat 3 to 9 Fuel pipe 10 Flexible pipe 2 Remove the fuel filter brackets 11 and dismount the fuel filters 12 Plus d informations sur www dbmoteurs fr ...

Page 71: ...and the drain pipe 3 of the right side 2 Remove the coupling cover 4 3 Remove two coupling connecting bolts 5 4 Remove pump mounting bolts 6 and 7 5 With the coupling attached to the injection pump leave the laminated plate on the drive shaft lift the injection pump to dismount 6 Unscrew the bracket mounting bolts and remove the brack et 8 Weight approx 60 kg 132 lb Plus d informations sur www dbm...

Page 72: ...l cooler inlet connector mounting bolts and disconnect the connector 3 4 Remove the oil thermostat 4 5 After unscrewing the oil filter bracket mounting bolts remove the filter bracket 5 complete with the oil cooler Weight approx 50 kg 110 lb Removing the oil filler and the oil level gauge 1 Remove oil filler 1 by unscrewing mounting bolts 2 Remove the oil level gauge 2 by unscrewing mounting bolts...

Page 73: ...and adjust the injection timing Refer to Section 1 3 of Chapter 5 Adjustments and Bench Testing Fuel Injection Pump Installations Right Injection pump 1 Turn the crankshaft in normal direction to align the timing mark 1 8 on the viscous damper with the pointer NOTE Verify the injection timing by referring to the caution plate attached to the No 1 rocker cover 2 Move the No 1 cylinder inlet and exh...

Page 74: ...ywheel and coupling then tighten the bolts to specified torque NOTE Only the side marked with GO should fit into the gap If not loosen the bolt and readjust the clear ance Flywheel and coupling clearance mm in Standard clearance 49 0 25 1 93 0 010 10 Tighten the pump mounting bolt 4 firmly Be sure that the coupling mark B aligns with the pump case pointer A Tighten the two connect ing nuts 5 to sp...

Page 75: ...edures described for the right in jection pump Adjust injection quantities of pumps 1 Check to make sure the output shaft of the gover nor is positioned on the side marked with 0 no injection side 2 Install governor lever 1 at an angle of 20 3 Install links 2 on the right and left hand banks making sure that the installation length is 62 0 7 mm 2 4 0 028 in 4 Install the link 3 on the right hand b...

Page 76: ...st the clearance between le ver 5 and follower 6 to be from 0 5 to 1 0 mm 0 020 to 0 039 in 4 Tighten nuts 2 and 3 Inspection 1 Cut off power to solenoid 1 extended 2 After adjusting the exhaust temperature run the engine at high idling speed 3 Supply electric current to solenoid 1 contracted condition 4 After the engine stops completely check to make sure the distance between the rack end surface...

Page 77: ... hole F Distortion cracks G Matching wear H Worn stem or face corrosion damage or carbon deposits I Cracks damage deterioration rubber parts cracked J Worn ends distortion K Worn cam contact face or sliding surface L Replace gasket Group 21 Engine Body Cylinder heads and valve mechanism 15 Push rod 16 Rocker case 17 Water outlet connector 18 Cylinder head bolt 19 Cylinder head 20 Inlet port packin...

Page 78: ...moving the rockershaft assemblies 1 Loosen the adjusting screw of each rocker 2 Store the shaft assembly and mounting bolts to gether as a set Disassembling rockershaft assemblies Arrange the disassembled rockers in the order re moved so you can install them in that order at reas sembly This will ensure the same rockershaft clear ance as before Remove the valve bridge Remove the valve bridge and b...

Page 79: ...gasket IMPORTANT Do not damage the cylinder head or crankcase surfaces when you remove the gasket with a screwdriver or other tool Removing valves and valve springs Use the valve spring pusher to compress the valve spring squarely then remove the valve cotters NOTE If the valves are to be reused do not change the combination of the valve seat and valve guide Removing studs guides etc Do not remove...

Page 80: ...ndard 36 000 36 040 1 41732 1 41889 Service limit 36 090 1 42086 Rockershaft diameter mm in Normal Value Ø36 1 42 Assembly Standard 35 966 35 991 1 41598 1 41697 Service limit 35 940 1 41496 Replacing rocker bushings Use the Rocker bushing tool to remove the rocker bushings for replacement NOTE Press a new bushing into the rocker from the chamfered side 1 of the bore NOTE Align the oil holes in th...

Page 81: ...10 015 0 39370 0 39429 Service limit 10 060 0 39606 Replacing valve guides and stem seals 1 Use the Valve guide remover to remove the valve guide for replacement 2 Use the Valve guide seal installer to install slowly a new guide with a press IMPORTANT The installation depth for the valve guide is specified so use the Valve guide seal installer to secure the correct depth IMPORTANT Do not apply any...

Page 82: ...alve face after the inspection or replacement of the valve guide NOTE When you press the valve coated with red lead into the valve seat do not rotate the valve A Good contact B Bad contact Valve seat mm in Angle A Assembly Standard 30 Valve sinkage depth B Assembly Standard 0 2 0 2 0 008 0 008 Repair limit 1 0 0 039 Width C Assembly Standard 2 15 2 45 0 0846 0 0965 Repair limit 2 8 0 110 Valve mar...

Page 83: ...een the cutter and valve seat 2 Lap the valve in the valve seat NOTE Cut or grind the valve seat only as needed for refacing NOTE Replace the valve seat if the seat width is more than the repair limit as a result of wear or cut ting NOTE Replace the valve seat if the valve sinkage exceeds the repair limit after refacing Replacing valve seats 1 Weld a stud 1 to the valve seat 2 Insert a shaft 3 int...

Page 84: ... 130 2 36614 2 36732 Cylinder head bore Valve seat clearance standard clearance 0 070 0 130 0 00276 0 00512 B Nominal value 3 6 0 142 C Nominal value 8 0 0 315 D Nominal value 11 6 11 7 0 4567 0 4606 A minus indicates interference 3 Chill the valve seat in liquid nitrogen 70 C 274 F for more than 4 minutes with the cylinder head kept at normal temperature or heat the cyl inder head to 80 to 100 C ...

Page 85: ...me in con tact with the valve Stern NOTE Use a compound of 120 to 150 mesh for initial lapping and a compound finer than 200 mesh for fin ish lapping NOTE Mixing the compound with a small amount of engine oil will facilitate coating Valve spring clearance and free length Measure the free length and clearance of each valve spring If the free length or clearance perpendiculari ty exceeds the service...

Page 86: ...ts if their cam contact faces are ab normally worn Measuring valve pushrod deflection If the deflection exceeds the assembly standard re place the push rods Push rod deflection mm in Assembly standard Less than 0 5 0 020 max Cylinder Head Measuring head gasket flatness of surface Use a straight edge and feeler gauges to measure warping on each cylinder head If warping exceeds the repair limit refa...

Page 87: ... the diagram on the right Spread the liquid gasket with a finger to a thick ness of 0 2 to 0 5 mm 0 008 to 0 020 in NOTE Liquid gasket should be applied to areas indi cated in the diagram on the right Do not apply an ex cessive amount of liquid gasket since it can press the head gasket O rings and cause deformation NOTE Do not allow liquid gasket to adhere within an area of 10 mm 0 394 in around t...

Page 88: ...re the protrusion of each piston Make sure that the protrusion is correct 1 Install the exhaust connector to the cylinder head while pushing down the exhaust connector so it touches the edge of the bolt hole NOTE Place the gasket so its MANIFOLD printed side aligns with the connector side 2 Install the Eye nut to the stud bolt and lift up the cylinder head assembly Locate the head aligning its hol...

Page 89: ...ps 1 Coat the bridge guides with engine oil A then install the bridges to the guides with the adjusting screws positioned on the exhaust manifold side 2 Coat the bridge contact face of the bridge caps A with engine oil Install the caps in position be ing careful not to let them fall into the crankcase through the push rod holes Installing rocker shaft assemblies 1 Install the spacer A on the rocke...

Page 90: ... into the cyl inder head aligning its connector hole with the rocker case hole IMPORTANT The grease must be high temp resistant and must not cover the nozzle holes 4 Tighten the fuel inlet connector to the specified torque 5 Tighten nozzle gland mounting nut to the speci fied torque NOTE Maintain equal distances between the fuel in let connector and the cylinder head before tightening the gland to...

Page 91: ...hing 12 Connecting rod bearing Look for A Wear scratches damage B Fatigue C Scratches cracks damage wear carbon deposits on outside surface D Cracks clogged oil hole E Scratches wear on inside surface rust on outside surface F Damage G Wear scratches discolored inside surface H Scratches seizure wiping out of overlay on both sides I Damaged threads Cylinder liners Pistons and Connecting rods Plus ...

Page 92: ...ng the piston assembly from which the connecting rod cap has been re moved to top dead center 2 Turn the crankshaft in reverse until the crank pin comes off the connecting rod and the bolt hole of the rod is visible through the inspection hatch on the side of the crankcase 3 Cover a bar with a cloth for protection Put the tip of the bar under the bottom of the big end of the connecting rod and pry...

Page 93: ... the crankcase 7 Hold the piston pin portion of the piston and lift the piston assembly off the liner Removing pistons in left bank cylinders Removal procedure is the same as that for removing pistons in right bank cylinders The only difference is that the position of the crank pin and the direction of the crankshaft rotation for removal are reversed 5 When the oil ring of the piston comes out of ...

Page 94: ...l it out from the cylinder liner Do not let it hit the connecting rod with its skirt Support the connecting rod to avoid the cylinder liner bore from scratching Removing the piston ring Use the Piston ring tool to remove I the piston rings Removing piston pins 1 Use the Ring pliers to remove the snap rings 2 Remove the piston pin to separate the piston from the connecting rod 3 If it is difficult ...

Page 95: ...inder liner protrusion at flange A mm in Assembly standard 0 11 0 20 0 0043 0 0079 IMPORTANT If the protrusion is less than the assembly standard the gasket will fail to seal the bore resulting in gas leakage When cylinder head has just been removed 1 Clean the gasketed surface of the crankcase and the top of the liners 2 Secure the top of the liner uniformly at four plac es with the Liner pusher ...

Page 96: ...nter bore depth A mm in Assembly standard 14 00 14 05 0 5500 0 5520 5 Measure the thickness of the cylinder liner collar Measuring step height of cylinder liner collar 1 Place a dial gauge on the rim of the liner collar and set the indicator to 0 zero 2 Measure the cylinder liner step at four locations and obtain the average Cylinder liner step height mm in Assembly standard 0 16 0 24 0 006 0 010 ...

Page 97: ... attach them to the new cylinder liner A black o ring B red o ring Carefully insert the liner into the bore of the crankcase 3 Lightly tap liner on the top with the installer so it rests on its flange on the counterbore in the crankcase After seating the liner tap on it sever al times more to secure the proper seating IMPORTANT After installing the liners on all bores test the liner fitting for wa...

Page 98: ...fects are found Measuring piston diameter Measure the diameter of each piston perpendicular A to the piston pin and 30 mm 1 18 in below the center of the piston pin B If the service limit is ex ceeded replace the piston If any pistons have to be replaced select new pistons so that weight difference in an engine is within assembly standards Piston diameter mm in Normal value Ø170 Ø6 69 Assembly sta...

Page 99: ... 0256 Cylinder head gasket thickness mm in Assembly standard 1 77 to 1 83 0 0697 to 0 0720 Piston top and cylinder head clearance mm in Assembly standard 1 22 to 1 95 0 0480 to 0 0768 IMPORTANT Keep the piston protrusion within assembly standard range to prevent the valves from stamping on the piston and to maintain high engine performance Measuring piston pin bore diameter Using calipers or a cyl...

Page 100: ...iston NOTE Use a piston to place the piston ring in the lin er by pushing it squarely Piston ring gap Top ring mm in Standard clearance 0 6 0 8 0 024 0 031 Service limit 2 0 0 079 Piston ring gap Second ring mm in Standard clearance 0 6 0 8 0 024 0 031 Service limit 2 0 0 079 Piston ring gap Oil ring mm in Standard clearance 0 3 0 45 0 012 0 018 Service limit 2 0 0 079 Plus d informations sur www ...

Page 101: ... if necessary Insert the piston pin and make sure that the pin rotates freely without rattling To inspect the rod bend when assembled with the piston place the piston on a surface plate Insert a round bar of the same diameter as the crank pin into the big end bore then measure heights A and B of the bar Connecting rod bend C D mm in Assembly standard 0 05 100 max 0 0020 3 9 Connecting Rods Bearing...

Page 102: ...ay over crankpin Weight difference of connecting rods in an engine When replacing connecting rods make sure that the weight difference of connecting rods in an engine is within the assembly standards below Weight difference of connecting rods g oz Assembly standard 30 1 06 Big end bore diameter Measure the connecting rod big end bore diameter in directions 3 4 and 5 and at front and rear positions...

Page 103: ...3 000 0 11811 Assembly standard 2 9 72 2 985 0 11701 0 11752 Service limit 2 930 0 11535 Bearing thickness 0 25 0 0098 mm in Nominal value 3 125 0 12303 Assembly standard 3 097 3 110 0 12193 0 12244 Service limit 3 055 0 12028 Bearing thickness 0 50 0 0197 mm in Nominal value 3 250 0 12795 Assembly standard 3 222 3 235 0 12685 0 12736 Service limit 3 180 0 12520 Bearing thickness 0 75 0 0295 mm in...

Page 104: ...se the Ring pliers to install the snap rings in the grooves of the piston Make sure that the rings are not fatigued and that they fit in the grooves properly NOTE Position the ends of both snap rings at the bottom of the pin bore Piston rings 1 Use the Piston ring tool to install the piston rings on the piston IMPORTANT The top piston ring and second piston ring are marked RH and the oil ring is m...

Page 105: ...osition of about 50 after top dead center Connecting rod bearing upper shells Install the upper shell of the bearing in the rod by fitting its locating lug in the lug groove of the rod A Coat the inside surface of the shell with engine oil Make sure the oil holes in the rod and bearing are aligned Inserting pistons 1 Put the connecting rod in the cylinder liner and carefully rest the piston on top...

Page 106: ...il spring B Gap of top compression ring C Gap of second compression ring D Gap of oil ring 3 Hold the compression ring portion of the piston and carefully insert the piston into the cylinder liner NOTE Do not pinch your fingers between the oil ring and cylinder liner Insert the piston slowly not to damage the oil ring 5 Lightly tap on the piston head with a soft head mallet to insert the piston in...

Page 107: ... by tapping Move the large end of this rod in the thrust direction Make sure that the rod has correct end play insert feeler gauges while tightening 5 Tighten the cap bolts to the specified torque NOTE Tighten connecting rod cap bolts according to the angle method Tighten to 245 N m 25 kgf m 181 lbf ft then 60 more 6 Use feeler gauges to measure the end play of the connecting rod Make sure that th...

Page 108: ...ear 10 Idler shaft 11 Front plate Look for A Worn seal lip B Roughness in rotation C Wear nicking chipping defective splines D Wear E Wear nicking chipping abnormally worn bushing F Clogged oil hole wear G Cracking defective dowel pin hole H Cracking defective dowel pin hole I Worn lip nicking deterioration J Cracking oil leakage Viscous damper and front gears Plus d informations sur www dbmoteurs...

Page 109: ...late by screwing the two jack bolts A 885455 M12 x 1 25 mm 0 47 x 0 049 in evenly into the plate Oil pump gear Remove the oil pump gear with the bearing Front gear case 1 Attach a sling to the front gear case 2 Unscrew the front gear case mounting bolts Re move the lifted gear case by sliding it until the gear case comes apart from the positioning dow el pin Be careful not to damage the oil seal o...

Page 110: ...nd play of the idler gear to obtain the data for replacement Refer to chapter Maintenance Standards Table Idler gear Unscrew the thrust plate mounting bolt and remove the idler gear Idler shaft Do not remove the idler shaft unless it is needed When needed remove it by unscrewing the mounting bolts and screwing the two jack bolts A Ml0 x 1 25 mm 0 39 x 0 049 in evenly Plus d informations sur www db...

Page 111: ...cklash mm in Standard clearance 0 12 0 18 0 0047 0 0071 Service limit 0 50 0 0197 Oil pump drive Diameters of bearings and bearing fitted sections Rotate the bearing and replace it if it is not smooth Check the fittings of following items and replace them if they show any evidence of excessive wear Drive shaft and bearing Drive case and bearing Drive shaft and oil seal Cover bearing bore mm in Nom...

Page 112: ...mit 49 900 1 96456 Idler gear end play Measure the end play with feeler gauges or dial gauge If the idler gear end play exceeds the service limit replace the thrust plate Idler gear end play mm in Standard clearance 0 2 0 4 0 008 0 016 Service limit 0 6 0 024 Replace idler bushing 1 Use the Idler bushing puller to remove the bush ing 2 Install a new bushing to the gear by pressing it until the end...

Page 113: ...h with the bottom of the crankcase Cut off the excess of the packing neatly along the edge of the plate Installing the idler shaft 1 Insert the idler shaft using the guide bolts 2 Tighten the shaft mounting bolts to the specified torque Installing the idler gear 1 Insert the idler gear into the shaft and install the thrust plate 2 Install the thrust plate then tighten the mounting bolts to the spe...

Page 114: ...he front plate Cut off the excess packing along the edge of the cover 6 Install the oil seal 2 to the front gear case 1 7 Apply engine oil to the lip of the oil seal 8 Insert the oil seal to the slinger 3 to a distance of 15 7 16 3 mm 0 588 0 612 in A using the special tool Front seal installer assembly When the Pointer is out of place To determine the top dead center on the compression stroke of ...

Page 115: ...Group 21 Engine Body 115 Disassembly 1 Oil pipe 2 Oil pan 3 Oil pan packing 4 Oil strainer Look for A Clogs B Replace C Cracks Oil pan and Oil strainer Plus d informations sur www dbmoteurs fr ...

Page 116: ...sembly is done in the reverse order of disas sembly 1 Fit the O ring to the oil passage of the oil pan mounting surface 2 Fit the packing to the oil pan by applying sealant to the 4 separated sections Plus d informations sur www dbmoteurs fr ...

Page 117: ...t plate 9 Camshaft 10 Rear plate 11 Nozzle plate 12 Cover Look for A Clogged oil hole B Damage wear C Rough bearing rotation damaged seal D Flaking or wear E Clogged oil wear F Cracks damaged dowel holes G Wear damaged or deteriorated lip H Damaged threads I Cracks defective dowel holes worn ring gear Flywheel Timing gears and Camshaft Plus d informations sur www dbmoteurs fr ...

Page 118: ... idler shaft thrust collar mounting nuts Mark the collar position 3 Screw bolts M6 x 1 0 mm 0 24 x 0 039 in through the thrust collar removing bolt holes and pull the thrust collar from the gear case NOTE Place marks to identify the right and left col lars to ensure proper backlash and end play in rein stallation Remove the timing gear case 1 Attach slings to the timing gear case 2 Unscrew the tim...

Page 119: ...ht Remove the idler shaft Do not remove the idler shaft unless you need to re pair it To remove install the sliding hammer to the idler shaft removing screw hole M22 x 1 5 mm 0 87 x 0 059 in Remove camshaft gears Unscrew the camshaft gear mounting bolts then re move the camshaft gear Remove camshafts Unscrew the thrust plate mounting bolts then pull out the camshaft from the crankcase Weight Appro...

Page 120: ...othly or if otherwise defective 3 Check the fit of the drive shaft in the bearing and the fit of the bearing in the drive case Replace excessively worn parts Bearing outside diameter mm in Nominal value Ø90 3 54 Assembly standard 89 985 90 000 3 54272 Bearing outside diameter mm in Nominal value Ø100 3 94 Assembly standard 99 985 100 000 3 93642 3 93701 Bearing inside diameter mm in Nominal value ...

Page 121: ... in Nominal value Ø65 2 56 Assembly standard 65 000 65 030 2 55906 2 56024 Service limit 65 2 56142 Idler gear shaft diameter mm in Nominal value Ø65 2 56 Assembly standard 64 951 64 970 2 55713 2 55787 Service limit 64 900 2 55512 Idler gear end play Measure the end play with feeler gauges or dial gauge If the idler gear end play exceeds the service limit replace the thrust plate Idler gear end p...

Page 122: ...Camshaft deflection mm in Assembly standard 0 05 0 0020 max Repair limit 0 08 0 0031 Measuring camshaft journal diameters Use a micrometer to measure each camshaft journal in two directions at right angles to each other If the diameter exceeds the service limit replace the cam shaft Camshaft journal diameter mm in Nominal value Ø84 3 31 Assembly standard 83 92 83 94 3 3039 3 3047 Service standard ...

Page 123: ...098 Service limit 0 40 0 0157 Replacing camshaft bushings Install the bushings in the crankcase then secure them in place with the set screws Before tightening the screws be sure that the screw holes in the bush ings and crankcase are aligned and that the oil holes in the bushings are aligned with those leading to the oil gallery in the crankcase Use a wide bushing as the bearing for the rear sect...

Page 124: ...the viscous damper mounting holes 2 Using these bolts turn the crankshaft with a bar to bring the No 1 cylinder piston to the top dead center Install idler gear shafts Fit the O ring to the idler shaft Apply grease to the O ring to insert the idler shaft into the crankcase At this time In this step make sure the TOP mark on the shaft is located at the top oil passage in vertical di rection Install...

Page 125: ...t the slinger to the crankshaft Installing the injection pump drive 1 Install the injection pump gear to the drive shaft then tighten it to the specified torque 392 N m 40 kgf m 289 lbf ft 2 Fit the O ring to the installation surface of the drive case Apply a thin coat of ThreeBond 1212 on the flange surface 3 Install the injection pump drive to the rear plate by aligning its matching mark to that...

Page 126: ...d exhaust valves of the No 1 cylinder Then insert a feeler gauge 0 05 mm 0 020 in thick between the bridge cap and rock er Slowly turn the crankshaft to find the position where the feeler gauge is firmly gripped the valve starts opening and the position where the gauge is released the valve starts closing Check that these positions coincide with the angular positions shown in the valve timing diag...

Page 127: ...n ter their holes 2 Coat the threads and the bolt bearing surface of the flywheel mounting bolts with engine oil Tight en the bolts to the specified torque Inspect the face and radial runouts of the flywheel Installing the pickup 1 Rotate the engine using the turning gear until a tooth of the ring gear is positioned at the center of the pickup mounting hole 2 Screw the pickup gently by hand into t...

Page 128: ...r 12 Crankshaft gear rear 13 Check valve 14 Piston cooling nozzle 15 Crankcase Look for A Scale damage cracks clogged oil holes B Wear scratching pitting scoring C Stripped threads D Wear E Clogged oil hole F Check valve movement G Scoring pitting flaking chipping cracks corrosion H Wear chipping abnormal tooth contact I Wear J Cracking K Stripped threads Crankcase Crankshaft and Main bearings Plu...

Page 129: ...lts M27 x 1 5 mm 1 06 x 0 059 in 2 Remove the thrust bearings from the No 9 bearing cap Do not damage the thrust bearings Removing the crankshaft 1 Remove the front upper halves of the thrust bearings by rotating them slowly 2 Carefully lift the crankshaft off the crankcase keeping it horizontal 3 Remove the rear upper halves of the thrust bearings on the crankcase Removing the piston cooling nozz...

Page 130: ...in diameter A mm in Nominal value Ø125 4 92 Assembly standard 0 050 0 070 0 00197 0 00276 Repair limit 0 110 0 00433 Crank journal diameter A mm in Nominal value Ø170 6 69 Assembly standard 0 060 0 080 0 00236 0 00315 Repair limit 0 110 0 00433 Pin Journal roundness mm in Assembly standard Dia diff 0 01 0 0004 max Repair limit 0 03 0 0012 Pin Journal cylindricity mm in Assembly standard Dia Diff 0...

Page 131: ...ylindricity Dia Diff 0 02 0 0008 max Journal diam undersize 0 50 0 0197 mm in Finishing dimension 169 42 169 44 6 6701 6 6709 Roundness Dia Diff 0 01 0 0004 max Cylindricity Dia Diff 0 02 0 0008 max Journal diam undersize 0 75 0 0295 mm in Finishing dimension 169 17 69 19 6 6602 6 6610 Roundness Dia Diff 0 01 0 0004 max Cylindricity Dia Diff 0 02 0 0008 max Journal diam undersize 1 00 0 0394 mm in...

Page 132: ...eplacement of the rear thrust bearings will generally be sufficient Thrust bearing journal length A mm in Nominal value 67 000 67 030 2 6400 2 64118 Crankshaft end play mm in Standard Clearance 0 20 0 40 0 0079 0 0157 Service limit 0 50 0 0197 Crankshaft Journal grinding dimensions oversize thrust bearings 0 25 0 0098 mm in Oversizes for Journal or Thrust bearings 67 25 2 6476 Oversizes for Journa...

Page 133: ...oil seal slinger Replace the slinger if it is pitted scratched or distort ed enough to cause oil leaks Remove the Slinger Use a gear puller to remove the slinger from the crankshaft Install the Slinger 1 Identify the front slinger and the rear slinger and pay attention to their attitudes A Front B Rear 1 Front cover 2 Timing gear case 3 Oil seal 4 Slinger 2 Use a slinger installer to install the h...

Page 134: ...lue Front side 0 106 0 171 mm 0 00417 0 00673 in Rear side 0 274 0 358 mm 0 01079 0 01409 in 2 Heat the gear to the range 180 to 200 C 356 to 392 F Do not heat the gear above 200 C 392 F 3 Drive the rear crankshaft gear onto the crank shaft by tapping the end face of the gear lightly with a copper hammer Be sure the crankshaft dowel pin enters the notch in the gear IMPORTANT Install the gear to th...

Page 135: ...ndard 4 592 4 605 0 18079 0 18130 Service limit 4 550 0 17913 Main bearing thickness center 0 50 0 0197 mm in Nominal value 4 750 0 18701 Assembly standard 4 717 4 730 0 18571 0 18622 Service limit 4 675 0 18405 Main bearing thickness center 0 75 0 0295 mm in Nominal value 4 875 0 19193 Assembly standard 4 842 4 855 0 19063 0 19114 Service limit 4 800 0 18898 Main bearing thickness center 1 00 0 0...

Page 136: ...ax Repair limit 0 2 0 008 NOTE Do not grind the crankcase more than neces sary to remove warpage Excessive grinding can cause the piston protrusion to exceed assembly stan dard Main bearing bore diameter Secure the end bearing cap to the specified torque and measure the bore diameter in the three direc tions Main bearing bore diameter mm in Nominal value Ø179 7 05 Assembly standard 179 000 179 025...

Page 137: ...rust bearings 1 Install the thrust bearings to the No 9 bearing seat of the crankcase with the oil groove side of the bearings facing out 2 After installing the crankshaft install the inner thrust hearing with the oil groove facing inside the crankcase Crankshaft 1 Wash the crankshaft with cleaning solvent and dry it with compressed air NOTE After washing the crankshaft make sure that the oil hole...

Page 138: ...et to drive in the metal caps evenly Bearing cap bolts 1 Temporarily tighten the bearing cap coated with engine oil Tighten the four bolts progressively and evenly to the specified torque 2 Tighten the left and right side bolts progressively and evenly to the specified torque 3 Make sure that the crankshaft rotates smoothly Crankshaft end play 1 Tighten No 1 through No 8 bearing cap bolts and side...

Page 139: ... 5 Driven gear 6 Driven gear 7 Bushing 8 Oil pump case Look for A Fatigue break wear B Cracks other damage C Worn broken spline D Damage wear E Replace packing F Damage wear G Damage wear H Cracks other damage Group 22 Lubrication system Oil Pump and Safety Valve Plus d informations sur www dbmoteurs fr ...

Page 140: ... is badly worn Drive gear and driven gear clearance mm in Nominal Value Ø60 2 36 Standard Clearance 0 100 0 148 0 00394 0 00583 Service Limit Tip clearance 0 35 0 0138 Measuring pump gear end clearance Use a dial gauge to measure thr clearance If the clearance exceeds the service limit replace the gears or case whichever is badly worn Pump gear end clearance mm in Nominal Value 72 5 2 854 Standard...

Page 141: ...ng inside diameter mm in Nominal Value Ø30 1 1 19 Assembly Standard 30 100 30 121 1 18504 1 18586 Service Limit 30 155 1 18720 Replacing oil pump bushings 1 Remove the oil pump bushing as needed If it is tooo difficult to remove the bushings replace the bushings and related parts as an assembly 2 When you install the pump cover bushing place the bushing joint positions as shown in the right drawin...

Page 142: ...se or decrease the thickness of shim inserted between the spring and spring cap nut For the thickness of a shim 1 mm 0 04 in cor responds to a change in pressure of 0 10 MPa 1 kgf cm2 14 2 psi Safety valve opening press MPa kgf cm2 psi Assembly Standard 1 27 0 13 13 1 3 185 18 5 Safety valve spring set length set force mm N in kgf lbf Assembly Standard 65 8 359 2 59 36 6 80 7 Service Limit 65 8 31...

Page 143: ... assy 7 Connector 8 Oil thermostat 9 Thermostat seal 10 Body assy 11 Cover 12 Cover 13 Drain cock Look for A Holes clogging cracks B Replace packing C Replace O rings D Replace O rings E Fatigue break wear of spring F Deterioration wear cracks G Wear cracks Oil Filter Filter Alarm Relief Valve Left Side Cooler and Thermostat Plus d informations sur www dbmoteurs fr ...

Page 144: ... mum speed 4 If the measured oil pressure is lower than the specified value adjust the valve opening pres sure by inserting shims For shim thickness 5 mm 0 2 in corresponds to a change in pressure of approximately 0 1 MPa 1 kgf cm2 14 psi Set pressure max speed MPa kgf cm2 psi Assembly Standard 0 49 0 64 5 0 6 5 71 12 92 46 Relief valve opening pressure Assembly Standard 0 50 0 02 5 0 0 2 71 10 2 ...

Page 145: ...e opens then mea sure it again when the valve lift is 11 mm 0 43 in Replace the thermostat if temperatures are not within standard Temperature for valve opening C F Assembly Standard 80 84 176 183 2 Temp for 11 mm 0 43 in valve lift C F Assembly Standard 95 203 IMPORTANT Stir the oil to maintain even tem peratures during the test IMPORTANT At reassembly confirm the valve opening temperature stampe...

Page 146: ...Oil Thermostat Inspection Follow the same inspection procedure as that for the left side oil cooler and oil thermostat If any deteriora tion is found replace them Reassembly Reassembly is the reverse procedure of disassembly 1 Replace packing and O rings for reassembly 2 Before reassembly clean the oil paths of the oil cooler cover etc by flushing them with oil then blowing them with compressed ai...

Page 147: ...7 Group 23 Fuel System Disassembly 1 Filter element 2 Bolt 3 Cover 4 O ring 5 Pin 6 Cock 7 Fuel filter bracket 8 Packing 9 Air vent plug Look for A Cracks damaged threads Fuel Filters Plus d informations sur www dbmoteurs fr ...

Page 148: ...ket into con tact with the sealing surface of the bracket tighten the filter with your hand about one half to three quarters of a full tum Bleed the filter NOTE After installing the fuel filter on the engine start the engine and look for leaks Reassembly 7 5 4 6 8 3 2 1 Reassembly sequence Plus d informations sur www dbmoteurs fr ...

Page 149: ... screw 3 O ring 4 Retaining nut 5 Nozzle 6 Spacer 7 Pushrod nozzle spring spring seat 8 O ring 9 Nozzle holder 10 Fuel inlet connector Look for A Fatigue damage length B Wear damage C Carbon deposits clogged spray hole sticking needle valve Plus d informations sur www dbmoteurs fr ...

Page 150: ...sting screw To increase the injection pressure tighten the screw To de crease the injection pressure loosen the screw 3 After completing the adjustment tighten the set screw and the cap nut to the specified torque 4 Re check the injection pressure to be sure that it is correct Spray pattem 1 When you are testing the injection pressure in spect each nozzle for clogged or leaking holes Also examine ...

Page 151: ...ng assemble the needle valve and body in clean diesel fuel NOTE The needle valve and body are finely finished Do not change the pairing of needle valve and body when cleaning more than one nozzle at the time 4 Tighten the retaining nut to the specified torque 5 If the spray pattem is still bad after the nozzle has been adjusted and cleaned replace the nozzle NOTE New nozzle tips are coated with va...

Page 152: ... retaining nut to the specified torque Excessive torque on the retaining nut will cause sticky movement of the needle and will result in exhaust smoke or the needle stick NOTE Always replace all o rings at reassembly 1 9 3 8 7 6 5 4 10 2 Plus d informations sur www dbmoteurs fr ...

Page 153: ...oil seal bearing outer race 23 Shim 24 Lower spring seat 25 Plunger 26 Plunger spring 27 Upper spring seat 28 Pinion 29 O ring 30 Barrel 31 Pump case 32 Rack bushing Look for A Fatigue B Wear and cracks on teeth wear of sliding surfaces C Ridges caused by abrasion cracks D Wear scratches E Damage F Cracks G Damage and scratches on bushing contact surfaces cracks H Rotation condition I Wear J Wear ...

Page 154: ...o not swap the original combinations of delivery valves and valve seats Removing plunger assemblies 1 Position the cam at the bottom dead center in the cylinder from which the plunger assembly is removed 2 Remove the deflector bolt located on the back side of the pump case IMPORTANT Be sure to remove the deflector before removing the plunger assembly If the plunger assembly is removed without remo...

Page 155: ...rooves of the control rack and rack bushing installed in the pump case and remove the bellows 2 Remove the set screw from the back side of the pump case and pull out the control rack Removing tappets Hook a wire to two small holes 4 mm 0 16 in dia on the upper side of the tappet and pull out the tap pet Removing the rear cover Remove the rear cover mounting bolts Insert the tips of screwdrivers in...

Page 156: ...gradually and remove the lower spring seat plunger and plunger spring from the barrel IMPORTANT Handle plungers carefully to pre vent damage and scratches IMPORTANT Place the removed plungers in a tray with clean diesel fuel do not change the original combinations of plungers and barrels IMPORTANT Do not swap the original combi nations of plungers and barrels Plus d informations sur www dbmoteurs ...

Page 157: ...ivery valves 1 In each delivery valve inspect the valve seat and sliding surfaces for scratches and check contact ing surface to the barrel 2 Wash parts with clean diesel oil Lift the valve and let it fall making sure that it slides down smoothly to the valve seat 3 If the valve sticks replace the delivery valve and valve seat as a set Tappets 1 Check each tappet roller roller bearing and tappet p...

Page 158: ...shaft diam at oil seal contact area mm in Assembly Standard 34 938 34 963 1 37551 1 37649 Service Limit 34 800 1 37001 3 Support the camshaft with V blocks and mea sure runout at the center bearing section using a dial gauge If the amount of runout exceeds the repair limit correct with a press or replace with a new part Camshaft deflection mm in Assembly Standard 0 05 0 00197 Repair Limit 0 15 0 0...

Page 159: ...lve spring mm in Free length A Assembly Standard 18 0 71 Perpendicularity B Service Limit 0 6 0 024 Length under test force mm in Assembly standard 14 15 0 56 Test force N kgf lbf Assembly standard 51 6 61 4 5 26 6 26 11 60 13 80 Valve holders 1 Check the contacting surfaces of injection pipe and delivery valve on each valve holder for scratches 2 If the contact surfaces are scratched replace the ...

Page 160: ...Group 23 Fuel System 160 Reassembly Reassembly sequence 30 28 31 29 25 27 26 23 22 21 17 19 20 18 15 16 24 13 14 12 3 5 4 2 1 9 11 10 8 6 7 Plus d informations sur www dbmoteurs fr ...

Page 161: ...unting bolts Assembling the camshaft center bearing 1 Install the bearing inner race on the camshaft by striking with a hammer 2 Lay the pump case on its side 3 Place the center bearing on the camshaft and in sert the shaft into the pump case 4 Slowly rotate the camshaft and align the bolt hole in the center bearing with the bolt hole in the pump case then tighten the mounting bolt Plus d informat...

Page 162: ... 02 0 06 0 00079 0 00236 2 If the measured clearance deviates from the assembly standard increase or decrease the shim thickness to make adjustment 3 Tum the camshaft to make sure if it rotates smoothly Assembling tappets 1 Install the tappet roller roller bearing and tappet pin in each tappet 2 Apply lubricating oil to each part 3 After assembly make sure the roller rotates smoothly without squee...

Page 163: ... A B and C 1 Install three O rings on each barrel 2 Install the pinion and upper spring seat on each barrel by tapping with a hammer Make sure the pin inserted in the barrel is positioned at the notch of the upper spring seat 3 On the Plunger spring compressin jig place the assembly consisting of barrel pinion and upper spring seat then install the plunger spring plunger and lower spring seat Plus...

Page 164: ...e control rack 1 Insert the control rack in the pump case making sure the F mark on the end surface or the threaded section is positioned on the driven side then tighten the set screw to 21 Nom 2 1 kgf m 15 lbf ft 2 Install the rack setting jig in the threaded hole at the tip of the counter drive side of the rack In this step visually check and make sure the wide tooth three times wider than other...

Page 165: ...er assembly by serching the correct meshing slow ly Do not apply excessive forte to press down the plunger assembly If the plunger assembly is jammed turn the flange by jiggling back and forth then press down 5 Insert standard barrel shims thickness 1 0 mm 0 04 in under each barrel flange and align the reference mark on the barrel flange with the align ment mark 1 5 mm 0 06 in diameter hole on the...

Page 166: ...tire stroke Control rack sliding resistance N kgf lbf Assembly Standard 4 9 0 5 1 10 or less 2 After making sure the rack sliding resistance is lower than the standard value install the deflector bolts on the pump case and tighten Assembling delivery valves 1 In each barrel install delivery valve valve spring spring seat and valve holder in that order 2 Apply grease to a new O ring to prevent 0 ri...

Page 167: ...m 0 2 in 5 With the camshaft in this position check to make sure the pointer located on the pump case end surface aligns with the stamped line on the fly wheel If they are not aligned stamp a new line on the flywheel at the pointer position 6 Point a flashlight from the top of the pump case and look through the deflector bolt hole and check the position of the upper end of the plunger 7 Rotate the...

Page 168: ...jection start intervals 45 0 5 Adjustment of Injection Volume 1 Install a fuel hose and the specified fuel pipe to the fuel injection pipe Adjustment conditions Nozzle holes Ø 10 0 325 mm 0 013 in Nozz opening press 34 32 MPa 350 kgf cm2 4979 psi Feed pressure MPa kgf cm2 psi 0 3 0 05 3 0 5 43 7 7 1 Fuel pipe dimensions out Ø x in Ø x L 7x2 8x817 mm 0 28x0 11x32 2 in Test fuel JIS Class 2 diesel f...

Page 169: ...r A Scuffing rust on piston and cylinder B Fatigue C Dust particles Gauze filter Wash with diesel fuel D Cracks damage of threads E Wear of seat IMPORTANT Do not disassemble the gauge filter if it is clogged the filter may become twisted and damaged Remove as much dust as possible through the small holes then disassemble the gauge filter with a screwfriver Plus d informations sur www dbmoteurs fr ...

Page 170: ...me Feed pump discharge start at 100 rpm sec Assembly Standard 20 sec or less Priming pump suction capacity Discharge fuel completely from the feed pump in the testing conditions described in the feed pump test Then operate the priming pump at a rate of 60 to 100 strokes per minute and count the number of pumping operations required for fuel to reach the pump Priming pump discharge start strokes As...

Page 171: ...G governor 2 Packing 3 Drive case 4 O ring 5 Idler gear 6 Snap ring 7 Idler shaft 8 Washer bolt 9 Bearings 10 Drive gear 11 Snap ring 12 Drive shaft 13 Snap ring 14 Bearings Look for A Rotation B Wear C Wear of teeth D Wear of spline Plus d informations sur www dbmoteurs fr ...

Page 172: ...l Value 52 2 05 Assembly Standard 51 987 52 000 2 04673 2 04742 Inside diameter Nominal Value 25 0 98 Assembly Standard 24 990 25 000 0 98386 0 98425 Drive shaft diam mm in Nominal Value 25 0 98 Assembly Standard 25 002 25 011 0 98433 0 98468 Case bore diam idler shaft side mm in Nominal Value 47 1 85 Assembly Standard 46 989 to 47 014 1 84996 to 1 85094 Idler shaft side bearing diameter mm in Out...

Page 173: ...Group 23 Fuel System 173 Reassembly Reassembly Sequence 3 9 7 8 6 14 12 5 13 11 10 1 4 2 Plus d informations sur www dbmoteurs fr ...

Page 174: ...y 1 Air cooler cover 2 Packing 3 Air cooler element 4 Plate 5 Packing 6 Air cooler case 7 Packing 8 Air cooler element 9 Plate 10 Packing Look for A Replace packing Group 25 Inlet and Exhaust System Air Cooler Plus d informations sur www dbmoteurs fr ...

Page 175: ...s 2 Wash the fresh water or salt water pipes in water and caustic soda lime then remove scale depos its by inserting a 3 mm 1 8 in bar into each pipe Inspecting air cooler for air tightness Immerse the air cooler in water then apply high pres sure air max press 0 39 MPa 4 kgf cm2 57 psi to the coolant side to inspect for air leaks NOTE Keep record of the water air temperatures using infrared temp ...

Page 176: ... Turbine backplate 20 Bearing 21 Snap ring 22 Snap ring 23 Bearing 24 Snap ring 25 Bearing housing Look for A Wear B Thrust face wear C Vane distortion damage rubbing contact on back face and gas erosion D Rubbing contact with compressor wheel E Rubbing contact with turbine wheel cracks and distortion F Vane distortion damage rubbing contact on back face and gas erosion and damage to ring grooves ...

Page 177: ...ressor cover with a soft faced hammer to remove the cover Also re move the o ring from the bearing housing Remove the compressor wheel IMPORTANT Handle the compressor wheel and turbine wheel with care during disassembly and assembly Vanes can easily bend when dropped or hit 1 Fasten the flange of the turbine housing in a vise and install the bearing housing to the turbine housing with the v clamp ...

Page 178: ...deflector 1 Using two screwdrivers gently pry out the insert from the bearing housing 2 Separate the finger sleeve together with the pis ton ring from the insert 3 Remove the o ring the oil deflector the compres sor thrust ring the thrust bearing and the turbo thrust ring from the bearing housing Remove the v clamp Loosen the v clamp with a socket wrench and dis lodge the clamp from its position P...

Page 179: ... the 3 snap rings and the bearing Removing the shaft turbine wheel 1 Remove the bolts and lock plates 2 While gripping the shaft of the shaft turbine wheel with one hand hold the bearing housing with the other hand and slowly remove the shaft turbine wheel from the turbine housing 3 Turn the bearing housing turbine wheel face up and place it on the compressor cover Remove the shaft and turbine whe...

Page 180: ... diameter If the measured diameter is less than the service limit replace the bearing Bearing inside diameter mm in Service Limit 29 876 1 17622 Measure bearing inside diameter If the measured diameter exceeds the service limit replace the bearing Bearing inside diameter mm in Service Limit 18 050 0 71063 Measuring bearing length If the measured length is less than the service limit replace the be...

Page 181: ...ervice limit replace the shaft tur bine w heel IMPORTANT If the shaft is bent replace Do not attempt to correct the bend 2 If the surface of the shaft journal is rough mount the shaft on a lathe and gently polish the surface using 400 sandpaper and engine oil while rotat ing at 300 600 min 1 Shaft deflection mm in Service Limit 0 015 0 00059 Insert Measure piston ring end gap Install a new piston ...

Page 182: ... ring 9 Piston ring 11 O ring 19 Piston ring IMPORTANT If vanes are damaged or cracked do not reuse the part IMPORTANT After reinstalling the overhauled turbocharger crank the engine to lubricate moving parts of the turbo 21 19 18 17 24 25 22 23 11 8 7 9 12 14 20 13 10 15 5 6 4 16 2 3 1 Plus d informations sur www dbmoteurs fr ...

Page 183: ...t ed with the piston ring in the bearing housing po sition the ring on the shaft so that there is a small space A at the ring end gap side B and a large space C on the other side Then insert the shaft turbine wheel while rotating IMPORTANT Do not expand the piston ring ex cessively or twist the ends when installing on the shaft turbine wheel IMPORTANT Do not apply excessive forte with out tenterin...

Page 184: ...st bearing To install the thrust bearing align the notch with the groove pin Install the O ring Apply grease to the O ring and install Install the oil deflector Apply engine oil to both sides of the thrust ring and in stall Then install the oil deflector with the baffle fac ing down Plus d informations sur www dbmoteurs fr ...

Page 185: ...ll on the insert carefully so as to avoid piston ring damage 2 After installing the above parts irrstall the sub as sembly in the bearing housing Install the snap ring Install the snap ring with the tapered side face up in the bearing housing NOTE Make sure you install the snap ring correctly NOTE Lightly drive both ends of the snap ring using a screwdriver and hammer to securely insert the ring i...

Page 186: ...ly Moly Disulfide to the threads of the lock nut then tighten to the speci fied torque Lock nut tightening method 1 Tighten the lock nut to torque of 49 N m 5 kgf m 36 lbf ft then loosen it completely 2 Retighten to a snug torque of 14 7 N m 1 5 kgf m 10 8 lbf ft then turn another 80 3 Shaft turbine wheel axial play Set a dial gauge on the end face of the shaft turbine wheel Measure the amount of ...

Page 187: ...e mm in Standard Clearance 0 55 1 15 0 02165 0 04528 Install the compressor cover 1 Apply grease to the o ring and install it 2 Mount the compressor cover on the bearing housing and be sure to follow the alignment marks made during disassembly Install the lock plates Install the lock plates to the compressor cover Install the turbine housing Mount the turbine housing on the bearing housing and be ...

Page 188: ...5 Unit seal 6 Oil seal sleeve 7 Bearing 8 Water pump gear 9 Bearing 10 Water pump shaft 11 Oil seal 12 Pump case Group 26 Cooling System Fresh Water Pump Look for A Rotation B Wear deterioration of lip C Corrosion chafing D Crack damage E Wear damage Plus d informations sur www dbmoteurs fr ...

Page 189: ...ve the impeller with the impeller remover Remove the water pump shaft 1 Remove the oil seal sleeve 2 Remove the gear and the bearing with the gear puller 3 Remove the snap ring of the impeller side ball bearing 4 Inset the two rings A of the ring remover be tween the unit seal and the pump case 5 Fit the outer ring B to the outside of the half rings to prevent them from falling down 6 Support the ...

Page 190: ...05 110 040 4 33090 4 33227 Bearing Diameter mm in Norminal value Ø120 4 72 Assembly standard 119 985 120 000 4 72381 4 72441 Bearing Diameter mm in Norminal value Ø110 4 33 Assembly standard 109 985 110 000 4 33012 4 33071 Bearing Inside diameter mm in Norminal value Ø55 2 17 Assembly standard 54 985 55 000 2 16476 2 16535 Bearing Inside diameter mm in Norminal value Ø50 1 97 Assembly standard 49 ...

Page 191: ...in the unit seal Replace the unit seal once disturbed NOTE Install the unit seal after coating the outer ring with sealant 3 Press the impeller side of the pump shaft com plete with ball bearings into the case Install the snap ring with its gap down 4 Press in the unit seal ring with the unit seal float ing seat using the ring installer NOTE Before installation coat the floating seat at two locati...

Page 192: ...ss in the impeller to the depth where impel ler s boss end face is flush with the shaft end 7 Mount the cover on the impeller side and secure it in place with the snap ring 8 After installing the water pump assembly install the alternator pulley and tighten the nut to the specified torque Plus d informations sur www dbmoteurs fr ...

Page 193: ...ostat in the water Measure the temper ature when the valve opens Measure it again when the valve lift is 11 mm 0 43 in Replace if not within standard Opening temp C F Assembly standard 71 2 159 8 3 6 Valve lift 11 mm 0 43 in temp C F Assembly standard 85 185 NOTE Stir the water to maintain even temperatures during the test NOTE Confirm the valve opening temperature stamped on its mounting flange P...

Page 194: ...ook for A Pipes clogged leaks B Change if less than 50 remains Inspection Cleaning of element 1 While pouring running water onto the outer sur face of the element clean with a wire brush Check the element for corrosion and tears 2 Insert a stick into the pipe and remove deposits Plus d informations sur www dbmoteurs fr ...

Page 195: ... 4 Bushing unit seal 5 Slinger 6 Nut spring washer 7 Pulley 8 Snap ring 9 Shaft key 10 Bearing 11 Oil seal 12 Holder 13 Cam Raw Water Pump standard rubber impeller IMPORTANT The rubber impeller is not resistant to anti freeze or cooling water conditioner Plus d informations sur www dbmoteurs fr ...

Page 196: ...minal value Ø110 4 33 Assembly standard 09 995 110 030 4 33050 4 33188 Service limit 110 030 4 33188 Bearing outside diameter mm in Nominal value Ø110 4 33 Assembly standard 109 985 110 000 4 33011 3307 Bearing inside diameter mm in Nominal value Ø50 1 97 Assembly standard 49 985 50 000 1 96791 1 9685 Shaft diam at bearing position mm in Nominal value Ø50 1 97 Assembly standard 50 002 50 013 1 968...

Page 197: ...Group 26 Cooling System 197 Reassembly Reassembly sequence 11 9 8 5 4 12 3 1 7 2 6 10 13 Plus d informations sur www dbmoteurs fr ...

Page 198: ...ust be coated with ThreeBond 1102 NOTE Be sure to replace the unit seal with a new part 3 Using a jig and a hammer install the bearing to the shaft making sure the bearing remains square to the center line of the shaft 4 Install the slinger A to the holder Install the bushing B with unit seal to the holder Clean the sliding surface C on the seat side of the unit seal with ethyl alcohol then coat w...

Page 199: ... ft 6 Install the impeller to the shaft by striking with a hammer NOTE Make sure the impeller vane tips are pointed in the direction opposite to the rotational direction 7 Install the O ring to the casing and mount the cover Tighten the bolts to the specified torque 8 Tighten the nut to secure the pulley in place tightening torque 196 N m 20 kgf m 144 7 lbf ft Plus d informations sur www dbmoteurs...

Page 200: ... 7 Center bracket 8 Shift lever assembly 9 Front bracket 10 Pinion case 11 Pinion clutch assembly Look for A Wear of gear damage B Play and unsmooth rotation C Adhesion of brush particles irregular wear brush movement in holder D Wear of gear E Surface roughness seizure wear and damage Group 30 Electrical System Starter Plus d informations sur www dbmoteurs fr ...

Page 201: ...s and the magnetic switch assembly 2 Unscrew the through bolts and the brush holder mounting screws Remove the rear bracket 3 Remove the brushes from the brush holder as sembly and then remove the yoke 4 Pull out the armature assembly Plus d informations sur www dbmoteurs fr ...

Page 202: ...inner housing and shift le ver from the pinion case 7 Using a jig remove the pinion stopper then re move the overrunning clutch from the pinion shaft NOTE To remove the shaft bearing for replacement use a bearing puller as shown in the drawing Plus d informations sur www dbmoteurs fr ...

Page 203: ...e your hand the plunger should not be attracted Testing magnetic switch contact points Measure the load current flowing through the starter If the voltage drop between terminals B and M ex ceeds 0 3 volts per 100 amperes clean or replace the contact points If the starter switch is tumed to OFF during voltage measurement the battery voltage is directly applied to the voltmeter This can damage the v...

Page 204: ... if the deflection exceeds the service limit Commutator deflection mm in Assembly Standard 0 06 0 0024 maximum Service Limit 0 10 0 0039 Testing the armature 1 Use a growler to test the armature for short cir cuits If the hacksaw blade vibrates against the core replace the armature 2 If there is continuity between the commutator and shaft replace the armature 2 Measure the mica depth Use a depth g...

Page 205: ...r damage If they are damaged replace the pinion IMPORTANT Do not immerse the overrunning clutch in cleaning solvent to clean it Immersion in cleaning solvent Will cause grease inside the clutch to run out causing clutch parts to seize when operating Brushes Inspecting for wear Brush height mm in Assembly Standard 21 22 0 83 0 87 A Service Limit 13 0 51 B Testing brush spring tension Brush spring t...

Page 206: ...urn the switch on and check that the starter tums 3 After step 2 above is completed if you remove the R terminal from the battery minus side or if you connect the terminal to the battery plus side after removal make sure you stop the start er operation IMPORTANT When you are making con nections pay special attention to the bat tery s polarity R Plus d informations sur www dbmoteurs fr ...

Page 207: ...ifi lever 3 Install the armature and yoke to the center brack et making sure that the dowel pin enters its hole 4 Install the brushes and brush holders 1 Install the center bracket overrunning clutch and pinion stopper to the pinion shaft Insert the shaft in position by tapping it with a soft head mallet 10 9 8 6 7 5 1 3 4 2 Plus d informations sur www dbmoteurs fr ...

Page 208: ... Secure the brush holders with bolts then tighten the through bolts 6 Measure the end play of the armature If the end play exceeds the assembly standard adjust it on the rear side Armature end play mm in Assembly Standard 0 3 0 7 0 012 0 028 7 Liberally coat the internal gear with grease then install the pinion shaft to the gear Plus d informations sur www dbmoteurs fr ...

Page 209: ...switch Apply a voltage of 24 volts between the C and E terminals Connect the lead wire and energize the circuit between the M and E terminals within 1 setond After the pinion has shifted measure retraction length of the pin ion If the measurement is not within 2 5 to 5 5 mm CO 098 to 0 22 in use the magnetic switch adjusting screw to make adjustments 10 Secure the lead wire 11 Install the safety s...

Page 210: ...bly 1 Nut washer 2 Pulley assembly 3 Set screw 4 Front bracket assembly 5 Rotor assembly 6 Field coil 7 Stator 8 Rear bracket 9 Regulator assembly 10 Rectifier assembly 11 Terminal assembly Alternator Plus d informations sur www dbmoteurs fr ...

Page 211: ...en the coil and core replace the stator Field coil Measure resistance between the terminals of the field coil If the measured resistance deviates from the standard value replace the coil Field coil resistance Ω Ω Ω Ω Ω Assembly Standard 7 3 8 6 Inspecting rectifier To check individual diodes measure resistance be tween the diode lead wire and heat sink Connect the positive test lead wire to the di...

Page 212: ...Notes Plus d informations sur www dbmoteurs fr ...

Page 213: ...Notes Plus d informations sur www dbmoteurs fr ...

Page 214: ...Notes Plus d informations sur www dbmoteurs fr ...

Page 215: ...Plus d informations sur www dbmoteurs fr ...

Page 216: ...7742853 0 English 09 2003 Plus d informations sur www dbmoteurs fr ...

Reviews: