c) Calibration
Before using the instrument for the first time, calibrate the instrument to achieve measuring
accuracy. Measuring accuracy is reduced with time. It is also recommended to perform
calibration periodically for greater accuracy. Use the supplied cloth or a soft cloth to clean the
glass bottle before placing it into the sample holder of the instrument.
1. Press the
button to turn the instrument on. If you turn on the instrument for the first
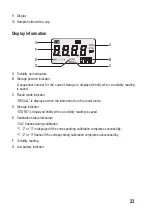
time or no calibration has been performed, the numbers of “1”, “2” and “3”
(E)
as calibration
status indicators flash on the bottom left of the display.
2.
Prepare the standard solution set (0 / 100 / 800 NTU) in a correct way before taking
measurement. See “Notes for an accurate measurement” for details.
3. Press and hold the
button for three seconds to enter the calibration mode. “CAL 1” and
“0.00 NTU” are displayed, indicating that the standard solution of 0 NTU is to be measured.
4.
Place the standard solution bottle marked “0 NTU” into the sample holder of the instrument.
Then close the cap of the sample holder securely by aligning the notch on the cap with the
arrow marked next to the cap.
5. Press the
button
(6)
to initialize calibration. “CAL” flashes on the display during
calibration. When the calibration completes, “CAL 2” and “100 NTU” are displayed. This
indicates that the standard solution of 100 NTU is to be measured.
6.
Place the standard solution bottle marked “100 NTU” into the sample holder of the
instrument. Close the cap of the sample holder securely as described in step 4. Then press
the
button to initialize and complete the calibration for 100 NTU reading.
7.
When “CAL 3” and “800 NTU” are displayed, place the standard solution bottle marked
“800 NTU” into the sample holder of the instrument. Close the cap of the sample holder
securely as described in step 4. Then press the
button to initialize and complete
the calibration for 800 NTU reading.
8.
When the calibration for “CAL 3” (“800 NTU”) completes, “SA” and “END” are displayed
respectively and briefly. This indicates that all the calibrations complete. Then the instrument
exits the calibration mode and enters the measurement mode automatically.
If all these three calibrations complete successfully, the numbers of “1”, “2” and “3”
(as calibration status indicators) are displayed on the bottom left of the display. If any
calibration completes unsuccessfully, the corresponding number flashes. In this case,
check if a wrong standard solution was taken for a particular calibration.
In the calibration mode, you may skip any calibration (“CAL 1”, “CAL 2” and “CAL 3”)
by pressing the
button
(5)
. In this case, the number (as calibration status
indicator) corresponding to the skipped calibration does not appear on the bottom left
of the display.
26


