background image

VOLT

®

 Low Voltage Landscape Lighting
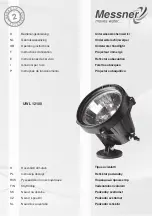
VOLT

®

 RGBW Max All-Star Integrated LED Spotlight

VAL-2045-ABK

INSTALLATION INSTRUCTIONS

Specifications and product details subject to change without notice. 

© Copyright 2020, VOLT

®

 Lighting, Lutz FL USA 33549 • All rights reserved. 

[email protected] • 813.978.3700

Help Hotline:  

1-813-978-3700 • Mon-Fri 8am-8pm • Sat-Sun 10am - 6pm (EST)

- 1 -

Summary of Contents for RGBW Max All-Star VAL-2045-ABK

Page 1: ...VAL 2045 ABK INSTALLATION INSTRUCTIONS Specifications and product details subject to change without notice Copyright 2020 VOLT Lighting Lutz FL USA 33549 All rights reserved customersupport voltlighting com 813 978 3700 Help Hotline 1 813 978 3700 Mon Fri 8am 8pm Sat Sun 10am 6pm EST 1 ...

Page 2: ...pool spa or fountain 3 This luminaire is intended to be used only with a power supply transformer rated maximum of 300 watts 25 AMPS at 15 volts 4 Wiring connections must be made with UL Listed wire connectors that are suitable for outdoor use 5 Position the low voltage wire and UL listed wire connector so that it is located within 6 inches 15 2 cm from a building structure a luminaire or fitting ...

Page 3: ...ents customersupport voltlighting com 813 978 3700 3 A 1 Fixture Body B 1 Allen Wrench C 1 IR Remote Product Dimensions Products Model Model Input Voltage Watt Input Current 15W Spotlight 12V 15W 1 2A 5 6 6 25 10 5 ...

Page 4: ...surface using the holes on the base as guides These marks will be used for anchors Mounting Surface Hole Fixture Body Base Install Anchors Anchor Drill the proper holes on the mounting surface for the anchors Insert the anchors into the drilled holes Mark Mounting Surface Install Fixture Body Place the base onto the anchors and secure with screws Fixture Body Screw Base Cable Wire exit Mounting Su...

Page 5: ...ly connect the leads from the luminaire to the main supply cable leads Pigtail Supply Wire from Fixture Wire Connectors Main Supply Cable Adjust Fixture Body Using the Allen wrench loosen the knuckle to adjust the fixture to the desired orientation Tighten the knuckle with the Allen key to secure the fixtures adjustment Fixture Body Knuckle Allen Wrench ROTATE ...

Page 6: ...crew the base and remove it from the fixture body Fixture Body Base Install Stake and Conduit Stake Stabilizer Grid Conduit Ground Level Dig a hole in the ground for the conduit runs and the stake Install the conduit Slide the stabilizer grid onto the stake and secure with the screws Place the stake over the conduit runs Backfill against the mounting stake ...

Page 7: ...hting com 813 978 3700 7 3 4 Remove Cap from Stake Screw Cap Stake Remove the cap from the stake by loosening the set screws Install Cap to Fixture Fixture Cap Thread the cap onto the fixture body and hand tighten until snug ...

Page 8: ...re for adjustment purposes Strip both leads from the fixture pigtail Using two UL listed wire connectors sold separately connect the leads from the fixture to the main supply cable leads Place the wire into the stake and attach the cap back onto the stake using the screws 6 Adjust Fixture Body Using Allen wrench loosen the knuckle to adjust the fixture to the desired orientation Tighten the knuckl...

Page 9: ...te An IR Remote is suitable for this fixture Please refer to the following instructions for usage and battery replacement Remove Plastic Film CR2025 RELEASE OPEN PUSH Backing Plastic Film IR Remote Remove Remove the plastic film from the IR remote before use ...

Page 10: ...at color will strobe every second alternating between on and off Mode 2 Hit strobe a second time and this mode will strobe a blended white color at the same speed as before 6 Fade Mode 1 Pick any color on the remote then press fade and that color will slowly fade in and out every second Mode 2 Hit fade a second time and it will fade a blended white color in and out at the same speed as before 7 Sm...

Page 11: ...eplace Battery CR2025 RELEASE OPEN PUSH PUSH Battery Bracket Battery REMOVE INSERT Backing IR Remote Push the side of the battery bracket and carefully remove it from the IR remote Replace the battery and then insert the battery bracket back into the IR remote Replacement Battery Style CR2025 Button Battery ...

Page 12: ...tails subject to change without notice Copyright 2020 VOLT Lighting Lutz FL USA 33549 All rights reserved customersupport voltlighting com 813 978 3700 w w w v o l t l i g h t i n g c o m Help Hotline 1 813 978 3700 Mon Fri 8am 8pm Sat Sun 10am 6pm EST 12 ...

Reviews: