background image


Davide e Luigi Volpi S.p.A. 

Via San Rocco,10 – 46040 Casalromano (MN) – Italy 

Tel. +39 0376.76009 - 76012   Fax. +39 0376.76408 

www.volpioriginale.it 

E-mail

[email protected]

 – [email protected]


____________________________________________________________________________________________________________________________________________________________________________________________________________ 

DAVIDE E LUIGI VOLPI S.p.A. - Via San Rocco,10 -  46040 CASALROMANO (MN) - ITALY                            YLBVT7_0 Libretto d’uso VT7                                pag. 24 di 32 

[email protected] 
 
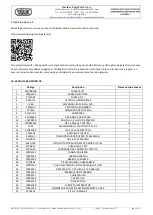
Active la garantía de su nuevo producto Originale Volpi a través de nuestro sitio web:  
 
http://www.volpioriginale.it/garanzia/ 


El comprador también debe guardar una copia del documento de venta (recibo, factura) y del registro de garantía: una copia 
de estos documentos debe entregarse al Distribuidor o taller de reparación Autorizado junto con la máquina a reparar. En 
ausencia de estos documentos, la máquina se considerará en cualquier caso fuera de garantía. 


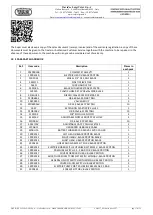
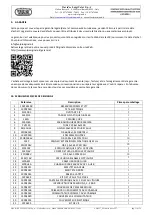
10.


MANUAL DE REPUESTOS 


Código 

Descripción 

Piezas en cada envase 

19KPR010B 

TANQUE VT7 

1


19PRE010 

CABEZA ELÉCTRICA 

1


PL01D01 

TUERCA 1/2 " 

2


3350/13 

FILTRO DE LLENADO Ø 69 

1


163N 

EMPUNADURA CLICK A LEVA 

1


3350/8A 

CINTURÓN DE HOMBRO 

1


PVC120 

MANGUERA DE ENTREGA 

1


92/4GU25 

HOMBRERA 

1


ZZOR6262 

OR 66,04x5,33 NBR 70SH 

5


10 

19KPR030 

VÁLVULA DE ALIVIO DE PRESIÓN 

5


11 

ZZOR3056V 

OR 13,95x2,62 FPM 70SH 

10


12 

192P 

ALARGADERA DE PLASTICO DE 42 cm 

1


13 

ZZOR109V 

OR 9,13x2,62 FPM 70SH 

10


14 

PL01C02 

BOQUILLA PLASTICO 

2


15 

3340/6V 

TUBO ARTICULADO CUERPO PP AMARILLO 

2


16 

ZZORR4V 

OR 4,9x1,9 FPM 50SH 

10


17 

3342/10V 

ORIFICIO TAPÓN AJUSTABLE PP AMARILLO 1,25 

2


18 

WCAB11 

CABLE USB 1,2 MT 

1


19 

WCBLI1A 

CARGADOR USB 100-240VAC 5VDC 1A 

1


20 

19PRE011 

CABEZA IZQUIERDA 

1


21 

19PRE012 

CABEZA DERECHA 

1


22 

19PRE013 

BASE DE LA CABEZA 

1


23 

19PREK2 

KIT MANGUERA Y ABRAZADERA 

1


24 

19PRE015 

PLACA ELECTRONICA CON 2 BATERIAS DE LITIO 

1


24 

19PRE015 

BATERÍA 8.4 V, 2 CÉLULAS, 3.7V 2600mAh 

1


25 

19PRE016 

INTERRUPTOR DE PRESIÓN 

5


26 

19PRE017 

CUBIERTA USB 

2


27 

19PRE018 

PUERTA USB 

2


28 

19PRE019 

INTERRUPTOR 

5


29 

19PRE020 

CUBIERTA INTERRUPTOR 

1


30 

19PRE014 

COMPRESOR 20 Lt-MIN PRESIÓN MÁXIMA 2,5 BAR 

1


31 

19PREK3 

KIT DE TORNILLOS 

1


Summary of Contents for VOLPITECH VT7

Page 1: ...OMANO MN ITALY YLBVT7_0 Libretto d uso VT7 pag 1 di 32 IRRORATRICE A PRECOMPRESSIONE ELETTRICA VOLPITECH VT7 MANUALE D USO ITALIANO pag 5 ELECTRIC PRE COMPRESSION SPRAYER VOLPITECH VT7 USER MANUAL ENGLISH page 12 BOMBA DE PRECOMPRESIÓN ELÉCTRICO VOLPITECH VT7 MANUAL DE USO ESPAÑOL pag 19 POMPE A PRÉCOMPRESSION ELECTRIC VOLPITECH VT7 MODE D EMPLOI FRANÇAIS pag 26 ATTENZIONE LEGGERE ATTENTAMENTE IL ...

Page 2: ...olpioriginale it export volpioriginale it ____________________________________________________________________________________________________________________________________________________________________________________________________________ DAVIDE E LUIGI VOLPI S p A Via San Rocco 10 46040 CASALROMANO MN ITALY YLBVT7_0 Libretto d uso VT7 pag 2 di 32 ...

Page 3: ...ginale it export volpioriginale it ____________________________________________________________________________________________________________________________________________________________________________________________________________ DAVIDE E LUIGI VOLPI S p A Via San Rocco 10 46040 CASALROMANO MN ITALY YLBVT7_0 Libretto d uso VT7 pag 3 di 32 1 2 3 4 5 6 7 ...

Page 4: ...ones para el tracto respiratorio FR Utiliser des protections pour les voies respiratoires I Distanza minima tra la macchina ed altre persone 3m UK Minimum distance between machine and other people 3m ES Distancia minima entre la maquina y otras personas 3m FR Distance minimal entre la machine et d autres personnes 3m I Utilizzare protezioni per gli occhi UK Wear eye protection ES Usar gafas protec...

Page 5: ...zio dell impiego della manutenzione o di qualsiasi altro intervento sulla macchina Un uso corretto della macchina ed un efficace e razionale manutenzione consentono di mantenere la macchina nelle condizioni ottimali di funzionamento e di non ridurre efficienza e sicurezza Il presente manuale è stato realizzato in conformità alle indicazioni contenute nell ALLEGATO I della DIRETTIVA MACCHINE 2006 4...

Page 6: ...ionare la pompa deve adottare procedure di lavoro sicure ed osservare le norme ed i regolamenti sulla sicurezza Non utilizzare prodotti dei quali si ignorino le caratteristiche tossicologiche ma esclusivamente prodotti consentiti dal Ministero della Sanità rispettando scrupolosamente tutte le specifiche indicazioni e le prescrizioni d uso elencate sulla confezione del prodotto che si vuole utilizz...

Page 7: ...NE DELLA POMPA Verificare la presenza dell OR sull impugnatura E ed avvitare la canna L sull impugnatura E fig 1 Svitare il girello N dall impugnatura E ed inserirlo sul tubo G Infilare completamente l estremità del tubo G sul portagomma dell impugnatura E Avvitare fino in fondo il girello N sull impugnatura E fig 1 Inserire il girello C sul tubo G Infilare completamente l estremità del tubo G sul...

Page 8: ...22 0 46 1 5 0 29 0 61 2 0 37 0 77 5 6 OPERAZIONI DA ESEGUIRE ALLA FINE DELLE ATTIVITÀ DI LAVORO Assicurarsi che l interruttore posto sulla testa della pompa fig 8 sia nella posizione OFF Mantenendo la pompa in posizione verticale azionare la valvola di scarico pressione fig 5 e scaricare completamente il serbatoio dalla pressione residua Svitare e togliere la testa dal serbatoio Versare l eventual...

Page 9: ... sempre la pompa con l interruttore generale spento Ricaricare e conservare la pompa a temperature comprese tra i 5 ed i 40 C In caso di prolungato stoccaggio o inutilizzo ricaricare la batteria ogni quattro mesi 7 ANOMALIE CAUSE RIMEDI ANOMALIE PROBABILI CAUSE RIMEDI Accendendo l interruttore della pompa non esce acqua Il motore non funziona Batteria scarica Ricaricare Pompa bloccata Contattare c...

Page 10: ...UBO PLASTICA RET PVC 8x13x1200 NERO NERO 1 8 92 4GU25 GUAINA 130x50 CM PER SPALLACCIO 25 GARDEN FLORA 1 9 ZZOR6262 OR 66 04x5 33 NBR 70SH POMPANTE V BLACK 5 10 19KPR030 ASSIEME VALVOLA V BLACK KOMPRESS NERO 5 11 ZZOR3056V OR 13 95x2 62 FPM 70SH SEDE VALVOLA SFERICA XX VOLPITECH ACIDI 10 12 192P CANNA PROLUNGA PLASTICA CM 42 1 13 ZZOR109V OR 9 13x2 62 FPM 70SH PROLUNGA PLASTICA 192P VOLPITECH ACIDI...

Page 11: ... p A Via San Rocco 10 46040 Casalromano MN ITALIA DICHIARA CHE LA MACCHINA Denominazione POMPA IRRORATRICE ELETTRICA Tipo VOLPITECH VT7 Modello VT7 È CONFORME ALLA PERTINENTE NORMATIVA DI ARMONIZZAZIONE DELL UNIONE DIRETTIVA 2006 42 CE Direttiva Macchine DIRETTIVA 2014 30 UE Compatibilità Elettromagnetica Riferimento alle pertinenti norme armonizzate utilizzate o riferimenti alle altre specifiche ...

Page 12: ...ry carefully this instruction handbook before any setting use maintenance or any other imaginable operation of on the sprayer A correct use of the sprayer and an effective and rational maintenance allows you to keep the sprayer in the best working conditions without reducing its efficacy and safety The present instruction handbook was drawn up in conformity with the indications included in ENCLOSU...

Page 13: ... situations and risks in order to assure safe working procedures appropriate behaviour rules and to plan individual protective devices DURING USE OF THE SPRAYER THE OPERATOR MUST FOLLOW SAFE WORKING PROCEDURES AND FOLLOW THE SICURITY RULES AND REGULATIONS Do not use products whose toxicological features are unknown Use exclusively products authorized by the Public Health Ministry carefully respect...

Page 14: ...heck for the presence of the OR on the handle E and screw the barrel L on the handle E fig 1 Unscrew the ring N from the handgrip E and insert it into the pipe G Stick completely the tip of the pipe G on the rubber holder of the handgrip E Tighten until the end the ring N on the handgrip E fig 1 Insert the ring C on the pipe G Insert completely the tip of the pipe G on the rubber holder of the tan...

Page 15: ...sure discharge valve fig 5 and depressurize completely the tank Unscrew and remove the head Pour the remaining liquid in a specific container and carefully rinse the internal part of the tank and the hose letting clean cold water flow through the lance Check that the water used for rinsing has completely come out Clean the handle using a damp cloth without soaking it in water Open the handgrip and...

Page 16: ...sprayer with the general switch off After the complete recharge keep the sprayer between 5 and 40 C In case of long stocking or non use recharge the battery every four months 7 PROBLEMS CAUSES SOLUTIONS PROBLEMS POSSIBLE CAUSES SOLUTIONS When turning on the switch of the sprayer no water is coming out Motor does not work Low battery Recharge Blocked sprayer Contact the service centre Broken cable ...

Page 17: ...E D 69 1 5 163N CLICK HANDLE D 8 1 6 3350 8A BLACK SHOULDER STRAP 25X1200 1 7 PVC120 PLASTIC HOSE RET PVC 8x13x1200 BLACK 1 8 92 4GU25 SHEATH 130x50 CM FOR STRAP 25 1 9 ZZOR6262 OR 66 04x5 33 NBR 70SH 5 10 19KPR030 VALVE GROUP 5 11 ZZOR3056V OR 13 95x2 62 FPM 70SH 10 12 192P EXTENSION PLASTIC PIPE cm 42 1 13 ZZOR109V OR 9 13x2 62 FPM 70SH 10 14 PL01C02 3 8 RING H 19 NYLON 2 15 3340 6V ADJUSTABLE N...

Page 18: ...ompany Davide e Luigi Volpi S p A Via San Rocco 10 46040 Casalromano MN ITALIA DECLARES THAT THE MACHINE Denomination ELECTRIC SPRAYER Type VOLPITECH VT7 Model VT7 IS IN CONFORMITY WITH THE RELEVANT COMMUNITY HARMONISATION LEGISLATION DIRECTIVE 2006 42 CE Machinery Directive DIRECTIVE 2014 30 UE Electromagnetic Compatibility Reference to the relevant harmonized standards used or references to othe...

Page 19: ...este manual de instrucciones antes de poner en marcha la máquina así como antes del uso del mantenimiento o de cualquier otra intervención en la misma El uso correcto de la máquina y un mantenimiento eficaz y racional permiten mantener el equipo en óptimas condiciones de funcionamiento e impiden la reducción de su eficiencia y seguridad Este manual ha sido realizado de conformidad con las indicaci...

Page 20: ...bajo Es necesario analizar adecuadamente la presencia potencial de dichas situaciones de peligro y riesgo para determinar procedimientos de trabajo seguros y normas de comportamiento adecuadas y predisponer dispositivos de protección individual CUANDO EL OPERADOR USA EL PULVERIZADOR DEBE ADOPTAR PROCEDIMIENTOS DE TRABAJO SEGUROS Y OBSERVAR LAS NORMAS Y LOS REGLAMENTOS DE SEGURIDAD No utilice produ...

Page 21: ...e el transporte y el almacenamiento la máquina debe colocarse en un sitio independiente sin apoyar otros aparatos encima o debajo de la misma Evite golpear la máquina durante el transporte Se aconseja desplazar la máquina con mucho cuidado para evitar golpes que podrían dañarla 5 MODO DE EMPLEO 5 1 PREPARACIÓN DEL PULVERIZADOR Verificar la presencia del OR en la empuñadura E y atornillar la lanza ...

Page 22: ...r el diametro de la rosa hasta obtener el chorro fig 7 5 6 OPERACIONES A REALIZAR AL FINALIZAR EL TRABAJO Asegúrese de que el interruptor en la cabeza del pulverizador fig 8 esté en posición OFF Manteniendo el pulverizador en posición vertical accione la válvula de descarga de presión fig 5 y descargue completamente el tanque de la presión restante Desenroscar y quitar la cabeza del tanque Vierta ...

Page 23: ... siempre el pulverizador con el interruptor general apagado Recargue y conserve el pulverizador a temperaturas que oscilen entre los 5 y los 40 C En caso de períodos prolongados de almacenamiento o inactividad recargue la batería cada quatro meses 7 ANOMALÍAS CAUSAS SOLUCIONES ANOMALÍAS PROBABLES CAUSAS SOLUCIONES Al accionar la palanca del pulverizador no sale agua El motor no funciona Batería de...

Page 24: ... DE REPUESTOS Código Descripción Piezas en cada envase 1 19KPR010B TANQUE VT7 1 2 19PRE010 CABEZA ELÉCTRICA 1 3 PL01D01 TUERCA 1 2 2 4 3350 13 FILTRO DE LLENADO Ø 69 1 5 163N EMPUNADURA CLICK A LEVA 1 6 3350 8A CINTURÓN DE HOMBRO 1 7 PVC120 MANGUERA DE ENTREGA 1 8 92 4GU25 HOMBRERA 1 9 ZZOR6262 OR 66 04x5 33 NBR 70SH 5 10 19KPR030 VÁLVULA DE ALIVIO DE PRESIÓN 5 11 ZZOR3056V OR 13 95x2 62 FPM 70SH ...

Page 25: ... S p A Via San Rocco 10 46040 Casalromano MN ITALIA DECLARA QUE LA MAQUINA Denominación PULVERIZADOR ELÉCTRICO Tipo VOLPITECH VT7 Modelo VT7 ES CONFORME CON LA LEGISLACIÓN DE ARMONIZACIÓN PERTINENTE DE LA UNIÓN DIRECTIVA 2006 42 CE Directiva Sobre Máquinas DIRECTIVA 2014 30 UE Compatibilidad Electromagnética Referencias a las normas armonizadas pertinentes utilizadas o referencias a otras especifi...

Page 26: ...avant de la mise en service de l utilisation de l entretien ou de toute autre intervention sur la machine Un emploi correct de la machine et un entretien efficace et rationnel permettent de garder la machine dans les conditions de fonctionnement les meilleures et de ne pas réduire son efficience et sa sécurité Le présent manuel a été réalisé conformément aux indications qui se trouvent dans l ANNE...

Page 27: ... de fixer des procédures de travail sûres des normes de comportement convenables et de prédisposer des dispositifs de protection individuelle L OPERATEUR LORSQU IL FAIT MARCHER LE PULVERISATEUR DOIT ADOPTER DES PROCEDURES DE TRAVAIL SURES ET OBSERVER LES NORMES ET LES REGLEMENTS CONCERNANT LA SECURITE Ne pas utiliser des produits dont on ignore les caractéristiques toxicologiques mais utiliser exc...

Page 28: ...nt La machine doit être transporté vide ou si non possible il doit être fixé correctement pour éviter les déversements accidentels du produit La machine ne doit pas être superposée à d autres matériaux ni d autres matériaux doivent être superposés à la machine soit pendant le transport soit pendant le stockage Pendant le transport ne pas faire subir des chocs à la machine On recommande de déplacer...

Page 29: ...sateur pendant une longue période 5 5 REGULATION DE LA BUSE Le pulvérisateur est fourni d une buse a cône réglable En vissant ou en tournant la partie terminale de la buse on peut ajuster le diamètre de la rose jusqu à obtenir le jet fig 7 5 6 OPERATIONS A EFFECTUER A LA FIN DES ACTIVITES DE TRAVAIL S assurer que l interrupteur de la tête du pulvérisateur fig 8 soit en position OFF En maintenant l...

Page 30: ...ue l interrupteur général A soit éteint La vie de la batterie dépend largement des règles fondamentales suivantes Ne pas la mettre en court circuit La recharger prestement avec l interrupteur général éteint et en respectant les temps nécessaires Ne pas actionner le pulvérisateur pendant les phases de charge Mettre toujours le pulvérisateur à sa place avec l interrupteur général éteint Recharger et...

Page 31: ... remise au concessionnaire ou au réparateur agréé avec l outil à réparer En l absence de ces documents la machine sera dans tous les cas considérée comme hors garantie 10 MANUEL DES PIECES DE RECHANGE Reference Description Pièces par emballage 1 19KPR010B RÉSERVOIR COMPLET VT7 1 2 19PRE010 TETE ELECTRIQUE 1 3 PL01D01 PIVOTANT 1 2 2 4 3350 13 TAMIS EN PLASTIQUE DIAM 69 1 5 163N POIGNEE CLICK 1 6 33...

Page 32: ...lpioriginale it info volpioriginale it La société Davide e Luigi Volpi S p A Via San Rocco 10 46040 Casalromano MN ITALIA DECLARE QUE LE MACHINE Dénomination PULVéRISATEUR ELECTRIQUE Type VOLPITECH VT7 Modèle VT7 EST CONFORME À LA LÉGISLATION D HARMONISATION DE L UNION DIRECTIVE 2006 42 CE Directive Machines DIRECTIVE 2014 30 UE Compatibilité Électromagnétique Référence aux normes harmonisées pert...

Reviews: