background image

User Manual

FKG-1

5 Controlling the

FKG-1

running Windows

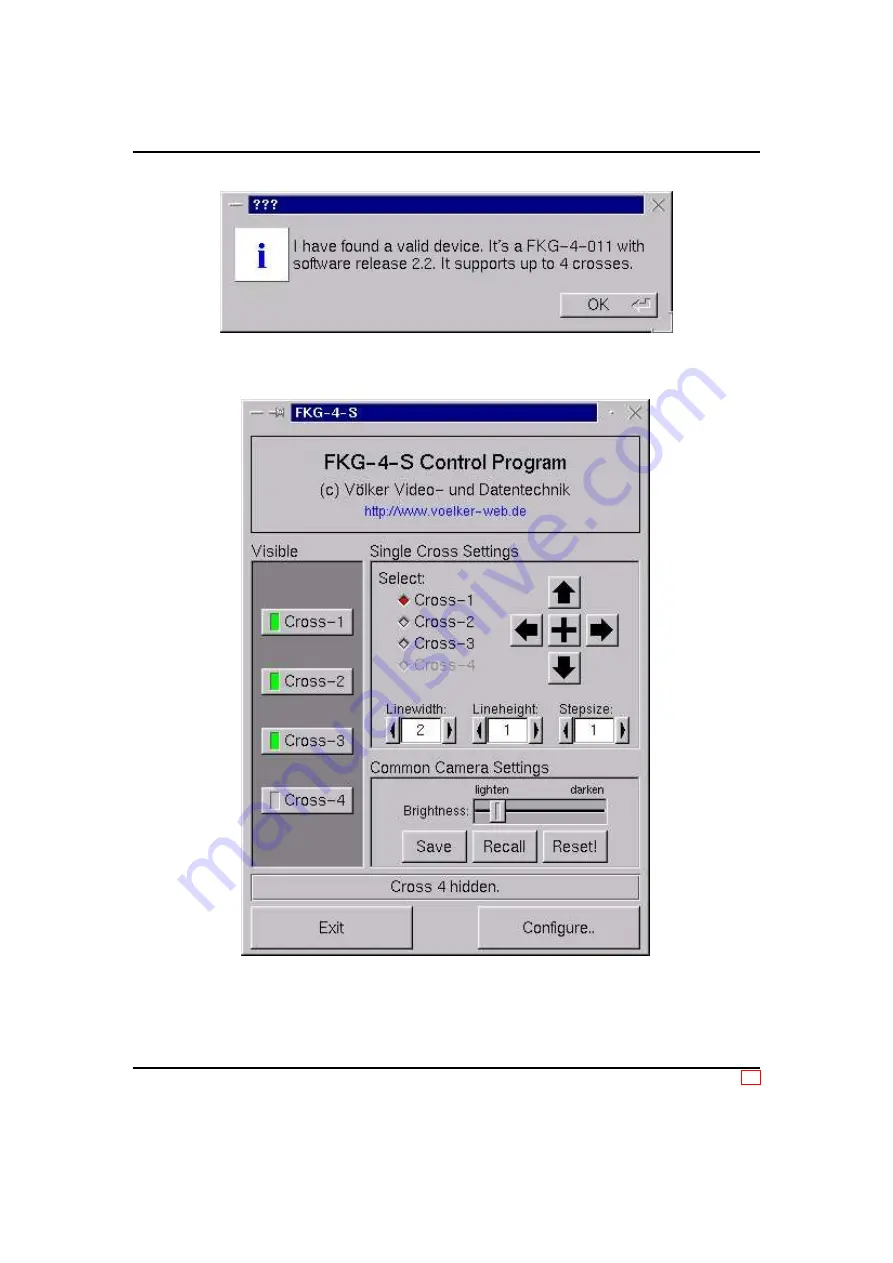
Figure 8: Informations queried from connected device.

Figure 9: A sample main window. In the case shown, the crosshair 2 is selected for modification.

Crosshair number 4 is disabled.

Revision 1.5, Dipl.-Ing. Joerg Desch / esw

11 / 16

Summary of Contents for FKG-1

Page 1: ...Video und Datentechnik GmbH Es ist erlaubt w rtliche Kopien dieses Do kuments zu verteilen solange der Copyright vermerk und diese Erlaubnis in allen Kopien enthalten sind Permission is granted to mak...

Page 2: ...ril 11 2006 Copyright c V lker Video und Datentechnik GmbH Dipl Ing Joerg Desch esw V lker Video und Datentechnik GmbH Robert Bosch Strasse 9 63477 Maintal D rnigheim Tel 49 61 81 43 77 0 Fax 49 61 81...

Page 3: ...The area Single Cross Settings 12 5 3 3 The area Persistent Camera Settings 13 6 Appendix 15 6 1 Technical Data 15 1 In General The FKG 1 is a compact crosshair generator It is available as a printed...

Page 4: ...d by potentiometers or by RS232 V 24 See section 6 on page 15 for an overview of more technical details of the device 2 Connecting The FKG 1 This member of the FKG product family is delivered inside a...

Page 5: ...User Manual FKG 1 2 Connecting The FKG 1 4 3 2 8 1 P3 5 P2 6 P1 7 Figure 2 Overview of the connectors and control elements of the FKG 1 for BAS FBAS Revision 1 5 Dipl Ing Joerg Desch esw 4 16...

Page 6: ...able Table 1 Pinout of the D Sub connector Pin Signal 2 transmission signal TxD 3 reception signal RxD 5 signal ground 3 Connecting The Printed Circuit Board The printed circuit board of the FKG 1 is...

Page 7: ...ment of ST1 and a sample wiring plan for the potentiometers is shown in figure 4 ST1 P3 brightness 5V GND P2 horizontal pos P1 vertical pos Figure 4 Connecting the potentiometers to ST1 3 2 The Video...

Page 8: ...n signal RxD 3 4 The Supply Voltage The supply voltage has to be connected to ST2 The FKG 1 needs a DC voltage between 8 V and 12 V The maximum current consumption is less then 80 mA ST2 pin 1 is posi...

Page 9: ...ontrols the vertical position With P3 the level of the brightness is adjustable in 255 steps The value of white is hereby 0 It isn t necessary to save any data in this operation mode All settings are...

Page 10: ...with FKG GUI you have to configure 9600 bps Ensure that the corresponding solder jumper is setup correctly 5 2 Configuration of the application After program start the configuration dialog box as sho...

Page 11: ...interface has been identified but no device is connected In this case you should check the cable connection If you are sure that the cable is OK and the connector is properly plugged repeat this test...

Page 12: ...1 running Windows Figure 8 Informations queried from connected device Figure 9 A sample main window In the case shown the crosshair 2 is selected for modification Crosshair number 4 is disabled Revis...

Page 13: ...our buttons which are provided with LED symbols These buttons are used to activate or deactivate the individual crosshairs The lit or unlit LEDs shows the current status of the corresponding crosshair...

Page 14: ...e i e no crosshairs must have been selected beforehand With the slider Brightness you can set the general brightness of all crosshairs displayed normal operation mode Changes are realized while the sl...

Page 15: ...User Manual FKG 1 5 Controlling the FKG 1 running Windows picture If you select No the reset process will be cancelled without causing any data loss Revision 1 5 Dipl Ing Joerg Desch esw 14 16...

Page 16: ...50 Hz interlaced 2 1 signal bandwidth 10 MHz 1 dB supply power 8 V to 12 V current consumption ca 80 mA weight ca 40 g resolution horizontal 785 vertical 585 brightness 255 levels line width 4 values...

Page 17: ...User Manual FKG 1 6 Appendix 79 25 9 3 5 2 5 2 5 3 5 2 5 50 2 5 Figure 12 Dimensioning of the printed circuit board All values are mm Revision 1 5 Dipl Ing Joerg Desch esw 16 16...

Reviews: