background image

VMAC 

– Vehicle Mounted Air Compressors


Toll Free:


1-888-241-2289  Local: 250-740-3200 

Fax: 1-250-740-3201 

15 


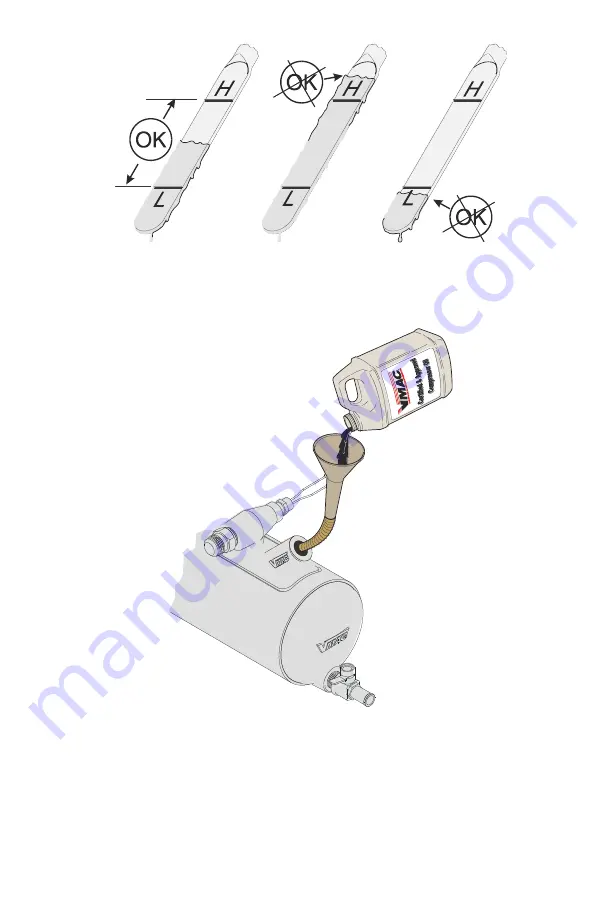
2.4.5 Use a funnel inserted into the dipstick hole and pour in VMAC 

certified and approved synthetic oil.  


2.4.6 Inspect the O-ring on the dipstick for abrasions or nicks. 

Replace the O-ring if damaged. Install the oil level dipstick and 
tighten it securely. 

 
2.4.7 Start the engine following the start-up procedure number 2.2. 

Summary of Contents for S700078

Page 1: ...C 0 0 1 1 2 6 V R 7 0 A i r C o mp r e s s o r I n s t a l l a t i o nMa n u a l K u b o t aV 3 6 0 0 S Y S T E MS 7 0 0 0 7 8...

Page 2: ......

Page 3: ...cedure 13 2 4 Check oil level in oil air separator tank 14 2 5 Check pressure supply valve 16 2 6 Check compressor for damage 17 2 7 Check air lines and hoses for damage 17 2 8 Change compressor oil 1...

Page 4: ...Loctite is registered trademarks of Loctite Corporation Notice Manuals and products are subject to change without notice Important Information The VMAC warranty form is located at the back of this man...

Page 5: ...erial Number Breakdown Description P170023 X X X 000X Part Revision Year Month Manufacturing A H J N P R T W Y ONLY AS PER ASME STANDARD Y14 35M YEAR X 2009 Y 2010 Z 2011 A 2012 B 2013 MONTH A JANUARY...

Page 6: ...PPLY VALVE AND TRIGGER ANY TOOLS ATTACHED TO DEPRESSURIZE THE SYSTEM BEFORE SERVICING THE COMPRESSOR AND COMPONENTS The information contained in this manual is based on sound engineering principles re...

Page 7: ...ert your safety is involved While it is impossible to warn about every conceivable hazard let good common sense be your guide This symbol is used to call your attention to instructions on a specific p...

Page 8: ...r render it unsafe Be aware that it is impossible to warn of all the possible hazardous consequences that might result from failure to follow these instructions Fire and Explosion Hazards Fire in the...

Page 9: ...urize the system could cause parts to separate explosively Flying parts could cause serious injury or death Oil air mixture could be sprayed out with sufficient force to penetrate the skin which could...

Page 10: ...stem from over pressurization If the oil temperature exceeds 290 F 143 C the system is switched off draining the high pressure air and reducing the load on the engine VMAC certified oil is used to lub...

Page 11: ...740 3200 Fax 1 250 740 3201 9 Compressor Oil Air Separator Tank Manifold Block Coalescing Separator Filter Oil Filter Oil Cooler Pressure Relief Valve Air Filter Solenoid Valve Oil Fill Dipstick Drai...

Page 12: ...e system 1 The auxiliary air tank must be connected to the supply valve 2 The air line MUST have a 60 psi minimum pressure check valve VMAC P N A700187 installed to prevent blow back from the auxiliar...

Page 13: ...tions STANDARD GRADE 8 NATIONAL COARSE THREAD Size 1 4 5 16 3 8 7 16 1 2 9 16 5 8 Foot pounds ft lb 9 18 35 55 80 110 170 280 Newton meter N m 12 24 47 74 108 149 230 379 STANDARD GRADE 8 NATIONAL FIN...

Page 14: ...ter optional 250 hrs Compressor Oil 250 hrs Oil Filter 250 hrs Coalescent Filter 250 hrs Note Inspect air filter for contamination every 5 days whether compressor has been used or not Every 500 hours...

Page 15: ...uipment is faulty not securely connected or not connected then excessive oil may be noticed in discharge air 2 2 2 Place the engine main RUN STOP switch in the STOP position 2 2 3 Place the compressor...

Page 16: ...panel and hose lengths have been designed to allow the tank to be accessed easily for servicing If the front panel tank is removed for oil change ensure the tank is oriented correctly to enable corre...

Page 17: ...a funnel inserted into the dipstick hole and pour in VMAC certified and approved synthetic oil 2 4 6 Inspect the O ring on the dipstick for abrasions or nicks Replace the O ring if damaged Install th...

Page 18: ...position 2 4 11 Shutdown the engine and wait 5 minutes then open the pressure supply valve to depressurize the system 2 4 12 Check for oil leaks 2 4 13 Repeat steps 2 4 3 through 2 4 13 until the oil...

Page 19: ...7 Check air lines and hoses for damage Follow all safety precautions 2 7 1 Trace all the airlines and hoses looking for chaffing against each other or metal edges If chaffing is seen use plastic convo...

Page 20: ...autions 2 8 1 Clean debris and dust from the area around the drain valve of the oil air separator tank to prevent contamination 2 8 2 Insert a hose over the oil air separator tank s drain valve outlet...

Page 21: ...pproved synthetic oil is required to fill the system 4 litres are required for servicing 2 8 5 Unscrew and remove the oil level dipstick Take care not to damage the O ring on the dipstick Use a funnel...

Page 22: ...of the manifold block for contamination old gasket material or damage Make sure the new filter is a VMAC filter part number 9200039 This oil filter is a high pressure oil filter not an automotive oil...

Page 23: ...intake with masking tape or a clean cloth to prevent contamination Do not use compressed air or perform any other tasks around the compressor until the filter and cover are replaced Never clean the fi...

Page 24: ...50 740 3201 22 Filter Retainer 2 10 5 Remove the masking tape or cloth from the compressor air intake The new VMAC filter is oval make sure that the filter fits over the machined step on the intake ho...

Page 25: ...mage the scavenging tube and screen Scavenging Tube Threaded Nipple Manifold Check Surface Check the filter to make sure that the threaded nipple did not unscrew with the filter If it is in the filter...

Page 26: ...til the gasket contacts the sealing surface of the manifold block 2 11 4 Tighten the filter an additional 3 4 to 1 turn to seat the sealing gasket Never over tighten the filter as this may damage the...

Page 27: ...for the problem by understanding how the system operates isolating the potential causes by accurate testing using the correct recognized procedures performing proper repairs using the correct procedur...

Page 28: ...quipment on level ground Restricted oil lines Check for kinked or pinched lines Plugged oil filter Replace oil filter Cooler not functioning or plugged Replace or clean oil cooler Engine cooling syste...

Page 29: ...l JIC O ring 1 2 3 4 16 3 1 9200039 Oil Filter VR 3 250 Short 4 1 4900035 Nipple Steel Str Thrd 3 4 16 5 1 5000020 Elbow Brass NPT Poly 1 8 1 4 6 1 9300007 Adapter 7 1 9300025 Assembly Scavenge Tube 8...

Page 30: ...300056 Cooler Assembly Item Qty Part Description 1 1 4900128 FTG STR 12MORB 12MJIC VITON 2 1 4900200 FTG STR 8MORB 8MJIC VITON 3 1 4900260 FTG 90 12MORB 12MJIC VITON 4 1 9300090 Assembly Dipstick Comp...

Page 31: ...essor and Brackets 1 2 3 4 5 6 P170024 Assembly Compressor S700066 Item Qty Part Description 1 1 9300071 Inlet Valve S700066 2 1 5830004 O ring Viton 3 1 8 ID x 1 8 3 1 P170023 Compressor S700066 4 1...

Page 32: ...289 Local 250 740 3200 Fax 1 250 740 3201 30 4 4 Electrical Components Wiring Harness Solenoid and Connectors Item Qty Part Description 1 2 5000020 Connector straight 1 8NPT 1 4Poly 2 1 4800679 Soleno...

Page 33: ...l red solenoid valve to inlet valve 5 1 1772144 Hose assembly discharge manifold to supply valve 6 24 5 1700055 Tube 1 4 outside diameter signal black compressor to solenoid valve 7 1 1772022 Hose ass...

Page 34: ..._______________________ City _____________________ State Prov ______________ Installation Date _____ _____ _____ Day Month Year Owner Information Company Name ______________________________________ Ad...

Page 35: ......

Page 36: ......

Reviews: