Snipe
Recommendations for assembly
5
2.5 Installing the aileron horns.
Attention:
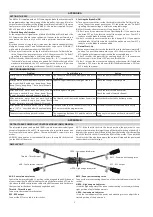
Snipe wing pylon has a complex kinematics.
Installing the horn the wrong location in the depth and the
chord of the wing there can be interference with the upper
wing skin . Figure 2.15
In order to provide clearance from the upper surface of the
wing patch stick to the pylon . Attach the patch to the upper
flat of the flaperon horn tab. Figure 2.16
Drill a hole with a diameter of 2- 3mm in the lower surface
of the wing in the control horn, to prepare horn installation
with glue . Figure 2.17
Clean the area around the flaperon pivot axis slot and
sandpaper for better adhesion . Figure 2.18
Insert the Horns in the slot of the flaperon , and insert the
pivot shaft into the flaperon horn. Secure the axle in the wing
slot with superglue . Figure 2.19 Make sure that the horn
separation matches Figure 2.24
Set the pylon in the gap of 0.3-0.7 mm from the stop line.
Set the plane parallel to the plane of the slot hog inside the
aileron . Lock Horns with thick superglue through the hole.
Use the accelerator , but do not let the foaming superglue .
Figure 2.20
Turn the aileron carefully seal the pylon inside the aileron .
Be careful - do not pour glue joint elerona.Figure 2.21 Kevlar
- 2.22
Cut carbon tissue ( 80-120 g/m2) or two layers of
Carboline. Glue the reinforcement , alternating impregnation
CA and crimping finger through a polyethylene film. Be
careful not to use too much CA and glue pylon axis . Fig.
2.25.
(JW note: I used good epoxy for these steps rather than
CA)
Fig. 2.15 - Kinematics aileron horn
Figure 2.16 – Flaperon horn tab insert
Figure 2.17 - Holes for gluing horn in flaperon