background image

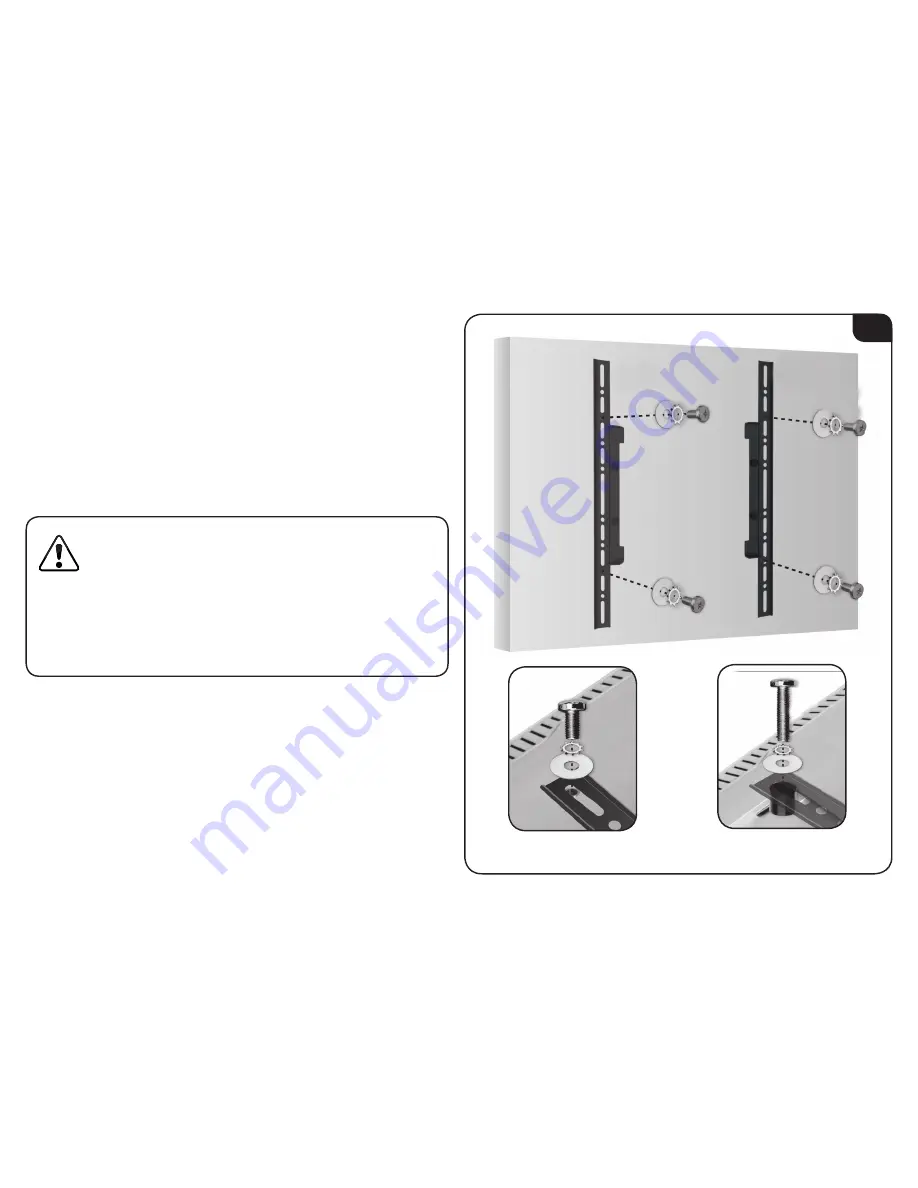
3. Using the screwdriver, insert the screws, star washers, and  
    washers as shown. 
 
    Because each TV is different, your VIZIO TV mount includes  
    screws of different lengths. Use screws that can be inserted  
    completely. 
    

    Do not use a short screw if a longer screw can be  
    inserted completely.

If your TV has a curved back, or if your TV has 
protruding components, place spacers between the 
brackets and the mounting holes. The spacers are in 
the pouch labeled MISC.
If using the M4 or M5 screws, use the small spacers.
If using the M6 or M8 screws, use the large spacers.

3

Without Spacer

With Spacer

17

Summary of Contents for XMA1200

Page 1: ...XMA1200 QUICK INSTALL GUIDE FULL ARTICULATING MOUNT UNIVERSAL FOR 40 60 TVS UP TO 120 LBS...

Page 2: ...nd a maximum screen size of 60 Attaching a screen that is larger or heavier than specified above may result in personal injury or damage to your TV If you have any doubts about the ability of the wall...

Page 3: ...installation ensure you have all of the items listed on this page Do not begin the installation unless you have all of the following items Mounting a TV requires lifting To make the installation easi...

Page 4: ...ded and undamaged To prevent loss do not unpack the small parts until they are required If any parts are missing or damaged contact VIZIO Customer Service 877 698 4946 x 1 x 2 x 2 x 2 x 4 x 4 Sec X1 x...
Page 5: ...x 4 M4 x 4 x 4 x 4 M5 x 4 x 4 x 4 M8 x 4 x 4 x 4 M6 x 4 x 4 x 4 x 4 MISC x 4 x 4 x 4 LAG x 6 x 6 ANCHOR x 6 3...

Page 6: ...e left or to the right Before you begin the installation you must decide which direction you want the arm to swing to the left or to the right If you want the arm to swing to the left do nothing The m...

Page 7: ...n the mount as shown and swing the arm away from the mount 3 Using the screwdriver remove the remaining 4 phillips head screws from the arm There are 2 screws inside the arm and 2 screws on the top of...

Page 8: ...the arm to the mount 6 Using the phillips head screwdriver replace the 6 phillips head screws Note that the tab should be on the top of the arm The arm is ready to swing to the right Go to Step 4 on...

Page 9: ...ce your TV s User Guide Locate the 9 holes on the top of the swing arm Determine your TV s correct holes using the image at right 2 Using the screwdriver remove the 4 screws from the swing arm as show...

Page 10: ...s For TVs 50 52 use the middle holes For TVs 55 60 use the outermost holes 4 Using the phillips head screwdriver replace the 4 screws The swing arm is adjusted If you are installing the mount on a wal...

Page 11: ...locate two studs in the wall The studs should be approximately 16 apart Use the pencil to mark the areas of the wall where the studs are located 2 Hold the template against the wall using the pencil...

Page 12: ...s Drill about 2 into the studs Remove the template from the wall 4 Remove 2 lag bolts and 2 washers from the pouch labeled LAG Use a wrench to insert the lag bolts and washers into the holes you just...

Page 13: ...e covers away from the mount Save the plastic covers They will be reattached in Step 7 6 Hang the mount on the wall using the 2 lag bolts then slide the mount so the lag bolts are resting in the narro...

Page 14: ...the power drill and the 7 32 drill bit drill 2 holes in the bottom two mount holes Drill about 2 into the studs 8 Remove 2 lag bolts and 2 washers from the pouch labeled LAG Use a wrench to tighten t...

Page 15: ...using the level to level the template When the template is level tape it in place 2 Using the power drill and the 1 2 drill bit drill into 6 of the template holes as shown Drill about 2 1 2 deep Remo...

Page 16: ...you just drilled Ensure the anchors are completely inserted and flush with the wall 4 Remove 6 lag bolts and 6 washers from the pouch labeled LAG Use a wrench to tighten the lag bolts and washers into...

Page 17: ...the mount on the wall using the 6 lag bolts then slide the mount so the lag bolts are resting in the narrow part of the slot Verify that the mount is level Make small adjustments before tightening al...

Page 18: ...s mounting holes If you do not have the User Guide or the size is not listed you may have to try several sizes until you find one that fits 2 Place the vertical TV brackets against the mounting holes...

Page 19: ...n be inserted completely Do not use a short screw if a longer screw can be inserted completely If your TV has a curved back or if your TV has protruding components place spacers between the brackets a...

Page 20: ...the pouch labeled Sec X1 and remove 4 nuts and their 4 matching screws 5 Insert the screws through both the horizontal and vertical TV brackets Ensure you attach both the top and bottom horizontal bra...

Page 21: ...hang the top bracket on the arm The tab on the mount arm fits into the slot on the horizontal bracket Then gently lower the bottom bracket so it rests against the arm This step requires lifting the TV...

Page 22: ...ty screws as shown 4 Place the locking tool inside one of the mount brackets then snap the plastic covers back into place By saving the locking tool in this place you can remove the security screws la...

Page 23: ...ke the 4 zip ties and 4 sticky mounts from the pouch labeled Sec X1 Bundle the cables together and wrap them with zip ties Before closing the zip ties lace each one through a sticky mount as shown 2 R...

Page 24: ...the TV Remove the allen wrench from the pouch labeled Sec X1 1 Using the allen wrench adjust the swivel tension by adjusting the top and bottom screws as shown 2 Using the allen wrench adjust the til...

Page 25: ...ging that affords an equal degree of protection VIZIO Technical Support will provide instructions for packing and shipping the covered Product to the VIZIO service center Limitations and Exclusions VI...

Page 26: ...ur Support Department at the number below Customer support and quality service are integral parts of VIZIO s commitment to service excellence For technical assistance contact our VIZIO Technical Suppo...

Page 27: ......

Page 28: ...ED ARE FOR ILLUSTRATION PURPOSES ONLY VIZIO THE V LOGO WHERE VISION MEETS VALUE AND OTHER VIZIO TRADEMARKS ARE THE INTELLECTUAL PROPERTY OF VIZIO INC PRODUCT FEATURES AND SPECIFICATIONS ARE SUBJECT TO...

Reviews: