background image

VIZIO VSB210WS User Manual 


www.VIZIO.com


Chapter 1 

Chapter 1 

Chapter 1 

Chapter 1 Installation

Installation

Installation

Installation


Preparing 

Preparing 

Preparing 

Preparing the

the

the

the    HD Sound Bar System

HD Sound Bar System

HD Sound Bar System

HD Sound Bar System    for Wall Mounting

for Wall Mounting

for Wall Mounting

for Wall Mounting


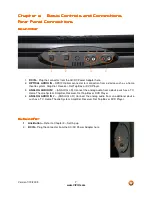
The  VIZIO  HD  Sound  Bar  System  can  either  be  kept  on  the  stand  base  or  mounted  on  the  wall  for 
viewing.  If you choose to mount the TV on the wall, please follow the instructions below for removing the 
stand. 


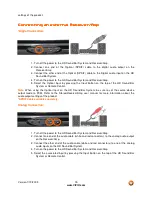
The two feet provided with the HD Sound Bar System can be used as brackets if it is to be wall 

mounted. Using a screwdriver, remove the stands from their original configuration as shown in 

Fig. 1, and re-attach to the HD Sound Bar System in the configuration shown in Fig. 2. 

Use M5 (Metric) or #10 (English) screws for keyhole to mount. 


  Figure 1  


   Figure 2 


NOTE: 

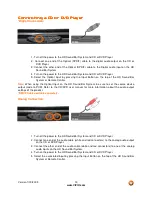
It  is  recommended  that  Power  and  Audio  cables  be  connected  to  the  HD  Sound  Bar  System 

before placing it on the wall. 


Summary of Contents for VSB210WS - V - Home Theater Speaker Sys

Page 1: ...fers extended warranty service plans These plans give additional coverage during the standard warranty period Visit our website or call us to purchase a plan Write down the serial number located on th...

Page 2: ...nless proper ventilation is provided Never push any object into the slots and openings on the HD Sound Bar System enclosure Do not place any objects on the top of the HD Sound Bar System Doing so coul...

Page 3: ...r System is dropped and the housing is damaged the internal components may function abnormally Unplug the power cord immediately and contact your dealer for repair Continued use of the HD Sound Bar Sy...

Page 4: ...he carton and packing material for future shipping Package Contents Package Contents Package Contents Package Contents VIZIO High Definition Sound Bar and Wireless Subwoofer 2x AC DC Power Adapter 2x...

Page 5: ...ote Control Precautions 10 Chapter 3 Connecting Equipment 11 Connecting a TV 11 Connecting a Cable or Satellite Box 12 Connecting a CD or DVD Player 13 Connecting an MP3 Player 14 Connecting a VCR or...

Page 6: ...ase or mounted on the wall for viewing If you choose to mount the TV on the wall please follow the instructions below for removing the stand The two feet provided with the HD Sound Bar System can be u...

Page 7: ...TICAL AUDIO IN SPDIF Optical connector for connection from a device such as a home theatre system Amplifier Receiver Set Top Box or DVD Player 3 ANALOG AUDIO IN 1 ANALOG L R Connect the analog audio f...

Page 8: ...Array is located at the lower right side of the Sound Bar There are a total of 10 LEDs The first 7 white LEDs are volume indicators Each LED has three brightness levels for a total of 21 volume setti...

Page 9: ...tton will set the sound system to have control over the level of the audio output preventing commercials on regular programming to become louder than the volume of the program being viewed Pressing th...

Page 10: ...w The effective range of the remote control is approximately 30 feet 10 meters from the front of the receiver window 30 to the left and right 20 up and down VIZIO Remote Control VIZIO Remote Control V...

Page 11: ...Bar System and TV 5 Select the Optical input by pressing the Input Button on the top of the HD Sound Bar System or Remote Control Note When using the Optical Input on the HD Sound Bar System be sure...

Page 12: ...he top of the HD Sound Bar System or Remote Control Note When using the Optical Input on the HD Sound Bar System be sure to set the source device output mode to PCM Refer to the TV user manual for mor...

Page 13: ...ound Bar System or Remote Control Note When using the Optical Input on the HD Sound Bar System be sure to set the source device output mode to PCM Refer to the CD DVD user manual for more information...

Page 14: ...erference Refer to your MP3 Player user manual for more information about the audio output settings and connections of the product CAUTION Do not connect the MP3 Player headphone output directly to th...

Page 15: ...e top of the HD Sound Bar System or Remote Control Note When using the Optical Input on the HD Sound Bar System be sure to set the source device output mode to PCM Refer to the Stereo Receiver Amp use...

Page 16: ...or Remote Control Note When using the Optical Input on the HD Sound Bar System be sure to set the source device output mode to PCM Refer to the Computer user manual for more information about the aud...

Page 17: ...Bar System power adapter DC connector Fig 1 3 Before connecting the AC cord to an outlet connect the Sub Woofer power adapter DC connector Fig 2 4 Connect the AC cords of the power adapter to suitabl...

Page 18: ...vers a remarkable TV viewing experience by eliminating irritating fluctuations in volume all too common in today s television broadcasts To ensure the technology functions properly enable it by pressi...

Page 19: ...lows Since many of today s broadcasts are encoded in 5 1 surround sound TruSurround HD enables listeners to experience up to 5 1 channels of audio over 2 channels or in this case 2 1 channels Simply...

Page 20: ...ote Control or on the Sound Bar will increase the volume level Hold for one half second to continuously increase volume Vol Pressing this button on the Remote Control or on the Sound Bar will decrease...

Page 21: ...ub Pressing this button will decrease the volume output of the Subwoofer relative to the overall system volume Chapter 6 Chapter 6 Chapter 6 Chapter 6 Error Detection Error Detection Error Detection E...

Page 22: ...fy the ventilation slots in the bar are clear the bar has proper ventilation and is not being operated in an environment that is too hot If these conditions exist reduce the volume level for the parti...

Page 23: ...e HD Sound Bar System to cycle through the inputs No sound on Optical In The source device may be set to AC3 Dolby Digital output SRS TS HD requires PCM audio Lt Rt encoded for movies Change the devic...

Page 24: ...anual 24 www VIZIO com Please have your VIZIO model number serial number and date of purchase available before you call VIZIO Address 39 Tesla Irvine CA 92618 USA Telephone 949 428 2525 Fax 949 585 95...

Page 25: ...ons However there is no guarantee that interference will not occur in a particular installation If this equipment does cause harmful interference to radio or television reception which can be determin...

Page 26: ...requency response 80Hz to 20kHz Integrated Class D Amplifier at 15x2 channel with 01 THD Discrete 192kHz 24 bit S PDIF receiver enables up to 144dB dynamic range digital audio delivery SNR 105db Suppo...

Page 27: ...39 95 W x 4 82 H x 4 33 D 1015mm x 122mm x 110mm Dimensions Subwoofer 11 18 W x 12 30 H x 11 87 D 284mm x 312mm x 301mm Net Weight HD Sound Bar System 7 8lbs 3 48Kg Net Weight Subwoofer 15 5lbs 6 92K...

Page 28: ...AM to 9 00PM Pacific Time Monday through Friday and 8 00AM to 4 00PM Pacific Time Saturday and Sunday Please note that holiday hours may vary For up to date information please visit www VIZIO com VIZI...

Page 29: ...eturn authorization number must first be obtained from VIZIO s Customer Service by emailing CustomerSupport VIZIO com or by calling 949 428 2525 6 00AM to 9 00PM Pacific Time Monday through Friday and...

Page 30: ...the original unit with the replacement unit VIZIO will be responsible for the return transportation charges from the service center to the customer Please read VIZIO s Limited Product Warranty for wa...

Page 31: ...king Sound Bar and Subwoofer 17 LED Blink Codes 17 19 M Maintenance 19 MP3 Player Connection 13 R Receiver Connection 14 Remote Control 9 Battery 10 Range 10 Programming VIZIO Universal Remote 9 S Saf...

Reviews: