


VIZIO VSB210WS User Manual
14
www.VIZIO.com
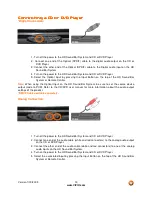
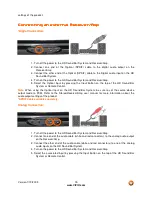
Connecting an MP3 Player
Connecting an MP3 Player
Connecting an MP3 Player
Connecting an MP3 Player
1. Turn off the power to the HD Sound Bar System and MP3 Player.
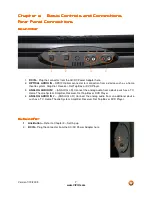
2. Connect one end of the audio cable to the analog audio output on the MP3 Player Docking
Unit*.
3. Connect the other end of the audio cable (white and red connectors) to one of the analog
audio inputs on the HD Sound Bar System.
4. Turn on the power to the HD Sound Bar System and MP3 Player.
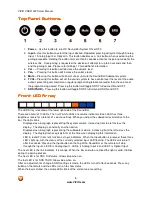
5. Select the associated input by pressing the Input Button on the top of the HD Sound Bar
System or Remote Control.
*Note:
MP3 analog audio output commonly uses a 1/8” Stereo Mini-Jack port. In this configuration,
a 1/8” Stereo Mini-Jack to RCA stereo cable will be required. If wall mounting of the Sound Bar
System is planned, purchase the above described cable having right-angle RCA connectors to
avoid mounting interference.
Refer to your MP3 Player user manual for more information about the audio output settings and
connections of the product.
CAUTION:
Do not connect the MP3 Player headphone output directly to the HD Sound Bar System. This
can result in damage to the devices. A docking unit or equivalent conversion unit is required to adapt line
level audio to the HD Sound Bar System.
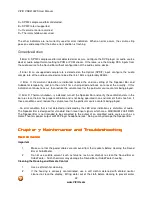
Connecting a
Connecting a
Connecting a
Connecting a VCR
VCR
VCR
VCR or Video
or Video
or Video
or Video Camera
Camera
Camera
Camera
6. Turn off the power to the HD Sound Bar System and VCR or Video Camera.
7. Connect one end of the audio cable (white and red connectors) to the analog audio output
on the VCR or Video Camera.
8. Connect the other end of the audio cable (white and red connectors) to one of the analog
audio inputs on the HD Sound Bar System.
9. Turn on the power to the HD Sound Bar System and VCR or Video Camera.
10. Select the associated input by pressing the Input Button on the top of the HD Sound Bar
System or Remote Control.
Note:
Refer to your VCR or Video Camera user manual for more information about the audio output


