background image

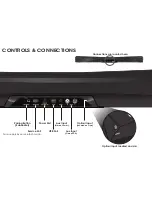
CONTROLS & CONNECTIONS

Connections are located here:

Pairing Button

(Subwoofer)

Service Port 

For use only by service technician.

Power Port

USB Port

Aux Input

(Stereo 3.5mm)

Aux Input

(Stereo RCA)

Optical Input

(Located on Side)

Optical Input located on side:

Summary of Contents for SB4021E-B0

Page 1: ...QUICK START GUIDE Model SB4021E B0 VIZIO ...

Page 2: ...maged the following rules should be observed for its installation use and maintenance Please read the following safety instructions before operating your Sound Bar Keep these instructions in a safe place for future reference Please heed all warnings and follow all instructions To reduce the risk of electric shock or component damage switch off the power before connecting other components to your S...

Page 3: ...in just two 2 hours and can lead to death Keep new and used batteries away from children If the battery compartment does not close securely stop using the product and keep it away from children If you think batteries might have been swallowed or placed inside any part of the body seek immediate medical attention A warning that batteries battery pack or batteries installed shall not be exposed to e...

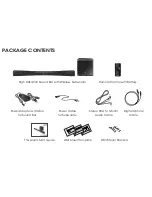
Page 4: ...efinition Sound Bar with Wireless Subwoofer SRS TVOL SRS TSHD SUB MUTE SUB This Quick Start Guide Wall Mount Template Wall Mount Brackets Power Adapter w Cable for Sound Bar Stereo RCA to 3 5mm Audio Cable Digital Optical Cable Power Cable for Subwoofer ...

Page 5: ...onnections are located here Pairing Button Subwoofer Service Port For use only by service technician Power Port USB Port Aux Input Stereo 3 5mm Aux Input Stereo RCA Optical Input Located on Side Optical Input located on side ...

Page 6: ...Controls located here Power Button Input Button Volume Up Down Buttons Indicator LEDs ...

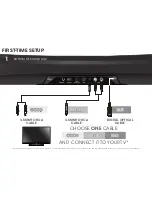
Page 7: ...ER 3 5MM TO RCA CABLE 3 5MM TO RCA CABLE 1 BOTTOM OF SOUND BAR BEST DIGITAL OPTICAL CABLE Not all TVs have the audio outputs shown above To connect the Sound Bar directly to your other devices Blu ray player game system etc see your device s user manual BEST BETTER GOOD ...

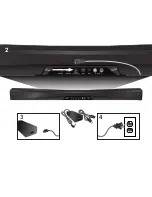
Page 8: ...2 3 4 ...

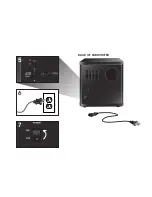
Page 9: ...BACK OF SUBWOOFER 7 6 5 ...

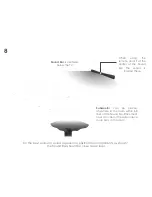
Page 10: ...d be close to ear level Subwoofer can be placed anywhere in the room within 60 feet of the Sound Bar Placement near a corner of the will produce more bass in the room Sound Bar is centered below the TV 8 When using the remote point it at the center of the Sound Bar The sensor is located there ...

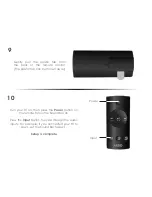
Page 11: ...ess the Input button to cycle through the audio inputs For example if you connected your TV to Aux 1 set the Sound Bar to Aux 1 Setup is complete SRS TVOL SRS TSHD SUB MUTE SUB Power Input 9 Gently pull the plastic tab from the back of the remote control The plastic tab can be thrown away ...

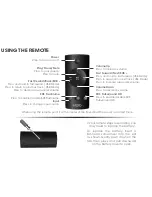
Page 12: ...ress to change input source Fast Forward Next SUB Press and hold to fast forward USB Mode Press to advance to next track USB Mode Press to increase subwoofer volume When using the remote point it at the center of the Sound Bar The sensor is located there Fast Rewind Back SUB Press and hold to fast rewind USB Mode Press to return to previous track USB Mode Press to decrease subwoofer volume SRS Tru...

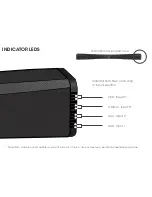
Page 13: ...UX Input 2 AUX Input 1 Indicator LEDs flash according to input selection LED Indicators located here Rapid flash indicates incompatible source or file format If there is no sound output see Help Troubleshooting page INDICATOR LEDS ...

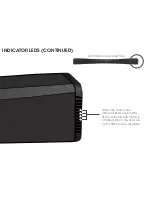
Page 14: ...When the four center Indicator LEDs are brightly lit the selected SRS mode is enabled When the LEDs are not lit SRS mode is disabled LED Indicators located here INDICATOR LEDS CONTINUED ...

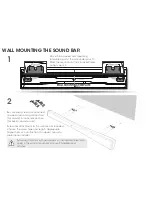
Page 15: ...consult a professional installer If you are unfamiliar with power tools or the layout of electrical wiring in the walls of your home consult a professional installer 1 2 Place the included wall mounting template against the wall under your TV Mark the locations of the 4 bracket holes using a pencil 32 24 819mm 80g White paper 920x160mm 2折后尺寸 230x160mm 请按照档案1 1印刷 32 24 819mm 32 80g White paper 920x...

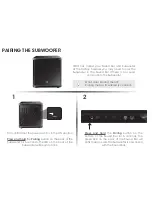
Page 16: ...osition Press and hold the Pairing button on the back of the Subwoofer for 5 seconds The LED on the back of the Subwoofer will begin to blink Press and hold the Pairing button on the bottom of the Sound Bar for 5 seconds The green LED on the back of the Sound Bar will blink then go solid The Subwoofer is now linked with the Sound Bar 1 2 What does Pairing mean Pairing means to wirelessly connect P...

Page 17: ... If you are using a SPDIF Optical connection make sure your TV is set to PCM audio output If the Indicator LEDs all flash rapidly the selected input cannot be decoded I hear buzzing or humming Ensure all cables and wires are securely connected Connect a different source device TV Blu ray player etc to see if the buzzing persists If it does not the problem may be with the original device Connect yo...

Page 18: ...of customer misuse modifications or adjustments as well as installation and set up issues or any repairs attempted by anyone other than by a VIZIO authorized service center Products with unreadable or removed serial numbers or requiring routine maintenance are not covered This one year limited warranty does not cover Products sold AS IS FACTORY RECERTIFIED or by a non authorized reseller THERE ARE...

Page 19: ...rence received including interference that may cause undesired operation Notice 1 The changes or modifications not expressly approved by the party responsible for compliance could void the user s authority to operate the equipment 2 Shielded interface cables and AC power cord if any must be used in order to comply with the emission limits 3 The manufacturer is not responsible for any radio or TV i...

Page 20: ... 2013 VIZIO INC ALL RIGHTS RESERVED 130206OC NC ...

Reviews: