background image


Version - 9/23/2004 

13

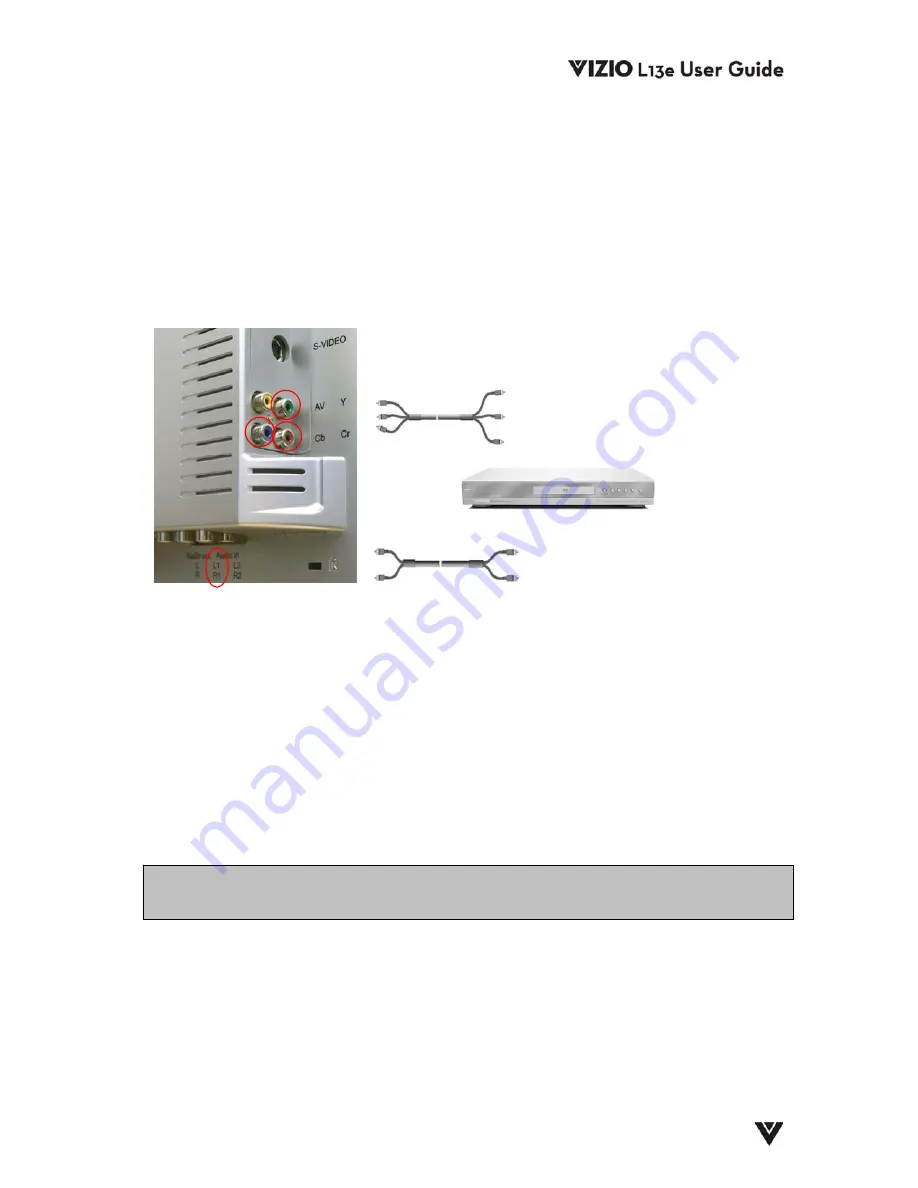
2.2 - Connecting Your DVD Player 

You have several options for connecting your DVD player to your new L13e LCD TV - 
Component, S-Video and Composite inputs.  Based on your home theater configuration, you can 
decide which option is the right one for you. 
 

2.2.1 - Using Component Video 

Installation: 


1.  Turn off the power to the LCD TV and DVD player.  
2.  Connect the Y (green color) connector on the rear of your DVD player to the 

corresponding Y (green color) connector on the side of your LCD TV.  

3.  Connect the Cb (blue color) connector on the rear of your DVD player to the 

corresponding Cb (blue color) connector on the side of your LCD TV. 

4.  Connect the Cr (red color) connector on the rear of your DVD player to the corresponding 

Cr (red color) connector on the side of your LCD TV.  

5.  Connect the R (red color) and L (white color) audio connectors on the rear of your DVD 

player to the R1 (red color) and L1 (white color) in the Audio In connections on the rear of 
your LCD TV.  

6.  Turn on the power to the LCD TV and DVD player.  
7.  Select YCbCr using the Input button on the remote control.  


Note:  Refer to your DVD player user manual for more information about the video output 
requirements of the product. 

Summary of Contents for L13e

Page 1: ...VIZIO WHERE VISION MEETS VALUE ...

Page 2: ... Player 13 2 2 1 Using Component Video 13 2 2 2 Using S Video 14 2 2 3 Using Composite Video 15 2 3 Connecting Your VCR or Video Camera 15 2 4 Connecting Coaxial RF 16 2 4 1 Using Your Antenna or Cable TV 16 2 4 2 Using the Antenna through Your VCR 16 Chapter 3 Getting Started 17 3 1 Turning your LCD TV On and Off 17 3 2 Installation of Wall Mount Optional 17 3 3 Adjusting Basic LCD TV Settings 18...

Page 3: ... RCA Left Right 1 x Stereo Audio 2 x RCA Left Right Outputs 1 x Stereo Headphone 1 x Stereo Mini Jack User Controls Vol Vol Menu Ch Ch Enter Power On Off Speakers Built in 2 x 2 5 W Features CC V Chip Comb Filter Video Scalar NTSC Video decoding via RF Antenna Cable or Satellite Set Top Box may be required or Video CVBS S Video or Component YCbCr Backlight Lamp life 60 000 hours Input IEC Connecto...

Page 4: ... carefully before performing the installation The power consumption of the display is approximately 50 Watts Please use the power cord designated for the product When an extension cord is required use one with the correct power rating The cord must be grounded and the grounding feature must not be defeated The product should be installed on a flat surface to avoid tipping Space should be maintaine...

Page 5: ...ting be sure these openings are not blocked or covered Do not place the L13e LCD TV in a bookcase or cabinet unless proper ventilation is provided Never push any object into the slot on the L13e LCD TV cabinet Do not place any objects on the top of the product It could short circuit parts causing a fire or electric shock Never spill liquids on the L13e LCD TV The L13e LCD TV should be operated onl...

Page 6: ...wet hands Insert batteries for the remote control in accordance with instructions Incorrect polarities may cause damage and leakage of the batteries operator injury and contamination the remote controller If any of the following occurs please contact the dealer o The power connector fails or frays o Liquid sprays or any object drops into the L13E LCD TV o The display is exposed to rain or other mo...

Page 7: ...grounding of the mast and supporting structure grounding of the lead in wire to an antenna discharge unit size of the grounding conductors location of antenna discharge unit connection to grounding electrodes and requirements of the grounding electrode Lzightning Protection For added protection of the LCD TV during a lightning storm or when it is left unattended or unused for long periods of time ...

Page 8: ...ard Remote Control Power Cord AV Cable 3 Colored Bezels white blue and pink This User Guide IMPORTANT Save the original box and all the packing material for future shipping needs Note Your product may also include various other accessories depending on region of purchase ...

Page 9: ... c These buttons are used to increase or decrease the selected channels While the OSD is active these buttons function as select controls in the OSD menus 4 Enter This button is used to select the highlighted option within the OSD menus 5 Power LED Lights green when powered on 6 Power Switch the TV on by pressing the button once Press the button again to turn the TV off 7 Remote Control Sensor Thi...

Page 10: ...DVD player or set top box 4 Audio In R2 and L2 Right and Left Connect the external audio from the second video source such as a DVD player or set top box 5 Component YCbCr Input Connect the external video devices with component output such as a DVD player or set top box 6 AV Input Connect the composite video to external video device such as VCR DVD and video games 7 S Video Input Connect the S Vid...

Page 11: ...or reference only Switch TV or CATV Source Select Mute On Off Volume Up or Down TV Sleep time setting OSD Menu On Off Power On Off Switch channel number key Source and channel information display MTS Select Channel Up Down adjust Function Up Down and Select Left Right adjust within the OSD Enter Return to previous channel ...

Page 12: ...the remote control at the remote control sensor to transmit the commands Do not place any obstacles between the remote control and the receiver window The effective range of the remote control is approximately 6 feet 2 meters from the front of the receiver window 30º to the left and right 20º up and down 1 10 4 Precautions for the VIZIO Remote Control Remote control should be kept dry and away fro...

Page 13: ...to this connector Basic Composite The complete video signal is carried through this single pin connector This is the most commonly used video connection Good S Video The video signal is separated into two signals one containing the black and white information and the other containing the color information Separating the color in this way avoids cross color effects where closely spaced black and wh...

Page 14: ...D TV 3 Connect the Cb blue color connector on the rear of your DVD player to the corresponding Cb blue color connector on the side of your LCD TV 4 Connect the Cr red color connector on the rear of your DVD player to the corresponding Cr red color connector on the side of your LCD TV 5 Connect the R red color and L white color audio connectors on the rear of your DVD player to the R1 red color and...

Page 15: ...3 Connect the R red color and L white color audio connectors on the rear of your DVD player to the R1 red color and L1 white color in the Audio In connections on the rear of your LCD TV 4 Turn on the power to the LCD TV and DVD player 5 Select S Video using the Input button on the remote control Note Refer to your DVD player user manual for more information about the video output requirements of t...

Page 16: ...ng Your VCR or Video Camera Installation 1 Turn off the power to the LCD TV and VCR or video camera 2 Connect the S Video jack on your VCR or video camera to the S Video jack on the side of your LCD TV 3 Connect the R red color and L white color audio connectors on your VCR or video camera to the R1 red color and L1 white color in the Audio In connections in the rear of your LCD TV 4 Turn on the p...

Page 17: ...sing the Antenna through Your VCR Installation 1 Turn off the power to the LCD TV and VCR 2 Connect the Output to TV RF Out or Antenna Out connector on the rear of your VCR to the TV connector on the rear of your LCD TV 3 Turn on the power to the LCD TV and VCR 4 Select TV using the Input button on the remote control 5 Select Channel 3 or 4 to match the channel selected on the rear of your VCR Not...

Page 18: ...onal If you would like to mount your L13e LCD TV to the wall you can contact V Inc directly or your local dealer to obtain the appropriate wall mounting kit To convert your LCD TV from a desk mounted to a wall mounted display follow the instructions below 1 Disconnect Power 2 Lay the LCD TV face down on a towel or blanket to protect the screen from damage 3 Press gently on the 2 concave portions o...

Page 19: ...els To step up through the available TV channels press the CH button on the front panel or remote control once for the next channel or hold it depressed until the desired channel is reached To step down through the available TV channels press the CH button on the front panel or remote control once for the previous channel or hold it depressed until the desired channel is reached Mute Press the MUT...

Page 20: ... the Main Menu will be displayed on the screen as shown opposite 2 Use the c d buttons on the remote control to highlight the feature you wish to select within the OSD menu 3 Use the e fbuttons on the remote control to adjust the selected option 4 Press the MENU button on the remote control to confirm the desired selection 5 Repeat steps 3 and 4 to adjust additional options within the selected OSD...

Page 21: ...s up Color Adjusts the color saturation making colors more intense Tint Adjusts the color of flesh tones Sharpness Adjusts the amount of detail enhancement in increments of approximately 12 12 25 37 50 66 83 100 3 4 2 2 Sound Menu Balance Adjusts the balance level between the channels Bass Adjusts the bass Treble Adjust the treble Audio Out Sets audio out as either off or on 3 4 2 3 Option Menu Ca...

Page 22: ...password is 0 0 0 0 For details see section 3 4 3 Using the Parental Controls on page 21 3 4 2 4 1 MPAA Rating MPAA Rating Choose either B Block or U Unblock for the following settings X Adult audience only NC 17 No one under 17 years of age R Mature audience PG 13 Recommended for children 13 years of age and older PG Parental guidance suggested G General audience 3 4 2 4 2 TV Rating TV Rating Cho...

Page 23: ...t steps 2 through 4 to access the Parent Control menu again 7 Once you are back into the Parent Controls press the button to select the MPAA Rating menu Then press the ENTER button on the remote control 8 Using the e fbuttons on the remote control navigate through the following options X no one under 17 years of age NC 17 no one under 17 years of age R mature audience PG 13 Recommended for childre...

Page 24: ...d on the remote control until the Parent Control menu is highlighted Then press ENTER 4 To access the Parent Control Menu you must first enter in the default password a Press 0 0 0 0 on the remote control as the default password b Then press ENTER to confirm the selection 5 Press the d button on the remote control to select New PinCode and then press the ENTER button 6 Enter in your new 4 digit pa...

Page 25: ...er from penetrating into the housing Wipe the display with a dry cloth after cleaning 4 2 Troubleshooting Guide If the display fails or the performance changes dramatically check the display in accordance with the following instructions Remember to check the peripherals to pinpoint the source of the failure If the display still fails to perform as expected contact the dealer for assistance Problem...

Page 26: ...ld be exhausted 4 3 Telephone Technical Support Products are often returned due to a technical problem rather than a defective product that may result in unnecessary shipping charges billed to you Our trained support personnel can often resolve the problem over the phone For more information on warranty service or repair after the warranty period please contact our Support Department at the number...

Page 27: ...icular installation If this equipment does cause harmful interference to radio or television reception which can be determined by turning the equipment off and on the user is encouraged to try to correct the interference by one or more of the following measures 1 Reorient or relocate the receiving antenna 2 Increase the separation between the equipment and receiver 3 Connect the equipment into an ...

Page 28: ...27 ...

Page 29: ...WHERE VISION MEETS VALUE BRAVO VIZIO and the V Logo are trademarks of V Inc Product specifications are subject to change without notice or obligation 2004 V inc All rights reserved ...

Reviews: