background image

2

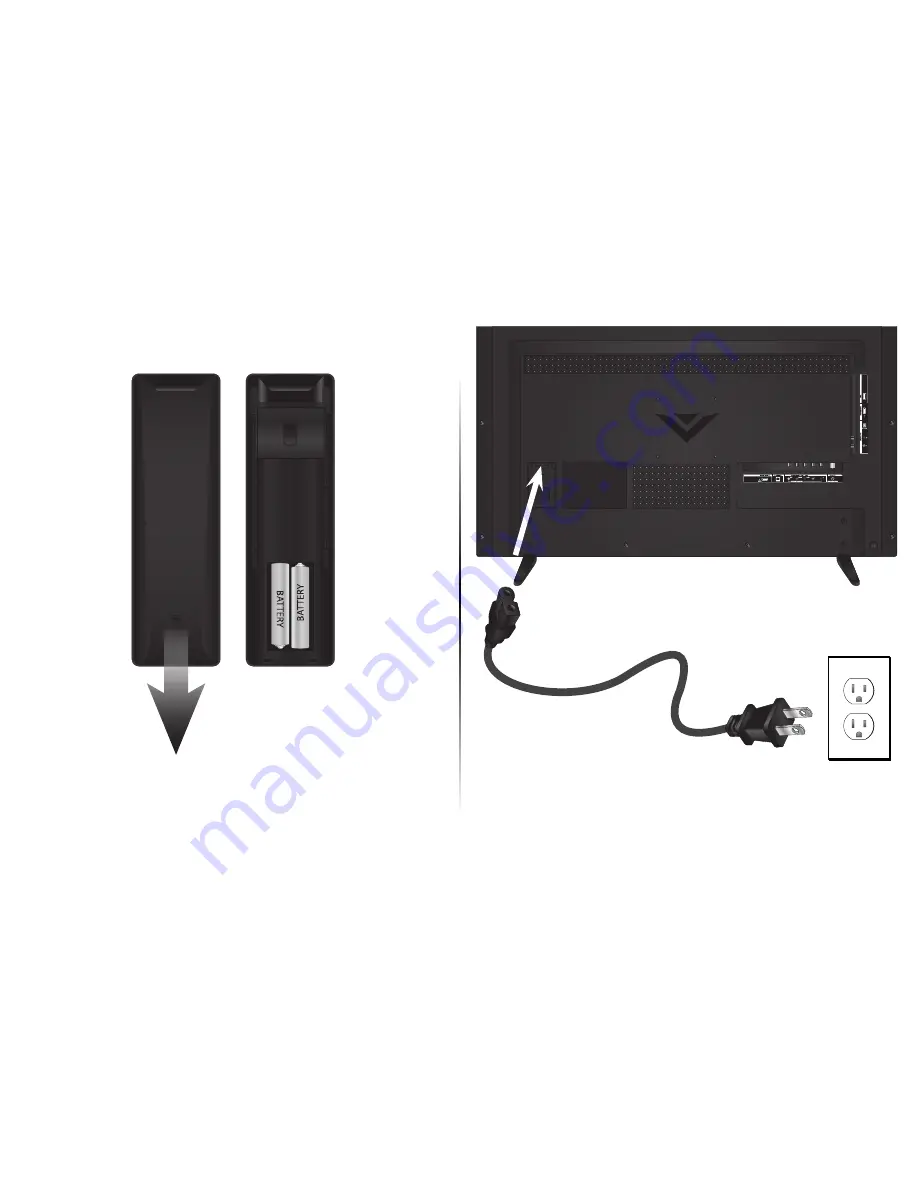
Remove the battery cover by pressing gently on the 

logo and sliding away from the remote.

Insert the included batteries.

Gently slide the battery cover back into place.

3

Connect the power cord to the back of the TV. 

The flat edge of the connector goes toward the 

inside of the TV.

Plug the power cord into an electrical outlet.

Summary of Contents for D32-D1

Page 1: ...QUICK START GUIDE Models D32 D1 D32h D1 D32x D1 VIZIO...

Page 2: ...the manufacturer s instructions Do not install near any heat sources such as radiators heat registers stoves or other apparatus including amplifiers that produce heat Do not defeat the safety purpose...

Page 3: ...of the grounding electrode TELEVISION ANTENNA CONNECTION PROTECTION Ground Clamp Antenna Lead In Wire Antenna Discharge Unit NEC Section 810 20 Grounding Conductors NEC Section 810 21 Ground Clamps P...

Page 4: ...ER YOUR VIZIO PRODUCT NOW Customized Support Get assistance quickly with your information on hand News and Offers Take advantage of the latest news and special offers from VIZIO Safety and Satisfactio...

Page 5: ...ems Product updates and more SUPPORT VIZIO COM You can also contact our award winning support team at Hours of Operation Monday Friday 7 am to 11 pm CST Saturday Sunday 9 am to 6 pm CST Live chat supp...

Page 6: ...PACKAGE CONTENTS This Quick Start Guide Remote Control with Batteries VIZIO LED HDTV Power Cable 4 x Phillips Screws TV Stands...

Page 7: ...e info window MENU Display the on screen menu PIC Opens the picture mode menu CHANNEL UP DOWN Change the channel GUIDE Display the info window LAST Return to the channel last viewed WIDE Change the di...

Page 8: ...1 INSTALLING THE BASE Place the TV screen down on a clean flat surface To prevent scratches or damage to the screen place the TV on a soft surface such as a blanket...

Page 9: ...he stands are identical Secure each stand to the TV with two 2 Phillips screws included Insert the screws into the back of the TV and tighten them using a Phillips screwdriver When you are finished pl...

Page 10: ...NG YOUR DEVICES BACK OF TV Match colored connectors to colored ports Red White Yellow Red White Red Blue Green Connect all of your devices first Choose ONE connection type for each device FIRST TIME S...

Page 11: ...L HD VIDEO 1080p HD AUDIO GOOD AV CABLE ANALOG VIDEO 480i STEREO AUDIO BETTER COMPONENT CABLE ANALOG HD VIDEO 1080p STEREO AUDIO Match colored connectors to colored ports BETTER COAXIAL CABLE ANALOG H...

Page 12: ...sliding away from the remote Insert the included batteries Gently slide the battery cover back into place 3 Connect the power cord to the back of the TV The flat edge of the connector goes toward the...

Page 13: ...to the back of the TV as shown For the best Smart TV experience VIZIO recommends using an Ethernet cable However your TV also has built in Wi Fi See the Connecting to the Internet with Wi Fi section f...

Page 14: ...V SETTINGS menu MENU Button 2 Highlight User Manual and press OK Help VIZIO Network Sleep Timer Input CC ABC Audio Wide Normal Picture Settings Panoramic Wide Zoom 2D 3D Exit TV SETTINGS Picture Audio...

Page 15: ...he Up and Down Arrow buttons to select the chapter you want to view Use the Left and Right Arrow buttons to browse through the pages in each chapter Press the EXIT button to exit the on screen User Ma...

Page 16: ...ess OK The Guided Setup menu is displayed Highlight Network Setup and press OK The Network Setup guide is displayed For streaming video your Internet connection speed should be 1 5 Mbps or higher If y...

Page 17: ...the on screen keyboard enter your network s password then highlight Connect and press OK If you are having trouble connecting to your network check your router placement Walls and large metal objects...

Page 18: ...and news information and more all on demand A high speed Internet connection is required to receive product updates and to access online content Press the V Button to display the V I A Plus App Dock P...

Page 19: ...twice to launch the fullscreen V I A Plus Apps window My Apps Features the apps installed on your TV Installed Apps The Apps displayed here are also available in the V I A Plus App Dock App Tabs Brow...

Page 20: ...s add black bars to the picture Set the TV to Wide or Zoom mode Press the WIDE button highlight Wide or Zoom and press OK Adjust the video settings of your external device There is no power Be sure th...

Page 21: ...und Bar System Enjoy the ultimate home theater experience with VIZIO s 40 5 1 Sound Bar System Featuring a refined all metal design with a distinguished finishing process the system harmoniously deliv...

Page 22: ...t notice To review the most updated version of this Quick Start Guide and the associated User Manual go to http www vizio com 2015 VIZIO Inc All Right Reserved This Quick Start Guide may not be copied...

Page 23: ...modification to this equipment It is the responsibilities of the user to correct such interference FCC Warning Changes or modifications not expressly approved by the party responsible for compliance w...

Page 24: ...for parts or labor during the warranty period Replacement parts may be new or recertified at VIZIO s option and sole discretion Replacement parts and VIZIO s labor are warranted for the remaining por...

Page 25: ...will not apply Exclusions and Limitations TO THE GREATEST EXTENT PERMITTED BY APPLICABLE LAW THERE ARE NO EXPRESS WARRANTIES OTHER THAN THOSE DESCRIBED ABOVE ANY IMPLIED WARRANTIES INCLUDING ANY IMPLI...

Page 26: ...pplications Recovery and reinstallation of user data and downloaded applications is not covered under this warranty In order to protect your personal information VIZIO recommends that you always clear...

Page 27: ...change without notice but any change will not affect your original warranty Check www vizio mx for the most current version INFORMATION EXCLUSIVELY FOR MEXICO To make a warranty claim or to obtain par...

Page 28: ...2016 VIZIO INC ALL RIGHTS RESERVED 151110OC US A...

Reviews: