background image

D

D

D

L

L

L

P

P

P


P

P

P

r

r

r

o

o

o

j

j

j

e

e

e

c

c

c

t

t

t

o

o

o

r

r

r


U

U

U

s

s

s

e

e

e

r

r

r

s

s

s


M

M

M

a

a

a

n

n

n

u

u

u

a

a

a

l

l

l


 47 


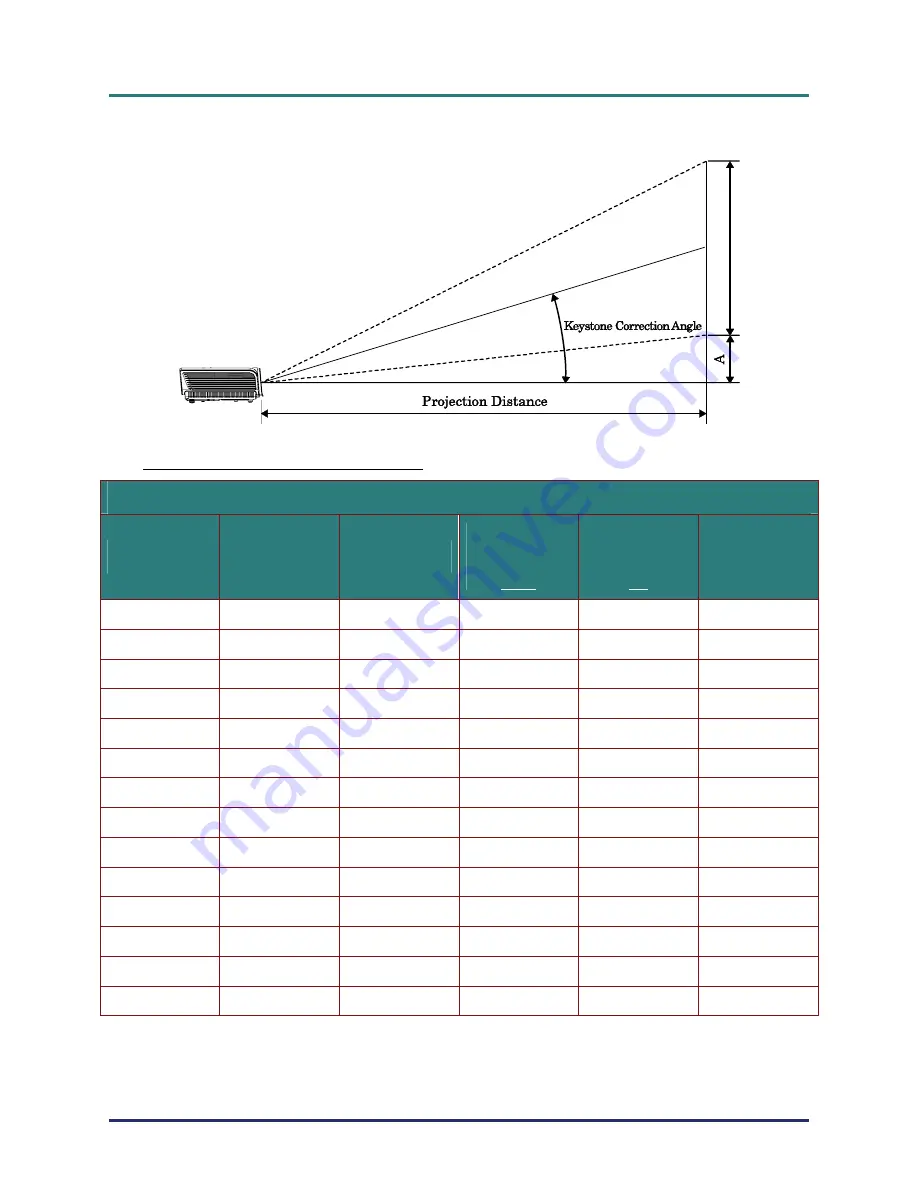
Projection Distance vs. Projection Size 


Projection Distance and Size Table 

D950HD


/


D952HD


/


D963HD


(16

9


SCREEN) 

I

MAGE 

D

IAGONAL


INCH


I

MAGE 

W

IDTH


(

INCH

I

MAGE 

H

EIGHT


(

INCH

P

ROJECTION 

D

ISTANCE 


MM


F

ROM


P

ROJECTION 

D

ISTANCE


MM


TO 

O

FFSET

-A 

(


MM


40 34.9 19.6

1408.0

1682.5 74.7

60 52.3 29.4

2112.0

2523.7 

112.1

70 61 

34.3

2464.0

2944.4 

130.8

72 62.8 35.3

2534.4

3028.5 

134.5

80 69.7 


39.2 

2816.0

3365.0 149.4

84 73.2 


41.2 

2956.8

3533.2 156.9

90 78.4 


44.1 

3168.0

3785.6 168.1

96 83.7 


47.1 

3379.1

4038.0 179.3

100 87.2 


49.0 

3519.9

4206.2 186.8

120 104.6 


58.8 

4223.9

5047.5 224.1

135 117.7 


66.2 

4751.9

5678.4 252.2

150 130.7 


73.5 

5279.9

6309.3 280.2

200 174.3 


98.1 

7039.9

8412.4 373.6

300 261.5 


147.1 

10559.8

12618.7 560.4


Im

ag

He

ig

ht


서울미디어테크        

02-6337-3468        

서울미디어테크        

02-6337-3468        

서울미디어테크        

02-6337-3468        

서울미디어테크        

02-6337-3468        

서울미디어테크        

02-6337-3468        

서울미디어테크        

02-6337-3468 


02-6337-3468        

서울미디어테크        

02-6337-3468        

서울미디어테크        

02-6337-3468        

서울미디어테크        

02-6337-3468        

서울미디어테크        

02-6337-3468        

서울미디어테크        

02-6337-3468         


서울미디어테크        

02-6337-3468        

서울미디어테크        

02-6337-3468        

서울미디어테크        

02-6337-3468        

서울미디어테크        

02-6337-3468        

서울미디어테크        

02-6337-3468        

서울미디어테크        

02-6337-3468 


02-6337-3468        

서울미디어테크        

02-6337-3468        

서울미디어테크        

02-6337-3468        

서울미디어테크        

02-6337-3468        

서울미디어테크        

02-6337-3468        

서울미디어테크        

02-6337-3468         


서울미디어테크        

02-6337-3468        

서울미디어테크        

02-6337-3468        

서울미디어테크        

02-6337-3468        

서울미디어테크        

02-6337-3468        

서울미디어테크

Summary of Contents for D950HD

Page 1: ...User s Manual D9 Series 3 4 6 8 서 울 미 디 어 테 크 3 3 7 3 4 6 8 서 울 미 디 어 테 크 0 2 6 3 3 7 3 4 6 8 울 미 디 어 테 크 0 2 6 3 3 7 3 4 6 8 서 울 미 디 어 테 크 0 2 6 6 3 3 7 3 4 6 8 서 울 미 디 어 테 크 0 7 3 4 6 8 ...

Page 2: ...right to revise this publication and to make changes from time to time in the content hereof without obligation of the manufacturer to notify any person of such revision or changes Trademark Recognition Kensington is a U S registered trademark of ACCO Brand Corporation with issued registrations and pend ing applications in other countries throughout the world HDMI the HDMI Logo and High Definition...

Page 3: ...s that may damage the unit create a hazardous environment or cause per sonal injury Throughout this manual component parts and items in the OSD menus are denoted in bold font as in this example Push the MENU button on the remote control to open the DISPLAY menu General Safety Information Do not open the unit case Aside from the projection lamp there are no user serviceable parts in the unit For se...

Page 4: ...e does not exceed 5 35 C while the projector is running and the air intake and exhaust vents are unobstructed All enclosures should pass a certified thermal evaluation to ensure that the projector does not recycle exhaust air as this may cause the device to shutdown even if the enclosure temperature is with the acceptable 5 35 C range Power Safety Only use the supplied power cord Do not place anyt...

Page 5: ...ore cleaning See Cleaning the Projector on page 39 Allow the lamp to cool for about one hour Regulatory Warnings Before installing and using the projector read the regulatory notices in the Regulatory Compliance section on page 51 Important Recycle Instructions Lamp s inside this product contain mercury This product may contain other electronic waste that can be hazardous if not disposed of proper...

Page 6: ... 17 OSD MENU OVERVIEW 18 PICTURE BASIC MENU 19 PICTURE ADVANCED MENU 20 HSG Adjustment 21 DISPLAY MENU 22 PC Detail Adjustment 23 SETUP BASIC MENU 24 Menu Settings 25 Source 25 Lan Control Settings 26 SETUP ADVANCED MENU 32 Audio 33 Lamp 33 HDMI 34 Closed Caption 34 Presentation Timer 35 STATUS MENU 36 MAINTENANCE AND SECURITY 37 REPLACING THE PROJECTION LAMP 37 CLEANING THE PROJECTOR 39 Cleaning ...

Page 7: ...TION DISTANCE VS PROJECTION SIZE 47 Projection Distance and Size Table 47 TIMING MODE TABLE 48 PROJECTOR DIMENSIONS 50 REGULATORY COMPLIANCE 51 FCC WARNING 51 CANADA 51 SAFETY CERTIFICATIONS 51 vi 3 4 6 8 서 울 미 디 어 테 크 3 3 7 3 4 6 8 서 울 미 디 어 테 크 0 2 6 3 3 7 3 4 6 8 울 미 디 어 테 크 0 2 6 3 3 7 3 4 6 8 서 울 미 디 어 테 크 0 2 6 6 3 3 7 3 4 6 8 서 울 미 디 어 테 크 0 7 3 4 6 8 ...

Page 8: ...RRY CASE CD ROM THIS USER S MANUAL QUICK START GUIDE WARRANTY CARD Contact your dealer immediately if any items are missing appear damaged or if the unit does not work It is recommend that you keep the original packing material should you ever need to return the equipment for warranty service Caution Avoid using the projector in dusty environments 1 3 4 6 8 서 울 미 디 어 테 크 3 3 7 3 4 6 8 서 울 미 디 어 테 ...

Page 9: ... IR receiver Receive IR signal from remote control 6 5 Focus ring Focuses the projected image 6 Zoom ring Enlarges the projected image 14 7 Function keys See Top view On screen Display OSD buttons and LEDs 3 Important Ventilation openings on the projector allow for good air circulation which keeps the projector lamp cool Do not obstruct any of the ventilation openings 2 3 4 6 8 서 울 미 디 어 테 크 3 3 7...

Page 10: ...one Navigates and changes settings in the OSD Quick Menu For Keystone 16 7 AUTO Optimizes image size position and resolution 8 Right cursor Volume Navigates and changes settings in the OSD Quick Menu For Volume 16 9 SOURCE Enter the Source menu 10 10 Down cursor Keystone Navigates and changes settings in the OSD Quick Menu For Keystone 16 Red Lamp is ready to be powered on 11 READY LED Flashing La...

Page 11: ... 12V TRIGGER Connect the 12V OUT 11 Kensington Lock Secure to permanent object with a Kensington Lock system 40 12 Speaker Outputs audio sound 10 13 IR receiver Receive IR signal from remote control 6 14 AUDIO IN L and R Connect the AUDIO CABLES from a audio device 15 AUDIO IN Connect an AUDIO CABLE from the input device 16 RS 232C Connect RS 232 serial port cable for remote control 17 AUDIO OUT C...

Page 12: ... When installing ensure that you use only UL Listed ceiling mounts For ceiling installations use approved mounting hardware and M4 screws with a maximum screw depth of 6 mm 0 23 inch The construction of the ceiling mount must be of a suitable shape and strength The ceiling mount load capacity must exceed the weight of the installed equipment and as an additional precaution be capable of withstandi...

Page 13: ... the remote control and the projector If the path be tween the remote control and the projector is obstructed you can bounce the signal off certain reflective surfaces such as projector screens 3 The buttons and keys on the projector have the same functions as the corresponding buttons on the remote control This user s manual describes the functions based on the remote control 6 3 4 6 8 서 울 미 디 어 ...

Page 14: ...in 14 Zoom Zoom out 15 Freeze Freeze unfreezes the on screen picture 16 Blank Makes the screen blank 17 Source Detects the input device 18 Auto Auto adjustment for phase tracking size position 19 Menu Opens the OSD 16 20 Status Opens the OSD Status menu the menu only opens when an input device is detected 36 21 Keystone top bottom Corrects image trapezoid wider top bottom effect 14 22 Left cursor ...

Page 15: ...function well within a radius of about 7 meters 23 feet and 15 degrees above or below the projector level If the projector does not respond to the remote control move a little closer Projector and Remote Control Buttons The projector can be operated using the remote control or the buttons on the top of the projector All operations can be carried out with the remote control however the buttons on t...

Page 16: ... the arrow 2 Insert the battery with the positive side facing up 3 Replace the cover Caution 1 Only use AAA batteries Alkaline batteries are recommended 2 Dispose of used batteries according to local ordinance regulations 3 Remove the batteries when not using the projector for prolonged periods 3 4 6 8 서 울 미 디 어 테 크 3 3 7 3 4 6 8 서 울 미 디 어 테 크 0 2 6 3 3 7 3 4 6 8 울 미 디 어 테 크 0 2 6 3 3 7 3 4 6 8 서 ...

Page 17: ...N Connect the COMPOSITE CABLE from a video device F VGA OUT Connect the RGB CABLE to a display G VGA IN Connect the RGB CABLE from a computer H HDMI 1 Connect the HDMITM CABLE from a HDMITM device I HDMI 2 Connect the HDMITM CABLE from a HDMITM device J DC 12V TRIGGER Connect the 12V OUT K AUDIO IN L and R Connect the AUDIO CABLES from a audio device L AUDIO IN Connect an AUDIO CABLE from the inpu...

Page 18: ...hing blue Then press the POWER button to turn on the projector The projector splash screen displays and connected devices are detected 4 If more than one input device is con nected press the SOURCE button and use to scroll among devices PC Analog RGB HDMI 1 2 High Definition Multimedia Interface Component DVD input YCbCr YPbPr S Video Super video Y C separated Video Traditional composite video 3 4...

Page 19: ...press on the control panel or on the remote control The projec tor turns off Caution Do not unplug the power cord until the READY LED stops flashing indicating the projector has cooled down 12 3 4 6 8 서 울 미 디 어 테 크 3 3 7 3 4 6 8 서 울 미 디 어 테 크 0 2 6 3 3 7 3 4 6 8 울 미 디 어 테 크 0 2 6 3 3 7 3 4 6 8 서 울 미 디 어 테 크 0 2 6 6 3 3 7 3 4 6 8 서 울 미 디 어 테 크 0 7 3 4 6 8 ...

Page 20: ...on angle Ensure the cables are in a safe location You could trip over them A D C 1 To raise the level of the projector lift the projector A and press the height adjuster button B The height adjuster drops down C 2 To lower the level of the projector press the height adjuster button and push down on the top of the projector 3 To adjust the angle of the picture turn the tilt adjuster D right or left...

Page 21: ...en size B 2 Use the Image focus control on the projector only to sharpen the pro jected image A 3 Use the KEYSTONE buttons on the projector or the remote control to correct image trapezoid wider top or bottom effect Remote control and OSD panel 4 The keystone control appears on the display 3 4 6 8 서 울 미 디 어 테 크 3 3 7 3 4 6 8 서 울 미 디 어 테 크 0 2 6 3 3 7 3 4 6 8 울 미 디 어 테 크 0 2 6 3 3 7 3 4 6 8 서 울 미 디...

Page 22: ...te control The volume control appears on the display 2 Press the Left or Right Cursor buttons on the keypad to adjust Volume 3 Press the MUTE button to turn off the volume This feature is available only on the remote 3 4 6 8 서 울 미 디 어 테 크 3 3 7 3 4 6 8 서 울 미 디 어 테 크 0 2 6 3 3 7 3 4 6 8 울 미 디 어 테 크 0 2 6 3 3 7 3 4 6 8 서 울 미 디 어 테 크 0 2 6 6 3 3 7 3 4 6 8 서 울 미 디 어 테 크 0 7 3 4 6 8 ...

Page 23: ...jector 1 To enter the OSD press the MENU button 2 There are six menus Press the cur sor button to move through the menus 3 Press the cursor button to move up and down in a menu 4 Press to change values for set tings 5 Press MENU to close the OSD or leave a sub menu Note Depending on the video source not all items in the OSD are available For example the PC Detail Adjustment item in the PICTURE Bas...

Page 24: ... Press the MENU button Press the cursor button to navigate to SETUP Basic 2 Press the cursor button until Language is highlighted 3 Press the cursor button until the language you want is selected 4 Press the MENU button to close the OSD 17 3 4 6 8 서 울 미 디 어 테 크 3 3 7 3 4 6 8 서 울 미 디 어 테 크 0 2 6 3 3 7 3 4 6 8 울 미 디 어 테 크 0 2 6 3 3 7 3 4 6 8 서 울 미 디 어 테 크 0 2 6 6 3 3 7 3 4 6 8 서 울 미 디 어 테 크 0 7 3 4 ...

Page 25: ...n n nu u ua a al ll OSD Menu Overview Use the following illustration to quickly find a setting or determine the range for a setting 18 3 4 6 8 서 울 미 디 어 테 크 3 3 7 3 4 6 8 서 울 미 디 어 테 크 0 2 6 3 3 7 3 4 6 8 울 미 디 어 테 크 0 2 6 3 3 7 3 4 6 8 서 울 미 디 어 테 크 0 2 6 6 3 3 7 3 4 6 8 서 울 미 디 어 테 크 0 7 3 4 6 8 ...

Page 26: ... the display contrast Color Press the cursor buttons to adjust the video saturation Notes This function is only available when Component Video or S Video input source is selected Tint Press the cursor buttons to adjust the video tint hue Notes This function is only available when Component Video or S Video with NTSC system input source is selected Sharpness Press the cursor buttons to adjust the d...

Page 27: ...ction Color Temperature Press the cursor button to set the Color Temperature Gamma Press the cursor button to adjust the gamma correction of the display Notes This function is only available in User 1 2 3 mode HSG Adjustment Press the ENTER button to enter the HSG Adjustment sub menu See HSG Adjustment on page 21 Color Space Press the cursor button to set the Color Space Range Auto RGB SDTV HDTV N...

Page 28: ...y Color Press the buttons to set the Primary Color Notes There are six sets R G B C M Y of colors to be customized Hue Press the buttons to adjust the Hue Saturation Press the buttons to adjust the Saturation Gain Press the buttons to adjust the Gain 21 3 4 6 8 서 울 미 디 어 테 크 3 3 7 3 4 6 8 서 울 미 디 어 테 크 0 2 6 3 3 7 3 4 6 8 울 미 디 어 테 크 0 2 6 3 3 7 3 4 6 8 서 울 미 디 어 테 크 0 2 6 6 3 3 7 3 4 6 8 서 울 미 디 ...

Page 29: ... Keystone Press the cursor button to adjust the Keystone Notes This function is available when the Auto keystone function is turned off Overscan Press the cursor button to adjust the Overscan PC Detail Adjustment Press the ENTER button to enter the PC Detail Adjustment sub menu See PC Detail Adjustment on page 23 Auto Keystone Press the cursor button to turn on or off the Auto Keystone Notes When ...

Page 30: ...tton on the control panel or the ENTER AUTO button on the remote control to automatically adjust frequency phase and position Frequency Press the buttons to adjust the A D sampling number Phase Press the buttons to adjust the A D sampling clock Horizontal Position Press the buttons to adjust the display position right or left Vertical Position Press the buttons to adjust the display position up or...

Page 31: ... is automati cally restored after the set time Range Disable 5 min 10 min 15 min 20 min 25 min 30 min Auto Power Off Press the cursor buttons to set the Auto Power Off timer The projector automatically turns off if no input source is detected after the preset period of time Range Disable 5 min 10 min 15 min 20 min 25 min 30 min Sleep Timer Press the cursor buttons to set Sleep timer The projector ...

Page 32: ... the ENTER button to enter the Source sub menu ITEM DESCRIPTION PC Press the buttons to enable or disable the PC source HDMI 1 HDMI 2 Press the buttons to enable or disable the HDMI source Component Press the buttons to enable or disable the Component source Video Press the buttons to enable or disable the Video source S Video Press the buttons to enable or disable the S Video source Quick Auto Se...

Page 33: ...ESCRIPTION Network State Displays the network connection status DHCP Press to turn DHCP On or Off Note If you select DHCP Off complete the IP Address Subnet Mask Gateway and DNS fields Projector IP Address Enter a valid IP address if DHCP is turned off Subnet Mask Enter a valid Subnet Mask if DHCP is turned off Default Gateway Displays the default Gateway address on the network DNS Enter a valid D...

Page 34: ...or through a network such as remotely manage Power On Off Brightness and Contrast settings Also projector status information such as Video Source Sound Mute etc 1 Connect an RJ45 cable to RJ45 ports on the projector and the PC Laptop 2 On the PC Laptop select Start Control Panel Network Connections 27 3 4 6 8 서 울 미 디 어 테 크 3 3 7 3 4 6 8 서 울 미 디 어 테 크 0 2 6 3 3 7 3 4 6 8 울 미 디 어 테 크 0 2 6 3 3 7 3 4...

Page 35: ... click on Local Area Connection and select Properties 4 In the Properties window select the General tab and select Internet Protocol TCP IP 5 Click Properties 28 3 4 6 8 서 울 미 디 어 테 크 3 3 7 3 4 6 8 서 울 미 디 어 테 크 0 2 6 3 3 7 3 4 6 8 울 미 디 어 테 크 0 2 6 3 3 7 3 4 6 8 서 울 미 디 어 테 크 0 2 6 6 3 3 7 3 4 6 8 서 울 미 디 어 테 크 0 7 3 4 6 8 ...

Page 36: ...er getting into Network input the following DHCP Off IP Address 10 10 10 10 Subnet Mask 255 255 255 0 Gateway 0 0 0 0 DNS Server 0 0 0 0 10 Press Enter to confirm settings 11 Open a web browser for example Microsoft Internet Explorer with Adobe Flash Player 9 0 or higher 12 In the Address bar input the IP address 10 10 10 10 29 3 4 6 8 서 울 미 디 어 테 크 3 3 7 3 4 6 8 서 울 미 디 어 테 크 0 2 6 3 3 7 3 4 6 8 ...

Page 37: ...ce and the other punctuation key included CATEGORY ITEM INPUT LENGTH IP Address 15 IP ID 2 Crestron Control Port 5 Projector Name 10 Location 9 Projector Assigned To 8 DHCP Enabled N A IP Address 15 Subnet Mask 15 Default Gateway 15 Network Configuration DNS Server 15 Enabled N A New Password 15 User Password Confirm 15 Enabled N A New Password 15 Admin Password Confirm 15 3 4 6 8 서 울 미 디 어 테 크 3 ...

Page 38: ...se e er r r s s s M M Ma a an n nu u ua a al ll For more information please visit http www crestron com 31 3 4 6 8 서 울 미 디 어 테 크 3 3 7 3 4 6 8 서 울 미 디 어 테 크 0 2 6 3 3 7 3 4 6 8 울 미 디 어 테 크 0 2 6 3 3 7 3 4 6 8 서 울 미 디 어 테 크 0 2 6 6 3 3 7 3 4 6 8 서 울 미 디 어 테 크 0 7 3 4 6 8 ...

Page 39: ... buttons to turn on or off High Altitude Mode when the altitude of the environment is higher than 1500m or the temperature is over 40 C Test Pattern Press the cursor buttons to turn on or off the grid test pattern Closed Caption Press the ENTER button to enter the Closed Caption sub menu See Closed Caption on page 34 LED Control Press the cursor buttons to select the LED control Select Normal for ...

Page 40: ... the speaker AGC Press the buttons to turn on or off the AGC setting Reset Press the ENTER button to reset all settings to default values Lamp Press the ENTER button to enter the Lamp sub menu ITEM DESCRIPTION Lamp Mode Press the buttons to adjust lamp brightness Reset Lamp Timer Press the ENTER button to reset the Lamp Hour after the lamp is replaced Lamp Hour Displays the number of hours the lam...

Page 41: ... Video signal HDMI Amplifier Gain Press the buttons to adjust HDMI Amplifier Gain Closed Caption Press the ENTER button to enter the Closed Caption sub menu ITEM DESCRIPTION Closed Caption Enable Press the buttons to turn on or off Closed Caption Caption Version Press the buttons to select the Caption Version 34 3 4 6 8 서 울 미 디 어 테 크 3 3 7 3 4 6 8 서 울 미 디 어 테 크 0 2 6 3 3 7 3 4 6 8 울 미 디 어 테 크 0 2 ...

Page 42: ...hieve better time management when giving presentations ITEM DESCRIPTION Timer Press the cursor button to enable or disable presentation timer Timer Period Press the cursor button to select timer period 1 60 minutes Timer Reset Press Enter to reset the timer settings 35 3 4 6 8 서 울 미 디 어 테 크 3 3 7 3 4 6 8 서 울 미 디 어 테 크 0 2 6 3 3 7 3 4 6 8 울 미 디 어 테 크 0 2 6 3 3 7 3 4 6 8 서 울 미 디 어 테 크 0 2 6 6 3 3 7 ...

Page 43: ... the activated input source Resolution Displays the native resolution of input source Lamp Hour Displays the number of hours the lamp has been in use Firmware Version Displays the firmware version of the projector Note Status displayed in this menu is for viewing only and cannot be edited 36 3 4 6 8 서 울 미 디 어 테 크 3 3 7 3 4 6 8 서 울 미 디 어 테 크 0 2 6 3 3 7 3 4 6 8 울 미 디 어 테 크 0 2 6 3 3 7 3 4 6 8 서 울 미...

Page 44: ...use glass dust or shards to be discharged outward from the rear exhaust vent Do not inhale or do not touch glass dust or shards Doing so could result in injury Always keep your face away from the exhaust vent so that you do not suffer from the gas and bro ken shards of the lamp When removing the lamp from a ceiling mounted projector make sure that no one is under the pro jector Glass fragments cou...

Page 45: ...dule 6 Reverse steps 1 to 5 to install the new lamp module While installing align the lamp module with the connector and ensure it is level to avoid damage Note The lamp module must sit securely in place and the lamp connector must be con nected properly before tightening the screws 38 3 4 6 8 서 울 미 디 어 테 크 3 3 7 3 4 6 8 서 울 미 디 어 테 크 0 2 6 3 3 7 3 4 6 8 울 미 디 어 테 크 0 2 6 3 3 7 3 4 6 8 서 울 미 디 어 테...

Page 46: ...can purchase optic lens cleaner from most camera stores Refer to the following to clean the pro jector lens 1 Apply a little optic lens cleaner to a clean soft cloth Do not apply the cleaner directly to the lens 2 Lightly wipe the lens in a circular motion Caution 1 Do not use abrasive cleaners or solvents 2 To prevent discoloration or fading avoid getting cleaner on the projector case Cleaning th...

Page 47: ... cable Note Contact your vendor for details on purchasing a suitable Kensington security cable The security lock corresponds to Kensington s MicroSaver Security System If you have any com ment contact Kensington 2853 Campus Drive San Mateo CA 94403 U S A Tel 800 535 4242 http www Kensington com 40 3 4 6 8 서 울 미 디 어 테 크 3 3 7 3 4 6 8 서 울 미 디 어 테 크 0 2 6 3 3 7 3 4 6 8 울 미 디 어 테 크 0 2 6 3 3 7 3 4 6 8...

Page 48: ...tached device is turned on Ensure a connected PC is not in suspending mode Ensure a connected notebook computer is configured for an external display This is usually done by pressing a Fn key combination on the notebook Tips for Troubleshooting In each problem specific section try the steps in the order suggested This may help you to solve the problem more quickly Try to pin point the problem and ...

Page 49: ...1 Verify the settings on your notebook or desktop PC 2 Turn off all equipment and power up again in the correct order Problem The image is blurred 1 Adjust the Focus on the projector 2 Press the Auto button on the remote control or projector 3 Ensure the projector to screen distance is within the 10 meter 33 feet specified range 4 Check that the projector lens is clean Problem The image is wider a...

Page 50: ...s 5 Replace the lamp module 6 Put the old lamp back in the projector and have the projector serviced Problem The lamp goes off 1 Power surges can cause the lamp to turn off Re plug power cord When the READY LED is on press the power button 2 Replace the lamp module 3 Put the old lamp back in the projector and have the projector serviced Remote Control Problems Problem The projector does not respon...

Page 51: ...n 2 Test the source audio output with other speakers 3 Have the projector serviced Having the Projector Serviced If you are unable to solve the problem you should have the projector serviced Pack the projector in the original carton Include a description of the problem and a checklist of the steps you took when trying to fix the problem The information may be useful to service personnel For servic...

Page 52: ... 10 meters There are many HDMI Adopters working on HDMI solutions that extend a cable s effective distance from the typical 10 meter range to much longer lengths These companies manufacture a variety of solutions that include active cables active electronics built into cables that boost and extend the cable s signal repeaters amplifiers as well as CAT5 6 and fiber solutions Q How can I tell if a c...

Page 53: ...peration temperature 5 35 C Dimensions W x D x H 332 8 mm x 254 6 mm x 113 mm 13 1 x 10 0 x 4 45 AC Input AC Universal 100 240 Typical 110VAC 100 240 10 Power consumption STD 290W Typical 310W Max ECO 240W Typical 260W Max STD 350W Typical 370W Max ECO 290W Typical 310W Max STD 350W Typical 380W Max ECO 290W Typical 320W Max Stand By 1 watt Lamp 220W 280W 300W Audio speaker AMP 5W speaker Digital ...

Page 54: ...0 2523 7 112 1 70 61 34 3 2464 0 2944 4 130 8 72 62 8 35 3 2534 4 3028 5 134 5 80 69 7 39 2 2816 0 3365 0 149 4 84 73 2 41 2 2956 8 3533 2 156 9 90 78 4 44 1 3168 0 3785 6 168 1 96 83 7 47 1 3379 1 4038 0 179 3 100 87 2 49 0 3519 9 4206 2 186 8 120 104 6 58 8 4223 9 5047 5 224 1 135 117 7 66 2 4751 9 5678 4 252 2 150 130 7 73 5 5279 9 6309 3 280 2 200 174 3 98 1 7039 9 8412 4 373 6 300 261 5 147 1...

Page 55: ...46 9 75 0 O O 800 x 600 48 1 72 2 O O 800 x 600 53 7 85 1 O O 1024 x 768 48 4 60 0 O O 1024 x 768 56 5 70 1 O O 1024 x 768 60 0 75 0 O O 1024 x 768 68 7 85 0 O O 1280 x 800 49 7 59 8 O O 1280 x 800 62 8 74 9 O O 1280 x 800 71 6 84 8 O O 1280 x 1024 64 0 60 0 O O 1280 x 1024 80 0 75 0 O O 1280 x 1024 91 1 85 0 O O 1400 x 1050 65 3 60 0 O O 1440 x 900 55 9 60 0 O O 1600 x1200 75 0 60 O O VESA 1920 x...

Page 56: ... 0 60 0 O O 1080i 33 8 60 0 O O 1080i 28 1 50 0 O O 1080p 67 5 60 0 O O HDTV 1080p 56 3 50 0 O O O Frequency supported Frequency not supported The native resolution of the panel is1920 x 1080 Resolution other than native resolution may display with uneven size of text or lines 3 4 6 8 서 울 미 디 어 테 크 3 3 7 3 4 6 8 서 울 미 디 어 테 크 0 2 6 3 3 7 3 4 6 8 울 미 디 어 테 크 0 2 6 3 3 7 3 4 6 8 서 울 미 디 어 테 크 0 2 6 ...

Page 57: ...o or r r U U Us s se e er r r s s s M M Ma a an n nu u ua a al ll Projector Dimensions 50 3 4 6 8 서 울 미 디 어 테 크 3 3 7 3 4 6 8 서 울 미 디 어 테 크 0 2 6 3 3 7 3 4 6 8 울 미 디 어 테 크 0 2 6 3 3 7 3 4 6 8 서 울 미 디 어 테 크 0 2 6 6 3 3 7 3 4 6 8 서 울 미 디 어 테 크 0 7 3 4 6 8 ...

Page 58: ...d used in accordance with the instruction manual may cause harmful interference to radio communica tions Operation of this equipment in a residential area is likely to cause harmful interference in which case the user will be required to correct the interference at his her own expense Changes or modifications not expressly approved by the parties responsible for compliance could void the user s au...

Page 59: ...2011 201107 3 4 6 8 서 울 미 디 어 테 크 3 3 7 3 4 6 8 서 울 미 디 어 테 크 0 2 6 3 3 7 3 4 6 8 울 미 디 어 테 크 0 2 6 3 3 7 3 4 6 8 서 울 미 디 어 테 크 0 2 6 6 3 3 7 3 4 6 8 서 울 미 디 어 테 크 0 7 3 4 6 8 ...

Reviews: