background image

— 18


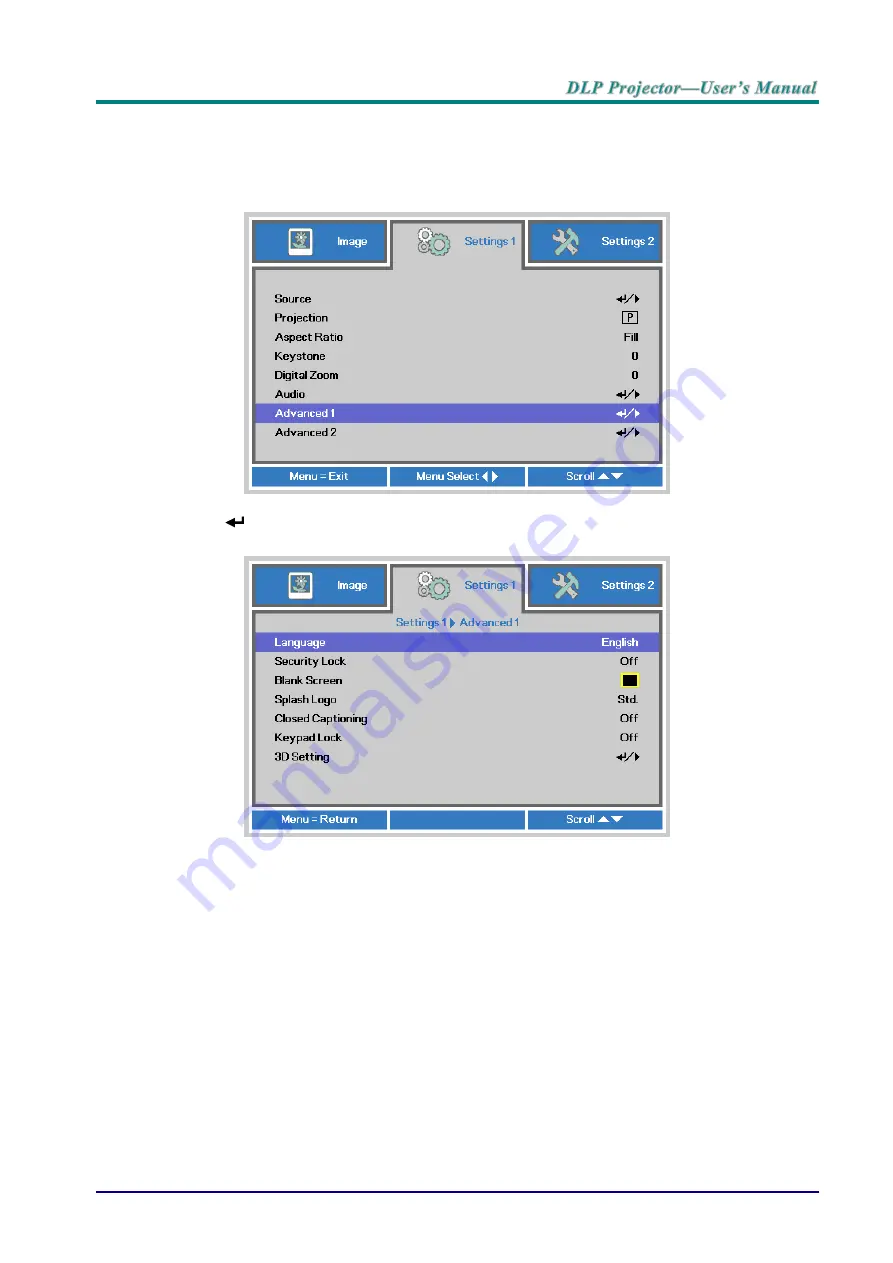
Setting the OSD Language 

Set the OSD language to your preference before continuing. 

1.  Press the 

MENU


button. Press the cursor ◄► button to navigate to 

Settings 1

. Press 

the cursor 

▲▼ button to move to the 

Advanced


1

 menu. 


2.  Press 

 (Enter) / 

► to enter the 

Advanced 1

 sub menu. 

Press the cursor ▲▼ button 

until 

Language

 is highlighted.  


3.  Press the cursor button until the language you want is highlighted.  

4.  Press the 

MENU

 button four times to close the OSD.   


Summary of Contents for D77 Series

Page 1: ...D77 Series ...

Page 2: ... particular purpose The manufacturer reserves the right to revise this publication and to make changes from time to time in the content hereof without obligation of the manufacturer to notify any person of such revision or changes Trademark Recognition Kensington is a U S registered trademark of ACCO Brand Corporation with issued registrations and pending applications in other countries throughout...

Page 3: ...you to situations that may damage the unit create a hazardous environment or cause personal injury Throughout this manual component parts and items in the OSD menus are denoted in bold font as in this example Push the Menu button on the remote control to open the Main menu General Safety Information Do not open the unit case Aside from the projection lamp there are no user serviceable parts in the...

Page 4: ...3 blade with earthing lead power cord can be used as substitution however do not use 2 blade power cord Verify if the voltage is stable grounded properly and there is no electricity leakage Measure total power consumption which should not higher the safety capacity and avoid safety issue and short circuit Turn on Altitude Mode when located in high altitude areas The projector can only be installed...

Page 5: ...ue for a certain period After the project enters STANDBY MODE status press the AC power button to turn off the projector and remove the power cord DO NOT remove the power cord during the shutdown process as it may cause damage to the projector In the meantime the delayed heat radiating will also affect the service life of the projector The shutdown process may vary depending on the model used What...

Page 6: ...lamp to cool for about one hour Regulatory Warnings Before installing and using the projector read the regulatory notices in the Regulatory Compliance section on page 68 Important Recycle Instructions Lamp s inside this product contain mercury This product may contain other electronic waste that can be hazardous if not disposed of properly Recycle or dispose in accordance with local state or feder...

Page 7: ... Navigating the OSD 17 Setting the OSD Language 18 OSD Menu Overview 19 Image Menu 22 Computer Menu 23 Advanced Feature 24 White Balance 25 Color Manager 26 Settings 1 Menu 27 Audio 28 Advanced 1 Feature 29 Advanced 2 Feature 31 Settings 2 Menu 32 Status 33 Advanced 1 Feature 34 Advanced 2 Feature 45 MAINTENANCE AND SECURITY 47 Replacing the Projection Lamp 47 Resetting the Lamp 49 Cleaning the fi...

Page 8: ... Table 63 Projector Dimensions DW771USTi DH773USTi 65 Projector Dimensions DW770UST DH772UST 66 Projector Dimensions DW771USTie DH773USTie 67 REGULATORY COMPLIANCE 68 FCC Warning 68 Canada 68 Safety Certifications 68 APPENDIX I 69 FOR DW770UST DW771USTi 69 RS 232C Protocol 69 FOR DH772UST DH773USTi 74 Communication parameter setup 74 APPENDIX II 79 About the Vivitek Support 79 ...

Page 9: ...POWER CORD VGA CABLE QUICK START CARD WARRANTY CARD THE FOLLOWING ITEMS ONLY FOR DW771USTI DH773USTI DW771USTIE DH773USTIE USB CABLE A TAPE TO MINI PENS BOX WITH FOUR AAA BATTERIES FOUR TIPS Contact your dealer immediately if any items are missing appear damaged or if the unit does not work It is recommend that you keep the original packing material should you ever need to return the equipment for...

Page 10: ...Manual Lens shift For Image vertical shift adjustment 6 Function keys See Top view On screen Display OSD buttons and LEDs 4 7 Interactive Camera Interactive function use Note Only available in DW771USTi DH773USTi DW771USTie DH773USTie 8 Aspheric mirror Reflects images Important Ventilation openings on the projector allow for good air circulation which keeps the projector lamp cool Do not obstruct ...

Page 11: ... Only available in DW770UST and DW771USTi DW771USTie To shift up the projection image twist the adjusters counter clockwise To shift down the projection image twist the adjusters clockwise H e xk e y 2 5 m m H x1 7 H H x1 7 ...

Page 12: ...confirm highlighted OSD menu item 6 AUTO Optimizes image size position and resolution 7 Navigates and changes settings in the OSD 17 8 Navigates in the OSD Quick Menu For Keystone 9 Turns the projector On or Off 10 LAMP LED Red Lamp Fail 56 Flashing Error code 11 POWER LED Green Ready to power on Standby Lamp Lit System stable Over Temperature Flashing System initial Power on Cooling Error code 12...

Page 13: ...or use 8 AUDIO OUT Connect an AUDIO cable to an audio amplifier 9 AC IN Connect the POWER cable 12 10 HDMI 1 Connect the HDMI cable from a HDMI device 11 HDMI 2 Connect the HDMI cable from a HDMI device 12 MONITOR OUT Connect the RGB cable to a display 13 COMPUTER Connect the RGB cable from a computer or components device 14 VIDEO Connect the composite cable from a video device 15 USB 1 5A Connect...

Page 14: ...priority of HDMI DVI component thru VGA Composite for better picture quality Note User should install driver before used Interactive function For more detail see driver disc Warning As a safety precaution disconnect all power to the projector and connecting devices before making connections ...

Page 15: ...en installing ensure that you use only UL Listed ceiling mounts For ceiling installations use approved mounting hardware and M4 screws with a maximum screw depth of 12 mm 0 47 inch The construction of the ceiling mount must be of a suitable shape and strength The ceiling mount load capacity must exceed the weight of the installed equipment and as an additional precaution be capable of withstanding...

Page 16: ...he path between the remote control and the projector is obstructed you can bounce the signal off certain reflective surfaces such as projector screens 3 The buttons and keys on the projector have the same functions as the corresponding buttons on the remote control This user s manual describes the functions based on the remote control Note Complies with FDA performance standards for laser products...

Page 17: ...s the on screen picture 16 Blank Makes the screen blank 17 Source Detects the input device 18 Auto Auto adjustment for phase tracking size position 19 Menu Opens or exit the OSD 17 20 Status Opens the OSD Status menu the menu only opens when an input device is detected 33 21 Keystone top bottom Corrects image trapezoid wider top bottom effect 16 22 Left cursor Navigates and changes settings in the...

Page 18: ...e perpendicular to the sides or the rear of the projector the remote will function well within a radius of about 7 meters 23 feet and 15 degrees above or below the projector level If the projector does not respond to the remote control move a little closer Projector and Remote Control Buttons The projector can only be operated using the remote control All operations can be carried out with the rem...

Page 19: ...over in the direction of the arrow 2 Insert the battery with the positive side facing up 3 Replace the cover Caution 1 Only use AAA batteries Alkaline batteries are recommended 2 Dispose of used batteries according to local ordinance regulations 3 Remove the batteries when not using the projector for prolonged periods ...

Page 20: ...y Lock on page 13 if security lock is enabled 4 If more than one input device is connected press the SOURCE button of the remote and use to scroll among devices Component is supported through the RGB to COMPONENT ADAPTER HDMI1 HDMI2 HDMI DVI VGA Analog RGB Component DVD input YCbCr YPbPr or HDTV input YPbPr via HD15 connector Composite Video Traditional composite video 5 When the Power Off Press P...

Page 21: ...password in a safe place Without the password you will not be able to use the projector If you lose the password contact your reseller for information on clearing the password 1 Press the MENU button to open the OSD menu 2 Press the cursor button to move to the Settings 1 menu press the cursor button to select Advanced 1 3 Press Enter to enter the Advanced 1 sub menu Press the cursor button to sel...

Page 22: ...e cursor buttons in any order to set the password Push the MENU button to exit the dialog box 6 The password confirm menu appears when user presses the power on key in case the Security Lock is enabled Enter the password in the order you set it at step 5 In case you forget the password please contact the service center The service center will validate the owner and help reset the password ...

Page 23: ...projector table or stand should be level and sturdy Position the projector so that it is perpendicular to the screen Ensure the cables are in a safe location You could trip over them To adjust the angle of the picture turn the tilt adjuster right or left until the desired angle has been achieved ...

Page 24: ...ONE buttons on the remote control to correct image trapezoid wider top or bottom effect 3 The keystone control appears on the display Adjusting the Volume 1 Press the Volume buttons on the remote control The volume control appears on the display 2 Press the MUTE button to turn off the volume This feature is available only on the remote ...

Page 25: ...on 2 There are three menus Press the cursor button to move through the menus 3 Press the cursor button to move up and down in a menu 4 Press to change values for settings 5 Press MENU to close the OSD or leave a submenu Note Depending on the video source not all items in the OSD are available For example the Horizontal Vertical Position items in the Computer menu can only be modified when connecte...

Page 26: ...he cursor button to navigate to Settings 1 Press the cursor button to move to the Advanced 1 menu 2 Press Enter to enter the Advanced 1 sub menu Press the cursor button until Language is highlighted 3 Press the cursor button until the language you want is highlighted 4 Press the MENU button four times to close the OSD ...

Page 27: ...Frequency 0 31 Tracking 5 5 Auto Image Advanced Brilliant Color 0 10 Sharpness 0 31 Gamma 1 8 2 0 2 2 2 4 B W Linear Color Temperature Warm Normal Cold Video AGC Off On Video Saturation 0 100 Video Tint 0 100 White Blalnce R Gain 0 200 G Gain 0 200 B Gain 0 200 R Offset 100 100 G Offset 100 100 B Offset 100 100 Color Manager Red Hue Saturation Gain 0 100 Green Hue Saturation Gain 0 100 Blue Hue Sa...

Page 28: ...ês 簡体中文 繁體中文 Italiano Norsk Svenska Nederlands Русский Polski Suomi Ελληνικά 한국어 Magyar Čeština العربية Türkçe Việt 日本語 ไทย فارسی תירבע Security Lock Off On Blank Screen Blank Red Green Blue White Splash Logo Std Black User Closed Captioning Off On KeypadLock Off On 3D Setting 3D Off DLP Link IR 3D Sync Invert Off On 3D Format Frame Sequential Top Bottom Side By Side Frame Packing 3D Frame Packing...

Page 29: ... Center Down Up Left Right Translucent Menu 0 25 50 75 100 Low Power Mode Off On On by Lan Fan Speed Normal High Lamp Hour Reset Projector ID 00 98 Network Network State Connect Disconnect DHCP Off On IP Address 0 255 0 255 0 255 0 255 Subnet Mask 0 255 0 255 0 255 0 255 Gateway 0 255 0 255 0 255 0 255 DNS 0 255 0 255 0 255 0 255 Apply Ok Cancel Advanced 2 Sleep Timer 0 600 Source Filter HDMI1 Dis...

Page 30: ... button to enter and set the Display Mode Brightness Press the cursor button to enter and adjust the display brightness Contrast Press the cursor button to enter and adjust the display contrast Computer Press Enter to enter the Computer menu See Computer Menu on page 23 Auto Image Press Enter to automatically adjustment for frequency tracking and position Advanced Press Enter to enter the Advanced...

Page 31: ...he Computer menu ITEM DESCRIPTION Horizontal Position Press the cursor button to enter and adjust the display position to left or right Vertical Position Press the cursor button to enter and adjust the display position to up or down Frequency Press the cursor button to enter and adjust the A D sampling clock Tracking Press the cursor button to enter and adjust the A D sampling dot ...

Page 32: ...nd adjust the display sharpness Gamma Press the cursor button to enter and adjust the gamma correction of the display Color Temperature Press the cursor button to enter and adjust the color temperature Video AGC Press the buttons to enter and enable or disable the Automatic Gain Control for video source Video Saturation Press the buttons to enter and adjust the video saturation Video Tint Press th...

Page 33: ...n Press the buttons to adjust the Red Gain G Gain Press the buttons to adjust the Green Gain B Gain Press the buttons to adjust the Blue Gain R Offset Press the buttons to adjust the Red Offset G Offset Press the buttons to adjust the Green Offset B Offset Press the buttons to adjust the Blue Offset ...

Page 34: ...ager Press the buttons to adjust the Hue Saturation and Gain Blue Select to enter the Blue Color Manager Press the buttons to adjust the Hue Saturation and Gain Cyan Select to enter the Cyan Color Manager Press the buttons to adjust the Hue Saturation and Gain Magenta Select to enter the Magenta Color Manager Press the buttons to adjust the Hue Saturation and Gain Yellow Select to enter the Yellow...

Page 35: ...Projection Press the cursor button to enter and choose from four projection methods Aspect Ratio Press the cursor button to enter and adjust the video aspect ratio Keystone Press the cursor button to enter and adjust the display keystone Digital Zoom Press the cursor button to enter and adjust the Digital Zoom menu Audio Press Enter to enter the Audio menu See Audio on page 28 Advanced 1 Press Ent...

Page 36: ...e to the Settings 1 menu Press to move to the Audio menu and then press Enter or Press to move up and down in the Audio menu ITEM DESCRIPTION Volume Press the buttons to enter and adjust the audio volume Mute Press the buttons to enter and turn on or off the speaker ...

Page 37: ...r and enable or disable security lock function Blank Screen Press the cursor button to enter and select different color to blank the screen Splash Logo Press the cursor button to enter and select splash logo Closed Captioning Press the cursor buttons to enter and enable or disable Closed Captioning Keypad Lock Press the cursor button to enter and enable or disable keys can be work on keypad 3D Set...

Page 38: ...tent from a 3D DVD or 3D media file 5 You need to enable the 3D source some 3D DVD content may have a 3D on off selection feature 6 You need DLP link 3D or IR 3D shutter glasses With IR 3D shutter glasses you need to install a driver on your PC and connect a USB emitter 7 The 3D mode of the OSD needs to match the type of glasses DLP link or IR 3D 8 Power on the glasses Glasses normally have a powe...

Page 39: ... press Enter or Press to move up and down in the Advanced 2 menu Press to enter and change values for setting ITEM DESCRIPTION Test Pattern Press the cursor button to enter and select internal test pattern H Image Shift Press the cursor button to enter and select H Image Shift V Image Shift Press the cursor button to enter and select V Image Shift ...

Page 40: ...down of lamp when no signal Auto Power On Press the cursor button to enter and enable or disable automatic power On when AC power is supplied Lamp Mode Press the cursor button to enter and select the lamp mode for higher brightness or lower brightness to save lamp life Reset All Press Enter to reset all settings to default values Status Press Enter to enter the Status menu See page 33 for more inf...

Page 41: ...DESCRIPTION Active Source Display the activated source Video Information Displays resolution video information for RGB source and color standard for Video source Lamp Hours Lamp hour used information is displayed Eco Normal and Dynamic Eco Serial Number Showing serial number of product Software Version Showing system software version ...

Page 42: ... to enter and turn Low Power Mode on or off Fan Speed Press the cursor button to enter and toggle between Normal and High fan speeds Note We recommend selecting high speed in high temperatures high humidity or high altitude higher than 1500m 4921ft areas Lamp Hour Reset After replacing the lamp this item should be reset See page 35 for more information on Lamp Hour Reset Projector ID Press the cur...

Page 43: ... Press to turn DHCP On or Off Note If you select DHCP Off complete the IP Address Subnet Mask Gateway and DNS fields IP Address Enter a valid IP address if DHCP is turned off Subnet Mask Enter a valid Subnet Mask if DHCP is turned off Gateway Enter a valid Gateway address if DHCP is turned off DNS Enter a valid DNS name if DHCP is turned off Apply Press Enter to confirm settings ...

Page 44: ...d States AMX is a registered trademark of AMX LLC of the United States Supported External Devices This projector is supported by the specified commands of the Crestron Electronics controller and related software ex RoomView http www crestron com This projector is supported by AMX Device Discovery http www amx com This projector is compliant to support Extron device s for reference http www extron ...

Page 45: ... 37 LAN RJ45 1 Connect an RJ45 cable to RJ45 ports on the projector and the PC Laptop 2 On the PC Laptop select Start Control Panel Network and Internet ...

Page 46: ... 38 3 Right click on Local Area Connection and select Properties 4 In the Properties window select the Networking tab and select Internet Protocol TCP IP 5 Click Properties ...

Page 47: ...ector 8 Select Settings 2 Advanced 1 RS232 Network Option 9 After getting into Network input the following DHCP Off IP Address 10 10 10 10 Subnet Mask 255 255 255 0 Gateway 0 0 0 0 DNS Server 0 0 0 0 10 Press Enter to confirm settings 11 Open a web browser for example Microsoft Internet Explorer with Adobe Flash Player 9 0 or higher ...

Page 48: ... 40 12 In the Address bar input the IP address 10 10 10 10 13 Press Enter The projector is setup for remote management The LAN RJ45 function displays as follows ...

Page 49: ...Name 10 Location 10 Assigned To 10 Network Configuration DHCP Enabled N A IP Address 15 Subnet Mask 15 Default Gateway 15 DNS Server 15 User Password Enabled N A New Password 10 Confirm 10 Admin Password Enabled N A New Password 10 Confirm 10 For more information please visit http www crestron com ...

Page 50: ...mand control way so called RS232 by TELNET for LAN RJ45 interface Quick Start Guide for RS232 by TELNET Check and get the IP Address on OSD of the projector Make sure that laptop PC can access the web page of the projector Make sure that Windows Firewall setting to be disabled in case of TELNET function filtering out by laptop PC Start All Programs Accessories Command Prompt ...

Page 51: ...nection ready and user can have RS232 command input then Enter key pressed the RS232 command will be workable How to have TELNET enabled in Windows 7 8 10 By default installation for Windows TELNET function is not included But end user can have it by way of Turn Windows features On or Off to be enabled Open Control Panel in Windows Open Programs ...

Page 52: ...ity directly after TELNET connection ready 5 Limitation 1 for Telnet Control there is only one connection for Telnet Control in one projector Limitation 2 for Telnet Control there is less than 50 bytes for successive network payload for Telnet Control application Limitation 3 for Telnet Control there is less than 26 bytes for one complete RS232 command for Telnet Control Limitation 4 for Telnet Co...

Page 53: ... or Press to move up and down in the Advanced 2 menu Press to enter and change values for setting ITEM DESCRIPTION Sleep Timer min Press the cursor buttons to enter and set Sleep timer The projector automatically turns off after the preset period of time Source Filter Press Enter to enter the Source Filter menu See page 46 for more information on Source Filter ...

Page 54: ...I1 Press the buttons to enter and enable or disable the HDMI source HDMI2 Press the buttons to enter and enable or disable the HDMI source VGA Press the buttons to enter and enable or disable the VGA1 source Composite Video Press the buttons to enter and enable or disable the Composite Video source ...

Page 55: ...may burn out during normal operation and cause glass dust or shards to be discharged outward from the rear exhaust vent Do not inhale or do not touch glass dust or shards Doing so could result in injury Always keep your face away from the exhaust vent so that you do not suffer from the gas and broken shards of the lamp When removing the lamp from a ceiling mounted projector make sure that no one i...

Page 56: ...y on the module handle to remove the lamp module 6 Reverse steps 1 to 5 to install the new lamp module While installing align the lamp module with the connector and ensure it is level to avoid damage Note The lamp module must sit securely in place and the lamp connector must be connected properly before tightening the screws ...

Page 57: ...pen the OSD menu 2 Press the cursor button to move to the Settings 2 menu Press the cursor button to move down to Advanced 1 and press enter 3 Press the cursor button to move down to Lamp Hour Reset 4 Press the cursor or Enter button A message screen appears 5 Press buttons to reset the lamp hour 6 Press the MENU button to get back to Settings 2 ...

Page 58: ...rojected image quality 1 Turn off the projector and unplug the AC power cord from the AC outlet 2 Cleaning the filter with a vacuum cleaner Caution Recommend avoiding dusty or smoky environments when you operate the projector it may cause poor image quality If the filter is heavily clogged and unable to clean replace a new filter Note Using a ladder is recommended to access the filter Do not remov...

Page 59: ...ojector Use soft brush gently to clean the filter dust both side 2 Or lift the filter from the filter cover 3 Replace a new filter module or replace filter into cover 4 Replace the filter cover back to the projector by pushing gently in the direction shown Waming Do not wash the filter with the water or other liquid matter Important When the lamp is replaced the filter should also be replaced not ...

Page 60: ...st with a Bellows Lens Blower readily available from Camera shops to prevent scratching the mirror when subsequently wiped Cautions 1 Always turn the projector off and allow to cool for at least 30 minutes prior to cleaning 2 Never touch the projector mirror or Lens directly by hand 3 Do not use abrasive cleaners solvents or other harsh chemical cleaners ...

Page 61: ...the case do not use abrasive alcohol based cleaners Warning 1 Be sure to turn off and unplug the projector at least 30 minutes before cleaning Failure to do so could result in a severe burn 2 Use only a dampened cloth when cleaning Do not allow water to enter the ventilation openings on the projector 3 If a little water gets into the projector interior while cleaning leave unplugged in a well vent...

Page 62: ...asing a suitable Kensington security cable The security lock corresponds to Kensington s MicroSaver Security System If you have any comment contact Kensington 2853 Campus Drive San Mateo CA 94403 U S A Tel 800 535 4242 http www Kensington com Using the Security Bar In addition to the password protection function and the Kensington lock the Security Bar helps protect the projector from unauthorized...

Page 63: ...y attached Ensure the attached device is turned on Ensure a connected PC is not in suspending mode Ensure a connected notebook computer is configured for an external display This is usually done by pressing a Fn key combination on the notebook Tips for Troubleshooting In each problem specific section try the steps in the order suggested This may help you to solve the problem more quickly Try to pi...

Page 64: ... 12 blinks OFF Restrike lamp fail 2 5 blinks 13 blinks OFF Lamp fail 1 5 blinks 14 blinks OFF Lamp fail 2 5 blinks 15 blinks OFF Fan 1 error 6 blinks 1 blinks OFF Fan 2 error 6 blinks 2 blinks OFF Fan 3 error 6 blinks 3 blinks OFF Fan 4 error 6 blinks 4 blinks OFF Case Open 7 blinks OFF OFF DMD error 8 blinks OFF OFF Color wheel error 9 blinks OFF OFF T1 Over Temperature OFF 1 blinks ON T1 I2C Fai...

Page 65: ...re is no light from the projector 1 Check that the power cable is securely connected 2 Ensure the power source is good by testing with another electrical device 3 Restart the projector in the correct order and check that the Power LED is on 4 If you have replaced the lamp recently try resetting the lamp connections 5 Replace the lamp module 6 Put the old lamp back in the projector and have the pro...

Page 66: ...ource audio output with other speakers 3 Have the projector serviced Having the Projector Serviced If you are unable to solve the problem you should have the projector serviced Pack the projector in the original carton Include a description of the problem and a checklist of the steps you took when trying to fix the problem The information may be useful to service personnel For servicing return the...

Page 67: ... run HDMI cables longer than 10 meters 4 There are many HDMI Adopters working on HDMI solutions that extend a cable s effective distance from the typical 10 meter range to much longer lengths These companies manufacture a variety of solutions that include active cables active electronics built into cables that boost and extend the cable s signal repeaters amplifiers as well as CAT5 6 and fiber sol...

Page 68: ...L cUL CB CE CCC KC PSB GOST CECP ICES 003 RCM Environmental Operation Condition 0 40 C 10 85 No condensing Environmental Storage Condition 20 60 C 5 to 95 No condensation Dimensions 287 5 mm W x 206 9 mm H x 374 0 mm D 287 5 mm W x 193 6 mm H x 374 5 mm D 287 5 mm W x 167 58 mm H x 374 5 mm D AC Input AC Universal 100 240V Power consumption 330W 0 5W Stand By Lamp 240W limited lens shift function ...

Page 69: ...CCC KC PSB GOST CECP ICES 003 RCM Environmental Operation Condition 0 40 C 10 85 No condensing Environmental Storage Condition 20 60 C 5 to 95 No condensation Dimensions 287 5 mm W x 206 9 mm H x 374 0 mm D 287 5 mm W x 193 6 mm H x 374 5 mm D 287 5 mm W x 167 6 mm H x374 5 mm D AC Input AC Universal 100 240V Power consumption 330W 0 5W Stand By Lamp 240W limited lens shift function Audio speaker ...

Page 70: ...m 445 8 20mm Image Width 1723mm 1874mm 2088mm 2154mm Image height 1077mm 1171mm 1305mm 1346mm H 280 50mm 300 2 50mm 325 5 50mm 336 9 50mm DH773USTi DH772UST DH773USTie 1080P 16 9 Diagonal 88 9 99 102 110 Distance 340 3 20mm 421 4 20mm 445 8 20mm 510 5 20mm Image Width 1968mm 2194mm 2262mm 2435mm Image height 1107mm 1234mm 1272mm 1370mm H 332 1 50mm 362 8 50mm 372 3 50mm 397 6 50mm ...

Page 71: ...8 48 4 60 0 3D FS TB SBS 3D FS TB SBS 1024 x 768 56 5 70 1 1024 x 768 60 2 75 0 MAC19 MAC19 1024 x 768 60 0 75 0 1024 x 768 68 7 85 0 1024 x 768 97 6 120 0 3D FS 3D FS 1152 x 870 68 7 75 1 MAC21 MAC21 1280 x 720 45 0 60 0 3D FS TB SBS 3D FS TB SBS 1280 x 720 90 0 120 0 3D FS 3D FS 1280 x 768 Reduce Blanking 47 4 60 0 3D FS TB SBS 3D FS TB SBS 1280 x 768 47 8 59 9 3D FS TB SBS 3D FS TB SBS 1280 x 8...

Page 72: ...7 5 30 0 3840 x 2160 112 5 50 0 3840 x 2160 135 0 60 0 SDTV 480i 15 7 60 0 3D FS DVI 不支 持此 Timing 576i 15 6 50 0 EDTV 576p 31 3 50 0 480p 31 5 60 0 HDTV 720p 37 5 50 0 3D FP TB 720p 45 0 60 0 3D FP TB 1080i 33 8 60 0 3D SBS 1080i 28 1 50 0 3D SBS 1080p 27 0 24 0 3D FP TB 1080p 28 0 25 0 1080p 33 7 30 0 1080p 56 3 50 0 1080p 67 5 60 0 O Frequency supported Frequency not supported 3D FS Field Sequen...

Page 73: ... 65 Projector Dimensions DW771USTi DH773USTi 287 5mm 374 5mm 206 9mm 123 1mm ...

Page 74: ... 66 Projector Dimensions DW770UST DH772UST 167 6mm 122 6mm 374 5mm 287 5mm ...

Page 75: ... 67 Projector Dimensions DW771USTie DH773USTie 287 5mm 374 5mm 193 6mm 123 1mm ...

Page 76: ...if not installed and used in accordance with the instruction manual may cause harmful interference to radio communications Operation of this equipment in a residential area is likely to cause harmful interference in which case the user will be required to correct the interference at his her own expense Changes or modifications not expressly approved by the parties responsible for compliance could ...

Page 77: ...Xh Xh 53h 30h 30h 30h 33h 0Dh Resync P F VXXG0004 56h Xh Xh 47h 30h 30h 30h 34h 0Dh Get Lamp Hours Pn F VXXS0006 56h Xh Xh 53h 30h 30h 30h 36h 0Dh System Reset P F VXXG0007 56h Xh Xh 47h 30h 30h 30h 37h 0Dh Get System Status 0 Reset 1 Standby 2 Operation 3 Cooling Pn F VXXG0008 56h Xh Xh 47h 30h 30h 30h 38h 0Dh Get F W Version Pn F VXXS0010 56h Xh Xh 53h 30h 30h 31h 30h 0Dh Lamp Hours Reset P F Co...

Page 78: ... Get Gamma 0 1 8 1 2 0 2 2 2 3 2 4 4 B W 5 Linear Pn F VXXS0107n 56h Xh Xh 53h 30h 31h 30h 37h nh 0Dh Set Gamma 0 1 8 1 2 0 2 2 2 3 2 4 4 B W 5 Linear P F VXXG0108 56h Xh Xh 47h 30h 31h 30h 38h 0Dh Get Display Mode 0 Presentation 1 Bright 2 Game 3 Movie 4 TV 5 sRGB 6 Blackboard 7 User Pn F VXXS0108n 56h Xh Xh 53h 30h 31h 30h 38h nh 0Dh Set Display Mode 0 Presentation 1 Bright 2 Game 3 Movie 4 TV 5...

Page 79: ...t 1 Rear 2 Ceiling 3 Rear Ceiling Pn F VXXS0308n 56h Xh Xh 53h 30h 33h 30h 38h nh 0Dh Projection Mode 0 Front 1 Rear 2 Ceiling 3 Rear Ceiling P F VXXG0309 56h Xh Xh 47h 30h 33h 30h 39h 0Dh Get vertical keystone value n 40 40 Pn F VXXS0309n 56h Xh Xh 53h 30h 33h 30h 39h nh 0Dh Set vertical keystone value n 40 40 P F VXXG0311 56h Xh Xh 47h 30h 33h 31h 31h 0Dh Get the zoom n 10 10 Pn F VXXS0311n 56h ...

Page 80: ... nh 0Dh Set R Offset n 100 100 P F VXXG0335 56h xh xh 47h 30h 33h 33h 35h 0Dh Get G Offset n 100 100 Pn F VXXS0335n 56h xh xh 53h 30h 33h 33h 35h nh 0Dh Set G Offset n 100 100 P F VXXG0336 56h xh xh 47h 30h 33h 33h 36h 0Dh Get B Offset n 100 100 Pn F VXXS0336n 56h xh xh 53h 30h 33h 33h 36h nh 0Dh Set B Offset n 100 100 P F VXXG0337 56h xh xh 47h 30h 33h 33h 37h 0Dh Get White R Gain n 0 100 Pn F VX...

Page 81: ...6h xh xh 53h 30h 33h 35h 30h nh 0Dh Set C_Saturation n 0 100 P F VXXG0351 56h xh xh 47h 30h 33h 35h 31h 0Dh Get C_Gain n 0 100 Pn F VXXS0351n 56h xh xh 53h 30h 33h 35h 31h nh 0Dh Set C_Gain n 0 100 P F VXXG0352 56h xh xh 47h 30h 33h 35h 32h 0Dh Get M_Hue n 0 100 Pn F VXXS0352n 56h xh xh 53h 30h 33h 35h 32h nh 0Dh Set M_Hue n 0 100 P F VXXG0353 56h xh xh 47h 30h 33h 35h 33h 0Dh Get M_Saturation n 0...

Page 82: ... Characters of settings Description Query current setup Question mark indicates querying current setup Setup settings Syntax Symbol suffixed with setup values Increase setup order of adjustment items Some settings are changed in steps Symbol indicates changing one step up Decrease setup order of adjustment items Some settings are changed in steps Symbol indicates changing one step down Execute ope...

Page 83: ... Color Manager Green Gain hsg g gain V V V V 0 100 Color Manager Blue Gain hsg b gain V V V V 0 100 Color Manager Cyan Gain hsg c gain V V V V 0 100 Color Manager Magenta Gain hsg m gain V V V V 0 100 Color Manager Yellow Gain hsg y gain V V V V 0 100 Color Manager Red Saturation hsg r sat V V V V 0 100 Color Manager Green Saturation hsg g sat V V V V 0 100 Color Manager Blue Saturation hsg b sat ...

Page 84: ... V 0 Fill 1 4 3 2 16 9 3 LetterBox 4 Native 5 2 35 1 Digital Zoom zoom V V V V 10 10 Keystone v keystone V V V V 40 40 H Image Shift img hshift V V V V 50 50 V Image Shift img vshift V V V V 50 50 Projection projection V V 0 Front 1 Rear 2 Ceiling 3 Rear Ceiling Test Pattern test pattern V V 0 None 1 Grid 2 White 3 Red 4 Green 5 Blue 6 Black Auto Power On direct poweron V V 0 Off 1 On Lamp Mode li...

Page 85: ...ic V V 0 Off 1 On Blank Screen blankscreen color V V 0 Black 1 Red 2 Green 3 Blue 4 White Splash Logo logo V V 0 Std 1 Black 2 Blue Menu Position menu position V V 0 Left 1 Right 2 Center 3 Bottom 4 Top Translucent Menu menu trans V V 0 Off 1 25 2 50 3 75 4 100 Keypad Lock keypad lock V V 0 Off 1 On Security Lock security lock V V 1 Up 2 Down 3 Left 4 Right Security Unlock security unlock V 1 Up 2...

Page 86: ...Info source info V string Lamp Hours light1 hours V string Lamp Hour 1 Reset light1 reset V Software Version sw ver V string Serial Number ser no V string Auto Image auto img V Lamp Status light1 stat V 0 Off 1 On Model model V string Pixel Clock pixel clock V string H Refresh Rate h refresh V string V Refresh Rate v refresh V string Blank blank V V 0 Off 1 On Power On power on V Power Off power o...

Page 87: ...North America Vivitek Service Center 15700 Don Julian Road Suite B City of Industry CA 91745 U S A Tel 855 885 2378 Toll Free Email T services1 vivitekcorp com URL www vivitekusa com Asia and Taiwan Vivitek Service Center 7F No 186 Ruey Kuang Road Neihu District Taipei Taiwan 11491 Tel 886 2 8797 2088 ext 6899 Direct Tel 0800 042 100 Toll Free Email kenny chang vivitek com tw URL www vivitek com t...

Reviews: