background image


37 

Print 

      You can print photos directly from the camera using the Pictbridge technology on your printer. 
 
1. 

Select a photo you want to print. 

2. 

Press the Menu/OK button. 

3. 

Press the Left/Right button to select the Pictbridge menu option. 

4. 

Press the Up/Down button to select Pictbridge. 


5. 

Press the Menu/OK button to confirm.   

6. 

“Please connect to device” message will appear on the LCD. 

7. 

Connect your camera to a compatible printer with the USB cable. 

8. 

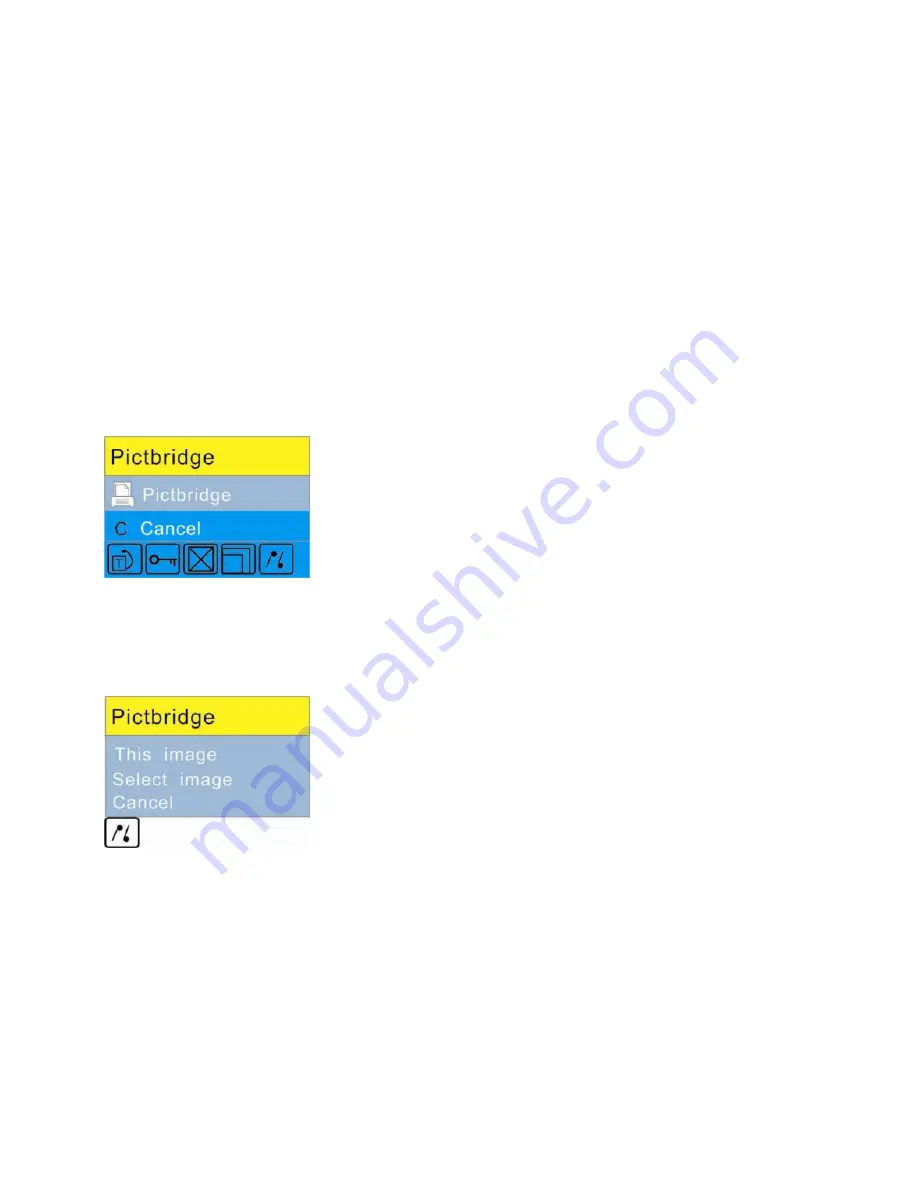
The following menu will appear: 


9. 

Press the Up/Down button to select the 

“This Image” option and press the Menu/OK button. 

10.  Select the 

“Select Image” option to select more than one photo for printing. 

Summary of Contents for VIVICAM 7690

Page 1: ...Camera Owner s Manual 2009 Sakar International Inc All rights reserved Windows and the Windows logo are registered trademarks of Microsoft Corporation All other trademarks are the property of their r...

Page 2: ...amera 9 Main Icons on the LCD 11 Camera mode 13 Video Mode 28 Playback Mode 30 Install the Vivitar Experience Image Manager Software 39 Connect your camera to the computer 41 Get photos and videos fro...

Page 3: ...order to get the most out of your digital camera Key Features Digital Video resolutions 320x240 Pixels 640x480 Pixels 7 1 mega pixels camera with choice of 6 digital camera resolutions 3072x2304 7MP 2...

Page 4: ...d photos and videos to your PC you will need the following minimum configuration Pentium 4 processor or above with Windows XP service pack 2 512 MB RAM with 100MB of free disk space 1024 x 768 Recomme...

Page 5: ...st 15GB of available space Support for Super VGA graphics Available USB Interface CD ROM drive QuickTime 6 or higher Microsoft Internet Explorer 7 or higher Internet connection required Computer Syste...

Page 6: ...5 Quick Look at Your Camera...

Page 7: ...ide of the camera 2 Insert the alkaline batteries correctly with the correct polarity as shown on the battery cover 3 Close the battery compartment When the Low Battery icon and Low Battery message fl...

Page 8: ...at you do not take out the batteries or power off your camera at will otherwise the test photos in the built in memory will be lost before they are either downloaded or copied to the SD memory card in...

Page 9: ...ress the Menu OK button to save the test photos videos to the SD memory card Select No and press the Menu OK button if you do not want to save these test photos videos 2 After the SD memory is inserte...

Page 10: ...mera When there is insufficient battery power a Low Battery message will appear on the LCD screen and the camera will power off automatically after a few seconds MODE switch Your digital camera has 3...

Page 11: ...s for you to take still photos You can shoot video files while in Video mode In Playback mode you can preview the photos videos you captured rotate protect delete crop and print your photos Main butto...

Page 12: ...11 Main Icons on the LCD...

Page 13: ...e Flash Auto No Flash Modes Camera Playback Video SD card inserted SD card inserted Locked Self timer On 10 seconds Self timer On 2 seconds Normal Capture Macro Capture Date on photo Digital Zoom Prot...

Page 14: ...will display Disk Full If you attempt to take a photo when the camera s internal memory is full the camera will beep continuously Please download the test images to your computer as soon as possible...

Page 15: ...the Macro setting Flash Your camera has a built in flash function which enables you to take photos when the light condition is not good The flash can only be activated in the photo mode 1 Press the U...

Page 16: ...eady and flat surface before you use the self timer The timer is either for 2 or 10 seconds 1 Press the Down or Timer button 2 The icon appears on the top of the LCD screen Press the Shutter button to...

Page 17: ...for you to take photos in almost any environment You can choose your best scenery according to your light and environmental conditions 1 In Camera mode press the Left Scene button 2 The scene options...

Page 18: ...comes with built in scenes for you to take photos in almost any environment You can choose your best scenery according to your light and environmental conditions 1 Press the Menu OK button 2 Press th...

Page 19: ...be saved and the amount of memory required for each photo The higher the photo quality the more memory it will take The image size and quality will also affect the maximum size you can print your phot...

Page 20: ...enu OK button 2 Press the Right Left button until you select the Anti Shake menu option 3 Press the Up Down button to select On or Off 4 Press the Menu OK button to confirm and exit to standby mode No...

Page 21: ...etup menu Exposure This setting allows you to control the brightness of your images 1 Press the Up Down button to select the Exposure option in the Setup menu 2 Press the Menu OK button to open the Ex...

Page 22: ...e Setup menu 2 Press the Menu OK button 3 Press the Up Down button to choose the ISO option from the ISO submenu that appears Auto 100 200 400 4 Press the Menu OK button to confirm and exit White Bala...

Page 23: ...exit Sharpness This setting allows you to adjust the sharpness of your images making edges more or less distinct 1 Press the Up Down button to select the Sharpness option in Setup menu 2 Press the Men...

Page 24: ...e 1 Press the Up Down button to select the Quality option in the Setup menu 2 Press the Menu OK button 3 Press the Up Down button to select the best quality for you Super Fine Fine Normal 4 Press the...

Page 25: ...ate on photos Set date setting the system date 4 Press the Menu OK button to confirm If you wish to change the date press the Set Date option 1 Press the Menu OK button to enter the Set Date submenu o...

Page 26: ...for 60 seconds Use this option to change the time 1 Press the Up Down button to select the Auto Power Off option in the Setup menu 2 Press the Menu OK button 3 Press the Up Down button to select a ti...

Page 27: ...ase all files in memory including files that have been protected please operate cautiously 1 Press the Up Down button to select the Format option in the Setup menu 2 Press the Menu OK button 3 Press t...

Page 28: ...mera you can reset the camera to the original factory settings 1 Press the Up Down button to select the Default setting option in the Setup menu 2 Press the Menu OK button 3 Press the Up Down button t...

Page 29: ...this AVI file in playback mode or on your computer using the Vivitar Experience Image Manager software Please read the section on Minimum Computer Requirements for your operation system in order to be...

Page 30: ...nce you desire Auto Daylight Cloudy Tungsten Fluorescent 4 Press the Menu OK button to confirm and exit to the video standby mode 5 The White balance effect you selected appears on the LCD screen Vide...

Page 31: ...LCD screen Playback Mode Set the mode switch to the Playback mode You can preview the photos and videos you have recorded In Playback mode you can rotate protect delete and crop your photos and you c...

Page 32: ...1 Pressing the W button once will open the thumbnail display view 2 Press the Right Left button to move between the images 3 Press the T button to view the image in full screen 4 To Zoom in to the pho...

Page 33: ...Select an AVI file you want to play 1 Press the Shutter button to begin playing the AVI file 2 Press the Shutter button to pause and again to continue 3 Press the Up button to stop and exit the video...

Page 34: ...u option 3 Press the Up Down button to select the degree you want to rotate your photo or cancel to exit 4 Press the Menu OK button to confirm 5 A Rotate and Saving message will appear on the LCD Afte...

Page 35: ...3 select Unlock and press Menu OK to unlock the current file Delete Delete unwanted photos and videos at any time to free up memory You can delete one image or video clip at a time or delete all the...

Page 36: ...etion 6 Press the Right Left button to select Yes or No if you delete one or all photos and videos 7 Press the Menu OK button to confirm and exit Crop Image Crop your photos to show only a specific po...

Page 37: ...buttons to out change the size of the rectangle the area you will crop 7 Press the Up Down Right Left button to move the rectangle to select the area of the photo you want to crop 8 Press the Shutter...

Page 38: ...menu option 4 Press the Up Down button to select Pictbridge 5 Press the Menu OK button to confirm 6 A Please connect to device message will appear on the LCD 7 Connect your camera to a compatible prin...

Page 39: ...cess your request After a moment the photo is printed Note Printing many photos will take more time Please be patient and wait for all the photos to print 11 When the print is finished a Print Finishe...

Page 40: ...ve The installation screen should automatically open 2 On PC The Vivitar Experience Image Manager Installer window appears If the window does not appear open the application s CD DVD drive and click o...

Page 41: ...ur language and click Next to open the next window 6 Select your camera model from the list and click Next to open the next window 7 Click Next to confirm your camera model selection and to install th...

Page 42: ...and run the Vivitar Experience Image Manager from your computer Connect your camera to the computer 1 Use the USB cable that came with your camera to connect your camera to your computer 2 Turn on the...

Page 43: ...to download photos videos or both 4 Select your camera removable disk from the device window If your camera is the only USB device connected then it will be selected automatically 5 Select a location...

Page 44: ...Seamlessly transfer photos and videos from one social network to another Organize your images by creating offline and online albums Edit images using automatic and manual tools Use automatic Geotaggin...

Page 45: ...computer Optionally select the files and choose Copy from the Finder s Edit menu Then select a folder and choose Paste from the Edit menu 5 We recommend that you copy the images into the Pictures fold...

Page 46: ...ill of sale 2 A detailed written description of the problem 3 Your return address and telephone number Daytime MAIL TO ADDRESS BELOW Sakar International Attention Service Department 195 Carter Drive E...

Page 47: ...9 2M 87 1M 140 VGA 256MB SD Card high quality About18 Interpolation7M 23 5M 27 3M 39 2M 46 1M 93 VGA LCD Display 2 4 Inch TFT LCD Lens f 7 45mm F3 0 with Macro Zoom 4X Digital Zoom Exposure 3 0EV 3 0E...

Page 48: ...options list until you see the removable device appearing If the computer does not recognize your device it may mean that your computer does not meet the minimum system requirements Please see the Sy...

Reviews: