background image


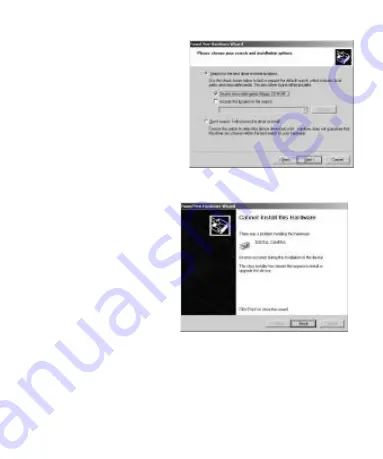
6. In this window select 

Search removable 

media [floppy, 
CD-ROM ...]’

 and click 

Next to continue 


7. After system files are copied, click Finish to continue the 

installation 


8. Double click the CD drive icon in My Computer and locate 

a file named InstallMgr.exe in the root directory of the CD. 
Double click on this file to begin the TWAIN driver 
installation. 


Summary of Contents for Vivicam 60

Page 1: ... Instruction Manual Vivicam 60 数码说明书之家 WWW 54GG COM 2005 09 04 ...

Page 2: ...ion to the Vivicam 60 3 3 Vivicam 60 Features 5 4 Taking Pictures 9 5 Installing the Driver and Utility Software 13 6 Transferring Pictures To Your Computer 21 7 TWAIN Driver Interface 26 8 Using The Vivicam 60 as a PC Camera 29 CONTENTS ...

Page 3: ...camera if it is raining or snowing n If the lens or the viewfinder gets dirty please clean them Using a lens brush or soft cloth Never touch the lens with your fingers n lf water gets inside the camera immediately remove the batteries and allow the camera to dry thoroughly n Do not open the camera case or attempt your own repairs High voltage internal components may create the risk of the electric...

Page 4: ... x 480 pixels 320 x 240 pixels 160 x 120 pixels n Range of Focus From 2 feet to infinity n 24 bit full color n Memory Built in 8MB SDRAM n File Format Bitmaped variable with Twain AP n Flash Lamp lnternal n Flash modes Auto Off n Self timer 10 seconds n Power 2 AA alkaline batteries n PC Interface USB n Auto Power Off Automatically turns power off if inactive for about 60 seconds ...

Page 5: ...2 2 Accessories 1 Camera Cradle 2 Two AA alkaline batteries 3 Camera hand strap 4 Camera driver and utility software CD 5 USB cable 6 Camera pouch 7 Quickstart Guide ...

Page 6: ...3 Vivicam 60 Features 3 1 General Guide Front Back ...

Page 7: ...icator n Picture Counter n Total number of pictures you have captured n Memory full n Flash Mode n Automatic flash mode n Flash Off default setting n Continuous Capture and Picture Delete n Continuous capture mode 3 1 2 ...

Page 8: ...ment n Outdoor default setting n lndoor n lmage Resolution n 640 x 480 pixels default setting n 320 x 240 pixels n Battery Power n Full battery power n Medium battery power n Low battery power n No battery power Camera will sound two beeps and shut down automatically 4 5 6 ...

Page 9: ...load your pictures before replacing the batteries n Self timer n Self timer mode 3 3 Camera Function Selection n Press Mode button to select the desired function The function icon on the LCD panel will blink Press Select button immediately until you hear two confirmation beeps n Function Mode Status 7 ...

Page 10: ... about 60 seconds The camera will also turn off if the batteries run extremely low 4 2 Taking Pictures n Press Shutter button to take a picture The camera will beep once with each image taken n LCD Panel will show the number of pictures you have taken Memory is full 4 3 Self timer n Press Mode until you see then press Select n Press Shutter to take a picture with a ten second delay ...

Page 11: ...en required by current exposure setting n Off Flash will not fire n The effective working range for the flash is 2 to 5 feet The best range is 3 to 4 feet n When taking pictures with the flash the Busy LED on the back of the camera will blink after you press the Shutter button The flash is charging when the LED is blinking uImportant Note The camera flash will no longer function when low battery p...

Page 12: ...se the Shutter button Continuous capture will also stop when the memory is full 4 6 Deleting Pictures 1 To delete all pictures n Press Mode select to n Press Select until you hear 2 beeps n The camera will delete all pictures and the picture counter will refresh to 0 2 Delete just the last picture n Press Mode select to n Press Select until you hear 2 beeps n The camera will delete the last pictur...

Page 13: ... you will have the option to enlarge your images to a resolution of 1024 x 768 To enlarge your images to 1024 x 768 you must should have originally taken them as VGA CIF resolution is used primarily for pruposes of making a movie clip using AVI Maker 4 8 Selecting a shooting lighting environment 1 Outdoor mode default setting you will normally use this mode Indoor mode Optional use this setting fo...

Page 14: ...rements before installing the software 1 Windows 98 98SE Me 2000 or XP 2 Pentium or higher CPU 3 CD ROM drive 4 USB port 5 2 Installation of the TWAIN Driver and AVI Maker 1 Turn on your computer 2 lnsert the V60 CD ROM into your CD ROM drive The following screen will appear Click on lnstall Vivicam TWAIN Driver ...

Page 15: ...3 Select the language from the source list Click OK to move to the next step 4 Your computer will display Click Next to move to the next step ...

Page 16: ...nto your CD ROM drive Note If you mistakenly plugged in your camera to your PC without first installing the driver please refer to the SUPPLEMENT section following this section 2 The Digital Camera Window Install Screen appears Click on Install Vivicam Twain Driver in the dialogue box Alternatively advanced users may explore the CD and double click on file named InstallMgr exe in the root director...

Page 17: ...3 Follow the screen instructions to complete the installation 4 Next plug in your camera to your PC using the USB cable Vivicam 60 Computer 5 Your PC will detect the camera ...

Page 18: ... Hardware Wizard window appears select Install from a list or specific location Advanced and click Next to continue 7 When the following window appears select Search removable media floppy CD ROM and click Next to continue ...

Page 19: ...8 Files are copied and the following screen appears 9 Click Finish to continue the installation ...

Page 20: ...are Wizard window appears again Select Install from a list or specific location Advanced and click Next to continue 11 When the following screen appears select Search removable media floppy CD ROM and click Next to continue ...

Page 21: ...12 Files are copied while the following screen appears 13 Click Finish to complete the installation ...

Page 22: ...4 lnstalling Application Software 1 lnsert the camera software CD into the CD ROM drive The installation screen appears again Click on the title of the software you wish to install Note The Vivicam 60 will function with any TWAIN compliant imaging software that you may already have on your PC TWAIN is a universal mechanism by which cameras and scanners pass images to imaging software ...

Page 23: ...1 Connect your camera to your PC Vivicam Computer 6 2 Start a TWAIN compliant application such as Photo Impression 1 Open the Photo lmpression 2000 application software 2 Click on the Get Photo button 3 Click on the Camera Scanner button 4 The Select Source list appears 5 Select Vivicam 6 Choose the destination album for your pictures from the Select Album list ...

Page 24: ...called thumbnails 9 Select the pictures that you like or click Select All to select all pictures then click on the Transfer button 10 When transfering images you may choose either Standard CIF or VGA to transfer images in the resolution in which they were captured or Large to enlarge your images to the next larger size using interpolation Select all Transfer ...

Page 25: ...ges Your camera will hold over 200 CIF images 2 Connect your camera to your PC with the USB cable and start the AVI maker from Windows programs menu 3 AVI Maker will automatically detect and read the continuous CIF pictures from the camera and present this window 4 Select the desired Compression Quality and frame rate and then click on the Create button ...

Page 26: ...VI file and select a directory where you would like to save the AVI video file Note that AVI stands for Audio Video Interlaced In the case of the Vivicam there is no audio only video 7 After the the AVI video file is completed it will play in Windows Media Player ...

Page 27: ...7 TWAIN Driver Interface User Interface Introduction 1 Save to disk Select images you want to save directly to your computer s hard disk and click this icon ...

Page 28: ...PG is used most often D Picture Size Select the desired image size E JPEG Quality If you have selected JPG you may further define the image quality and file size using the quality slider 2 Select All Click this button to select all images 3 Deselect All Click this button to deselect all images 4 Delete Last Click this button to delete just the last imgage stored in the camera 5 Delete All Click th...

Page 29: ...play the self timer Window A Timer setting adjustment up or down B Exit this window C Start the count down to take a picture D Shows the time you have selected 9 Page up and down Display the previous or next page images 10 Enlarge preview you can preview enlarged image by moving mouse cursor over an image 11 About Displays version information 12 Exit Quits the TWAIN Interface Window ...

Page 30: ... panel will show 3 Refer to the documentation of the PC camera software that you are using for general information about using a PC camera 4 Select Vivicam Dual Mode DSC Video Camera in your softwares video capture source list u Important Note Do not disconnect the USB cable while you are running the camera as a PC camera in order to avoid a function failure ...

Page 31: ...talling the drivers follow these steps to complete the installation process 1 Insert the CD ROM into your CD ROM drive 2 When the Found New Hardware Wizard window appears select Install from a list or specific location Advanced and click Next to continue 3 When this window appears select Search removable media floppy CD ROM and click Next to continue ...

Page 32: ...opied as the following screen appears Click Finish to continue the installation 5 When the Found New Hardware Wizard window appears again select Install from a list or specific location Advanced and click Next to continue ...

Page 33: ...ext to continue 7 After system files are copied click Finish to continue the installation 8 Double click the CD drive icon in My Computer and locate a file named InstallMgr exe in the root directory of the CD Double click on this file to begin the TWAIN driver installation ...

Page 34: ...tion Setup will finish installing all the necessary files on your computer It will prompt you to restart your computer Click Yes and then Finish to restart your computer and to complete Setup 10 After your PC restarts the following window appears Select Install the software automatically Recommended and click Next to continue ...

Page 35: ...are copied and the following screen appears Please click Finish to continue the installation 12 When the following window appears please select Install the software automatically Recommended and click Next to continue ...

Page 36: ...13 System files are copied and the following screen appears Click Finish to complete the installation ...

Reviews: