Vivitar Vivicam 4100 User Manual Download Page 43

43

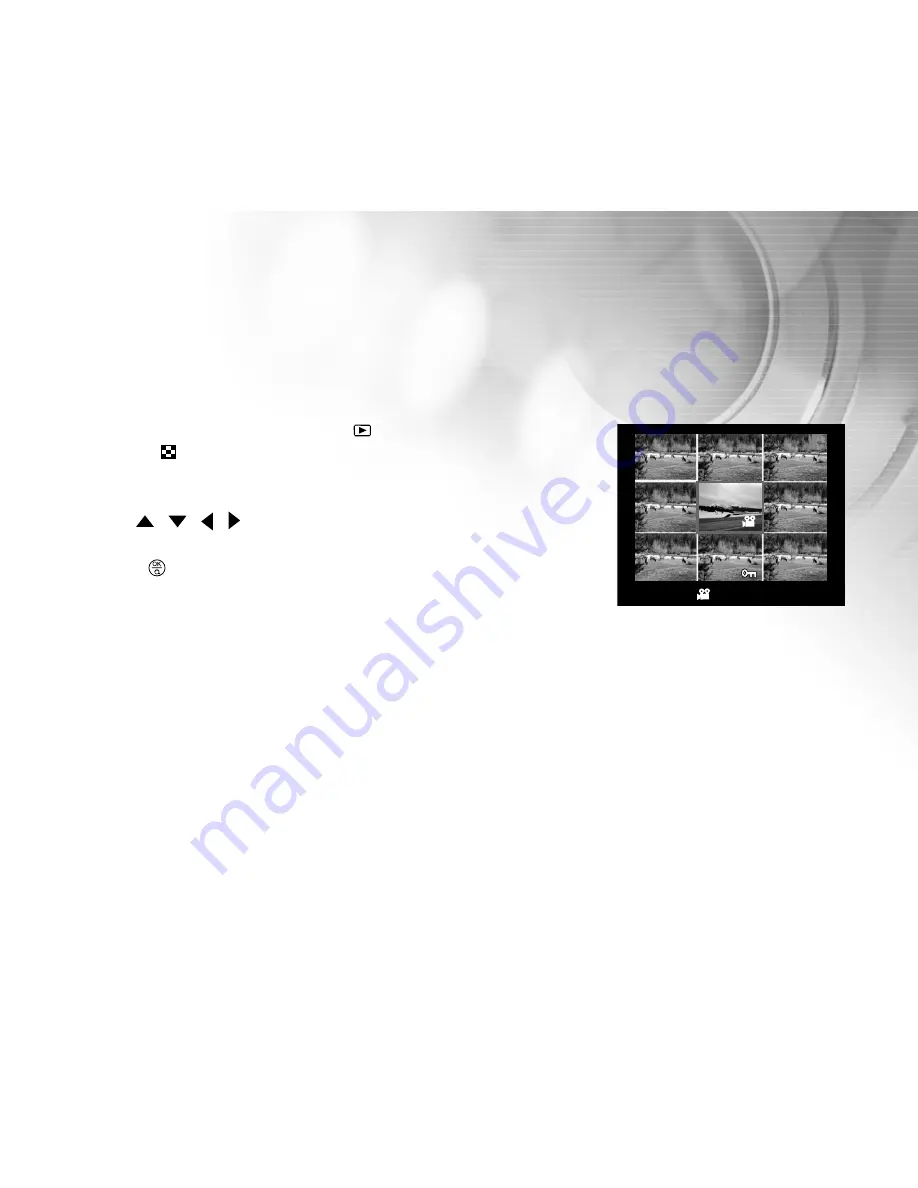
Viewing Nine Images At A Time

This function allows you to view nine thumbnail images on the LCD monitor simultaneously so that you can quickly
scan for a particular image.

1. Press twice the MODE button to enter [ 

 ] Playback mode.

2. Press the [ 

 ] thumbnail button and nine thumbnail images appear on

the LCD monitor. (Assuming there are nine or more recorded images in
the memory.)

3. Use the 

 / 

 /   /    button to move the cursor to select the image to

be displayed at regular size.

4. Press the 

  button to display the selected image on the full screen.

00:12

05 of 09

Summary of Contents for Vivicam 4100

Page 1: ...tions However there is no guarantee that interference will not occur in a particular installation If this equipment does cause harmful interference to radio or television reception which can be determ...

Page 2: ...ra may be different from those described in this manual This is due to the fact that different retailers often specify slightly different product inclusions and accessories to suit their market requir...

Page 3: ...inspection ask the store of purchase Do not use the camera in areas near water This might cause fire or electric shock Take special care during rain snow on the beach or near the shore Do not place th...

Page 4: ...a precision instrument Do not drop it strike it or use excessive force when handling the camera This might cause damage to the camera Do not use the camera in humid steamy smoky or dusty places This m...

Page 5: ...ect the number of pictures that can be taken Therefore to maximize their performance and lifetime we recommend that you fully charge the batteries and discharge them for at least one complete cycle be...

Page 6: ...Using the LCD Monitor 25 Using the Normal Mode 26 Adjusting the Zoom 27 Using the Flash 28 Using the Self Timer 30 Using the Macro Mode 31 Setting the Image Resolution and Quality 32 SHOOTING LETTING...

Page 7: ...puter 51 Step 3 Downloading Recorded Images Video Clips 52 SOFTWARE INSTALLATION 53 INSTALLING PHOTO EXPLORER 53 INSTALLING PHOTO EXPRESS 54 USER MANUAL 55 INSTALLING ADOBE ACROBAT READER 56 LIST OF M...

Page 8: ...mages turn out right The internal built in memory let you capture and store images without the need for an additional memory card However you may wish to expand the memory capacity by using an externa...

Page 9: ...t you have the following items In the event that any item is missing or if you find any mismatch or damage promptly contact to your dealer ViviCam 4100 Digital Camera Camera Strap User s Manual Softwa...

Page 10: ...10 1 Battery SD card cover 2 Shutter button 3 Power switch 4 Self timer indicator COMPONENTS GUIDE Front View 6 5 7 1 2 4 OPEN 3 8 5 Flash 6 Microphone 7 Lens 8 Macro switch...

Page 11: ...4 O P E N 10 8 11 1 Strap eyelet 2 Up Thumbnail button 3 Right OSD On Off button 4 Down Flash Delete button 5 Left Self timer button 6 Tripod socket 7 USB connector 8 LCD monitor 9 MENU button 10 MOD...

Page 12: ...ntrol Panel 1 Arrow button Up Thumbnail button 2 Arrow button Right OSD On Off button 3 OK button Digital zoom button 4 Arrow button Down Flash button Delete button 5 Arrow button Left Self timer 5 2...

Page 13: ...o LED indicator Blinking green Image is being recorded to the memory card No LED indicator Solid green USB communication transfer in progress No LED indicator Solid green The camera is ready to record...

Page 14: ...capture fast moving subjects 3 Night Scene mode Select this option to take images of people against dark or nighttime background 4 Portrait mode Select this option to make people stand out with the b...

Page 15: ...de Sports mode Night Scene mode Portrait mode Landscape mode Backlight mode 2 Image quality Fine Normal Economy 3 Image size 2304X1728 1600X1200 1280X960 640X480 7 ISO speed no indication for Auto Aut...

Page 16: ...still images 11 Flash mode Fill flash on Flash off A Automatic flash A Red eye reduction 12 Self timer mode 13 Macro mode icon 14 White balance no indication for auto white balance Auto Daylight Cloud...

Page 17: ...displayed when playing images back 2 of 10 1 Playback mode 2 Card indicator 3 Battery level Fully battery level Fairly consumed Nearly exhausted Virtually no battery power 4 Protect indicator 5 Index...

Page 18: ...rs are displayed when recording video clips REC 12 20 1 Movie mode 2 Recording indicator 3 Video counter 4 Card indicator 5 Battery level Fully battery level Fairly consumed Nearly exhausted Virtually...

Page 19: ...video clips back 00 52 2 of 10 1 Playback mode 2 Battery level Fully battery level Fairly consumed Nearly exhausted Virtually no battery power 3 Card indicator 4 Index number of total number 5 Movie m...

Page 20: ...ing the batteries in extremely cold environments as low temperatures may shorten the battery life and reduce the camera performance Low temperature will influence Alkaline battery performance Ni MH re...

Page 21: ...t be inserted check the orientation 4 Close the SD card battery cover Note To prevent valuable data from being accidentally deleted from an SD memory card you can slide the write protect tab on the si...

Page 22: ...month day and the time by using the button To increase the value press the button To decrease the value press the button 2 Press the button after all fields are set Choosing the Language Follow the s...

Page 23: ...al slippage during the use always use the camera strap Attach the camera strap as follows 1 Thread the small loop of the strap through the strap eyelet on the camera 2 Pull the large loop through the...

Page 24: ...NCTIONS Turning the Power On 1 Slide the POWER switch to turn the camera on 2 The camera sounds one beep when it is initiated Turning the Power Off Slide the POWER switch back to turn the camera off O...

Page 25: ...y vary according to the current settings 1 Slide the POWER switch to turn the camera on 2 Set the scene mode in the Capture menu based on the desired scenery Auto Sports Night Scene Portrait Landscape...

Page 26: ...he subject 1 1m to infinity Select this mode for general shooting including portraits and scenery 1 Move the macro switch located on the front side of the camera to the position 2 Compose your image 3...

Page 27: ...om s range is from 1x to 2x to 4x To exit the digital zoom press the button again and return to the capture status 3 Press the shutter button to capture a zoomed image Note You can only set the digita...

Page 28: ...that setting even if the camera is turned off 1 Set the scene mode in the Capture menu based on the desired scenery Auto Sports Night Scene Portrait Landscape Backlight 2 Press the button located on...

Page 29: ...flash The flash fires automatically according to the ambient lighting conditions Select this mode for general photography A Red eye reduction The flash emits a precursor flash before the main flash f...

Page 30: ...king relatively slow for the first 7 seconds or the first 2 seconds and then blinking rapidly for the last 3 seconds 1 Secure the camera to a tripod or place it on a stable surface 2 Slide the POWER s...

Page 31: ...camera to the position LCD monitor will display as Macro mode 2 Compose your image 3 Press the shutter button To disable macro photography slide the Macro switch back to the Normal mode Note In Macro...

Page 32: ...graphic results but produce large files sizes Therefore fewer images will take up more memory space High resolution and quality settings are recommended for printed output and situations requiring the...

Page 33: ...0 The above data shows the standard testing results The actual capacity varies according to the shooting con ditions and settings 8MB SD Memory Card 16MB SD Memory Card 32MB SD Memory Card 64MB SD Mem...

Page 34: ...enu and select Scene by using the button Press the button to enter the sub menu 2 After entering the sub menu select Auto by using the button Press the button to confirm the setting LCD monitor will d...

Page 35: ...by using the button Press the button to enter the sub menu 2 After entering the sub menu select Sports by using the button Press the button to confirm the setting LCD monitor will display as Sports mo...

Page 36: ...ton to enter the Capture menu and select Scene by using the button Press the button to enter the sub menu 2 After entering the sub menu select Night Scene by using the button Press the button to confi...

Page 37: ...on Press the button to enter the sub menu 2 After entering the sub menu select Portrait by using the button Press the button to confirm the setting LCD monitor will display as Portrait mode icon 3 To...

Page 38: ...he Capture menu and select Scene by using the button Press the button to enter the sub menu 2 After entering the sub menu select Landscape by using the button Press the button to confirm the setting L...

Page 39: ...ene by using the button Press the button to enter the sub menu 2 After entering the sub menu select Backlight by using the button Press the button to confirm the setting LCD monitor will display as Ba...

Page 40: ...he Movie mode 2 You can start recording a video clip by pressing the shutter button 3 To stop recording press the shutter button again Note In Movie mode resolution quality self timer cannot be set or...

Page 41: ...ime 1 Press twice the MODE button to enter Playback mode The last recorded image appears on the LCD monitor 2 View and select your recorded images by using the button To view the previous image press...

Page 42: ...mode The last image frame appears on the LCD monitor 2 View and select your images by using the button 3 Enlarge the image by pressing the button Pressing the button once magnifies the image to 2X 4...

Page 43: ...age 1 Press twice the MODE button to enter Playback mode 2 Press the thumbnail button and nine thumbnail images appear on the LCD monitor Assuming there are nine or more recorded images in the memory...

Page 44: ...ODE button to enter Playback mode Then press the MENU button to enter the Playback menu 2 Select Slide Show by using button then press the button to enter the sub menu 3 Set the playback interval by u...

Page 45: ...Select Protect by using the button and press the button 3 You can select to protect single image or all images at one time by using the button and press the button Single Protect one image at one time...

Page 46: ...rame appears on the LCD monitor 2 View and select unwanted images by using the button then press the delete button 3 Continue the deletion if necessary If all images are deleted No Image will pop up T...

Page 47: ...All Images by using the button then select Execute and press the button to confirm the deletion To cancel the action select Cancel Note Please be aware of that deleted images cannot be recovered Exer...

Page 48: ...ng button then press the button to confirm To cancel the action select Cancel No Image pops up after the SD memory card or the internal memory is been formatted Note Be sure the SD memory card is prop...

Page 49: ...deo clips from the camera to your computer follow the steps bellow Step 1 Installing the USB driver Windows 98 98SE users only Step 2 Connecting the camera to your computer Step 3 Downloading images v...

Page 50: ...ows 98 and 98SE Windows 2000 ME XP users should not install the USB driver 1 Insert the enclosed CD ROM into your CD ROM drive 2 When the welcome screen appears click Install USB Driver Follow the on...

Page 51: ...r computer 2 Connect the other end of the USB cable to the USB connector on the camera 3 Turn the camera on 4 Look for a new Removable Disk icon appearing in the My Computer window Your recorded image...

Page 52: ...ws Open the removable disk by double clicking on it Double click on the folder contains your recorded images video clips Select the images video clips that you prefer and then choose Copy from the Edi...

Page 53: ...e tool for owners of digital cameras DV camcorders scanners or anyone who strives to effectively organize a large collection of digital media 1 Insert the enclosed CD ROM into your CD ROM drive 2 When...

Page 54: ...otographic filters and special effects Embellish projects by adding creative design elements such as frames callouts and stamp objects Share results with family and friends via e mail and multiple pri...

Page 55: ...Manual on the CD ROM is that you have Acrobat Reader Adobe Reader installed on your computer Updates to this manual and versions in other languages may be found on the Vivitar website www vivitar com...

Page 56: ...installed in your computer Adobe Acrobat Reader is included on the camera CD ROM Using Adobe Acrobat Reader you can read the user s manual and print sections of interest 1 Insert the CD ROM that came...

Page 57: ...arpness and Date Imprint Press the MENU button and then scroll through the options by using the button Press the button to enter the sub menu After entering the sub menu select your option by using th...

Page 58: ...Size Refer to Setting the Image Resolution and Quality in BASIC FUNCTIONS Quality Refer to Setting the Image Resolution and Quality in BASIC FUNCTIONS Scene Refer to SHOOTING LETTING YOU SELECT SETTIN...

Page 59: ...press the button and press the button to confirm Effective Subjects and Set Values Positive Compensation Copying of printed text black characters on white paper Backlit portraits Very bright scenes su...

Page 60: ...ds of light that actually enters the lens You may set in advance the white balance when taking photographs under specific lighting conditions Auto Daylight Cloudy Sunset Tungsten and Fluorescent Auto...

Page 61: ...t photographs can be taken with less light Auto ISO 100 Sensitivity equivalent to ISO100 ISO 200 Sensitivity equivalent to ISO200 Color To capture an image the camera offers three types of color Full...

Page 62: ...the different degrees of color This is called Saturation Sharpness Your camera will automatically emphazise the borders between light and dark areas of the image This will make the image s edges look...

Page 63: ...e sub menu press the button After settings are set press the button to confirm Playback menu items Delete Copy to Card Slide Show and Protect Delete Refer to Deleting Images Video Clips in DELETING IM...

Page 64: ...you can set EV compensation white balance to record video clips with your preferences Video menu items EV and White Balance EV Refer to Capture Menu in LIST OF MENU OPTIONS White Balance Refer to Capt...

Page 65: ...g ure by using the button Setup menu items Date Time Format Beeper Language LCD Brightness Power Off and Set to Default Date Time Refer to Setting the Date and Time Format Refer to Formatting an SD Me...

Page 66: ...ss of the LCD monitor The brightness op tions are Low Medium High Power Off If no operation is performed for a specific period of time the power to the camera is automatically turned off This feature...

Page 67: ...67 CONNECTING YOUR VIVICAM 4100 TO OTHER DEVICES USB Cable Notebook Computer PCMCIA Adapter SD Card Reader SD Card Reader SD Memory Card Printer OPEN...

Page 68: ...mage quality Fine Normal Economy Recording media Internal 16MB 14MB for image storage External SD Card optional up to 512 MB Lens Aperture 3 5 Focal length 7 7mm Focus range 0 6 1 1m 1 1 infinity LCD...

Page 69: ...t Sunset File formats JPG MPG Interface USB connector Operating environment Operation 5o C 40o C 15 90 humidity Storage 20o C 60o C 10 95 humidity Power 2x AA Alkaline NiMH Optional Dimensions Approx...

Reviews: