background image


6


2-2 Specifications


Lens:


F=8.5 mm


Image Sensor:


1/2" CMOS with 1.3 mega pixels


Focus:


F=3.5


Sensitivity:


ISO 100


White Balance:


Auto, Sun, Tungsten, Fluorescent.


Shutter:


Electrical


Shutter Speed:


1/4 sec. ~ 1/2000 sec.


Storage Media:


8MB Internal Flash Memory


SD Card (MMC compatible) Slot 

(support 4/8/16/32/64/128MB)


Image File Format:


Still Image for JPEG


Motion Image for JPEG


Image Resolution:


FINE: 1600 x 1200 

(Firmware Interpolation Technology)


MED: 1280 x 1024


LOW: 640 x 480


Digital Zoom:


10-Step 2X Digital Zoom


Focal Range – Standard:


60cm ~ Infinity


Focal Range – Macro:


20 ~ 25cm


Self-timer:


10 sec. delay


PC-CAM Mode:


CIF (320 x 240) 20

30 fps


VGA (640 x 480) 15

25 fps


Flash Mode:


Auto, Red-eye reduction, Off


TV-OUT:


NTSC / PAL system selectable


PC Connector:


USB (Ver. 1.1)


Movie File:


Recording 60 sec. Continuous movie file with CIF 

(320 x 240) format (8MB internal memory)


Recordable Image Numbers (8MB):


(640 x 480) Approx. 65 images


(1280 x 1024) Approx. 20 images


(1600 x 1200) Approx. 15 images 

Power Supply:


2 x AA Alkaline Batteries or supports CRV-3


USB 5V (PC-CAM Mode)


Dimensions:


93 x 56 x 38 mm


Weight:


About 120g (batteries excluded)


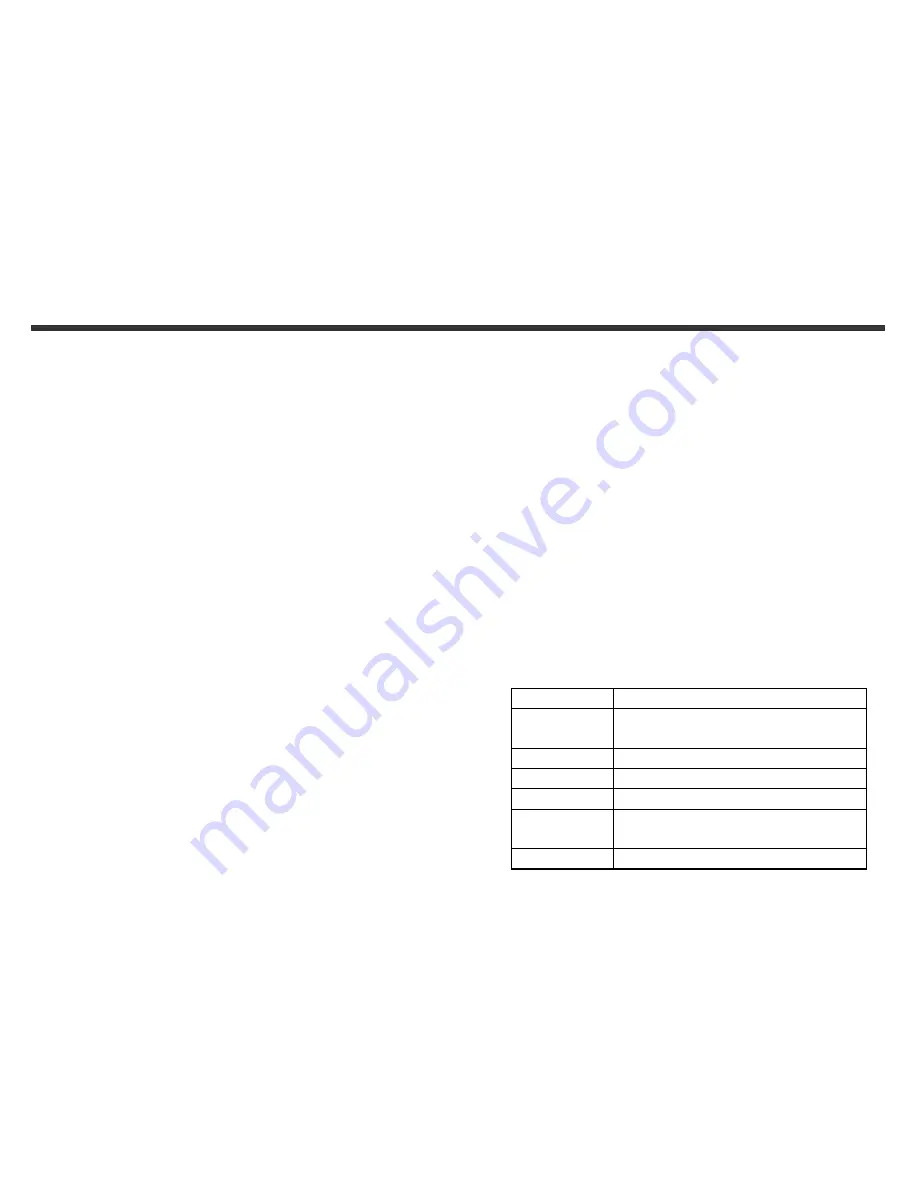
2-3 System Requirement


Please refer to the minimum system requirements for the digital 
camera. We recommend that you use a computer system that 
exceeds the minimum requirements in order to utilize the camera at 
its optimum efficiency. The minimum system requirements for the 
digital camera is as the following: 
   

System                Requirement


OS


Microsoft Windows 
98SE/Me/2000/XP


CPU


Intel Pentium 166MHz or higher


Memory


Minimum 32 MB memory or above


CD-ROM


4X or above


HDD


Hard drive with 10 MB free disk 
space minimum


Others


One standard USB 1.1 port


Summary of Contents for Vivicam 3330

Page 1: ...Ds 0 Model Quickstart Guide...

Page 2: ...Macro Button 10 Chapter 4 Navigating Modes and Menus 4 1 Mode Selection 11 4 2 Record Mode 11 4 3 Play Mode 12 4 4 Movie Mode 13 4 5 Setup Mode 14 Chapter 5 Preparing Your Camera 5 1 Attaching the Str...

Page 3: ...malfunction of this product such as costs of photography or any loss of benefit generated by the photography is not the responsibility of our company and no compensation will be given for it Copyrigh...

Page 4: ...ately turn the power OFF and remove the batteries How to maintain your camera 1 If lens LCD monitor or viewfinder surface is dirty please use lens brush or soft cloth to wipe clean instead of touching...

Page 5: ...Port USB Port 2 1 Names of Parts Front View Chapter 2 Getting to Know Your 1 Flash 2 Lens Cover Power Button 3 Lens 4 Shutter Button 5 Self timer LED 6 Red eye Reduction LED 7 Macro Button 8 Terminat...

Page 6: ...5 Memory Card Slot Rear View 1 LCD Monitor 2 Mode Display Button 3 Mode Dial 4 Status LED 5 Macro Mode LED 6 ENTER Button 7 Multi Select Button 8 Strap Holder 9 Flash Button 10 Battery Cover...

Page 7: ...PC Connector USB Ver 1 1 Movie File Recording 60 sec Continuous movie file with CIF 320 x 240 format 8MB internal memory Recordable Image Numbers 8MB 640 x 480 Approx 65 images 1280 x 1024 Approx 20...

Page 8: ...on and standby Green On Macro mode Off Basic Mode for photography 3 2 LCD Monitor Display 1 Image resolution 2 Image quality 3 Current working mode 4 Memory card loaded symbol 5 Possible number of sho...

Page 9: ...d appears on the LCD monitor If no operation is carried out for a fixed amount of time default about 1 minute the power is turned OFF to prevent battery wear This is called Auto Power OFF You can pres...

Page 10: ...3 5 Mode Dial You can select the working mode by using this Mode Dial 1 PC Mode 2 Record Mode 3 Play Mode 4 Movie Mode 5 Setup Mode 3 6 MENU ENTER Button You can perform different operation in the di...

Page 11: ...he camera is power off 3 In the Record Mode the camera will be auto power off cause of the power saving function You can press the Mode Display Button to turn on the camera again 3 9 Macro Button Slid...

Page 12: ...11 4 1 Mode Selection 4 2 Record Mode For more information please refer to the 3 2 LCD Monitor Display section in page 7 Index for Quick Menu Image Resolution Chapter 4 Navigating Modes and Menus...

Page 13: ...th DPOF for printing your images there are three options for you print one image print all images and print the recorded date or not DPOF function can only be operated with the printer settings of the...

Page 14: ...13 4 4 Movie Mode 1 Movie Mode 2 Recorded Movie Time seconds 3 Recording the movie pictures 4 Remaining battery power 5 Time Date...

Page 15: ...14 4 5 Setup Mode 1 Image Resolution 1600x1200 1280x1024 640x480 2 Image Quality Fine Quality Basic Quality 3 Self timer On Off 4 White Balance Auto Sun Fluorescent Tungsten...

Page 16: ...nsation 6 OSD Language 7 Date Time 8 Reset to default factory anticipated settings 9 Format Media If there is a memory card inserted it will only format the memory card not the internal memory 10 TV O...

Page 17: ...16 11 Light Frequency Select the correct frequency type 50Hz or 60Hz according to your region...

Page 18: ...rt 2 x AA alkaline batteries or a rechargeable battery Please make sure the batteries are full of power If the batteries are in low power please change the new batteries as soon as possible for keep t...

Page 19: ...power is wear you can continue to use the flash KWhen the battery indicator turns red you cannot take still and movie pictures any more 5 3 Loading and Removing the Memory Card Make sure to turn off t...

Page 20: ...y for saving data If you want to store data in the internal memory please remove the memory card first The specification of memory card applicable to this camera is SD or MMC 4 8 16 32 64 128MB If ins...

Page 21: ...ord Mode offers you a quick and easy way to take the ideal pictures you want 1 Turn the Mode Dial to Record Mode 2 Using the lens cover located on the front of the camera to turn on off camera After t...

Page 22: ...he Memory is not enough warning message appears on the LCD Monitor It means the memory card is full please removing the memory card and insert a new one immediately 6 3 Play Mode In Play Mode users ca...

Page 23: ...l show the recorded time seconds while you are recording the movie pictures L To record the movie pictures the maximum recording time will depending on the free space of the memory card 6 5 PC Mode To...

Page 24: ...e camera to connect the camera and output device 3 You can turn on the camera There will no images shown on the LCD Monitor All the images and information will shown on the output device s display via...

Page 25: ...elcome screen appears If your CD ROM drive doesn t support the auto run function Please double click on the My Computer icon on the desktop Double click the CD ROM drive icon and click the InstallMgr...

Page 26: ...n program will be executed and the welcome screen appears If your CD ROM drive doesn t support the auto run function Please double click on the My Computer icon on the desktop Double click the CD ROM...

Page 27: ...allation 7 Please follow the instructions of installation Wizard to select a destination folder and components you need 8 Please select the program folder you want to install 9 When the installation i...

Page 28: ...you plug in the camera and select PC Camera Mode on Windows XP Operate System system will configure the device automatically and the following screen will appear 1 users should click Next button 2 Us...

Page 29: ...28 3 Users should click Next button 4 Users should click Continue Anyway button and complete the camera setting on Windows XP...

Reviews: