background image

35

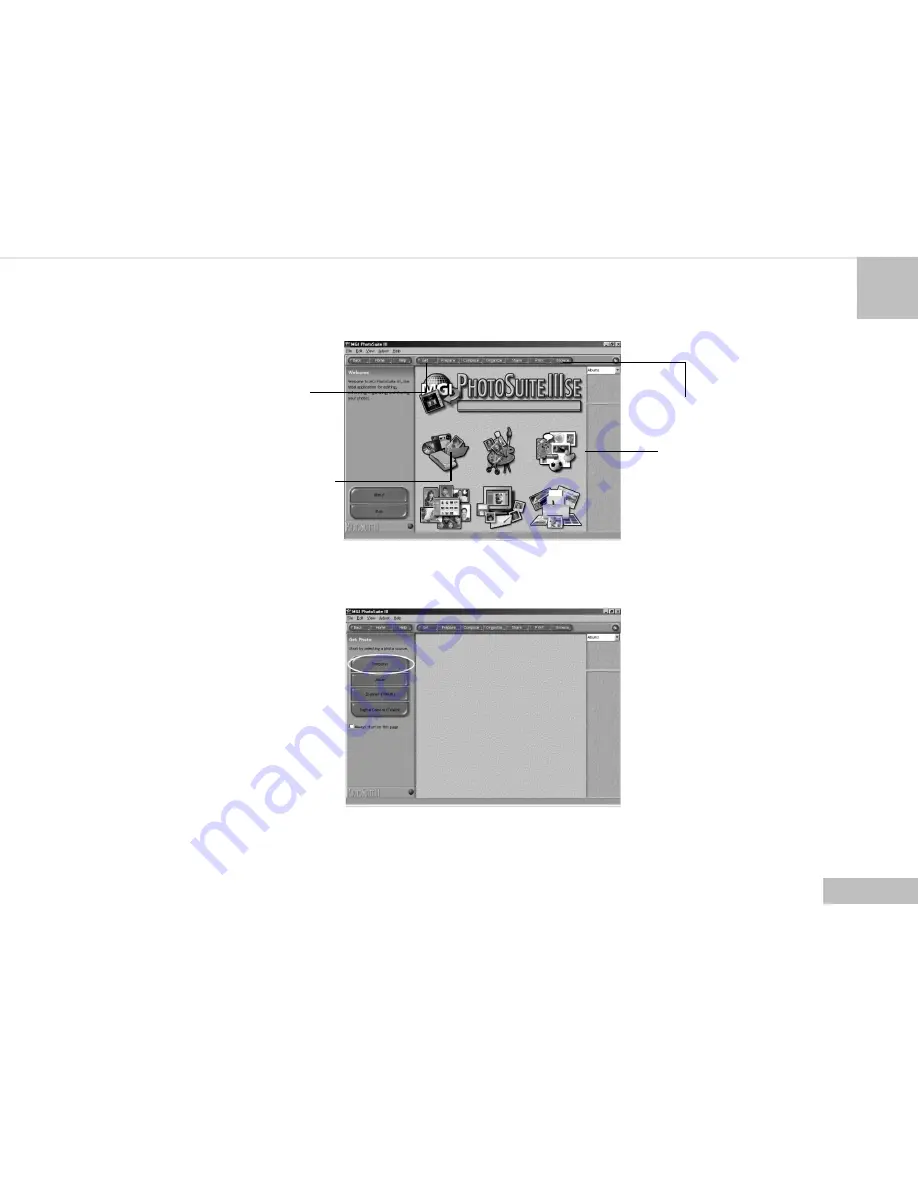
1. Launch MGI PhotoSuite.

2. Click the large Get button on the Welcome screen, or the Get button on the Navigation bar.
3. Choose a photo source (e.g. computer) and click the Open button.(see below)

4. Now you are able to process your images with all the tools provided by PhotoSuite.

Get button

Get button

Navigation bar

Welcome screen

Summary of Contents for Vivicam 3305

Page 1: ...Vivicam 3305 User Manual English 021009...

Page 2: ...le protection against harmful interference in commerical installation This equipment generates uses and can radiate radio frequency energy and if not installed and used in accordance with the instruct...

Page 3: ...e adapter from the AC power outlet after you have disconnected the camera Then contact your dealer or your local authorized service facility Do not continue to use the camera as this may cause a fire...

Page 4: ...drop metallic or inflammable foreign objects into the camera through access points such as the Compact Flash card slot This may cause a fire or an electrical shock Do not attempt to modify this camer...

Page 5: ...cause the battery to split or leak resulting in fire or injury Do not heat or attempt to disassemble a battery and do not place a battery in water or in a fire Any of these actions may cause the batte...

Page 6: ...cause a fire Always use the camera and its accessories in well ventilated locations Handle the camera carefully and do not bump the camera into any hard object Handling the camea roughly may cause a m...

Page 7: ...ng or leaking and causing a fire injury or soiling of the battery compartment When fitting batteries into the camera check the polarity markings on the battery and to ensure that you insert the batter...

Page 8: ...etting the Date and Time Identifying the Parts Top View Front View Rear View Bottom View Operating Mode Knob Status LCD LCD Monitor Connectors Basic Operations How to record images How to playback ima...

Page 9: ...lf Timer How to format the CF Compact Flash TM card Operating Modes and Menus RECORD Mode PLAY Mode SETUP Mode DELETE Mode PC Mode Transferring your Images to the Computer Driver Installation Acquirin...

Page 10: ...will guide you through the whole picture taking process please keep this booklet on hand and enjoy your time Checking Accessories Standard Accessories AC Power Adapter 4 x AA alkaline batteries Video...

Page 11: ...higher recommended Preparing the Power Supply Using Batteries 1 Slide the battery cover in the direction indicated by the arrow 2 Insert 4 batteries with the correct polarity as shown on the inner sid...

Page 12: ...ries if they won t be used for a long period of time since the last time Using the Power Adapter 1 Open the connector cover and connect one end of the power adapter to the DC 6V IN port as illustrated...

Page 13: ...op of thin cord and pull the strap tight Setting the Date and Time Switch to SETUP mode and then power on the camera the Setup menu appears Press the OK button to select DATE TIME The cursor skips to...

Page 14: ...entifying the Parts Top View Front View Status LCD Power Button Shutter Button Menu Button Flash Mode Button Resolution Quality Button Operating Mode Knob Viewfinder Window Flash Lens Focus Knob Jack...

Page 15: ...14 Rear View Bottom View Viewfinder LED 1 LED 2 LCD Monitor Up Backward Self timer Buttons Down Forward Buttons OK Button Display Button Strap Holder Battery Cover Tripod Socket CF Cover...

Page 16: ...d Mode 2 Play Mode 3 Setup Mode 4 Erase Mode 5 PC Mode Status LCD The status LCD contains the following indicators 1 Resolution Indicator 2 PC Mode Indicator 3 Image Quality Indicator 4 Battery Power...

Page 17: ...t Video Port DC IN Port Basic Operations How to record an image To record an image perform the following 1 Power on the camera 2 Set the operating mode to RECORD LED1 will be on under Record mode USB...

Page 18: ...g Hold the camera firmly with both hand and brace your elbows lightly against your body Take care to keep your fingers hair and the camera strap away from the camera lens Use the viewfinder or LCD dis...

Page 19: ...or on a TV To playback images perform the following On the LCD Monitor 1 Power on the camera 2 Set the operating mode to PLAY 3 The last image recorded appears Use the arrow buttons to forward backwar...

Page 20: ...ptured image will then be shown up 4 Use the arrow button to browse the captured images 5 Click on the OK button to delete the image shown on the LCD Repeat the step 2 5 to delete more images 6 To exi...

Page 21: ...rded images on the LCD Monitor or on a TV How to set the focus Before taking a picture you may need to set the focus The camera provides 2 different type for your selection Simply switch the Focus kno...

Page 22: ...erform the following 1 Power on the camera 2 Set the operating mode to RECORD 3 Press the Resolution Quality button To toggle the selection The setting is conserved even if the camera power is off Res...

Page 23: ...nge the setting press the Flash Mode button a number of times until the desired one is selected 1280x960 1280x960 1280x960 640x480 640x480 640x480 20 1 12 1 8 1 16 1 8 1 4 1 Resolution Quality Compres...

Page 24: ...desired exposure value The effective range is from 1 8 to 1 8 in steps of 0 3 EV This setting is reset to AUTO when the camera power is off How to adjust the White Balance To adjust the White Balance...

Page 25: ...imer function perform the following 1 Press the Self Timer button to activate the Self timer 2 Press the Shutter button 3 After 10 seconds an image is captured and the timer will turn itself off The S...

Page 26: ...cursor skips to the data field as the OK button being pressed Use the arrow buttons to increase decrease the LCD brightness Press the OK button again to make the change The cursor returns to the RECOR...

Page 27: ...OK button being pressed Use the arrow buttons to select the desired white balance type Press the OK button again to make the change The cursor returns to the RECORD menu automatically when the change...

Page 28: ...on in PLAY mode the Play menu appears The menu contains the following items LCD BRIGHTNESS Changes the brightness setting 5 5 Interval 1 of the LCD Monitor Press the OK button to select this item The...

Page 29: ...ress the OK button again to make the change The slide show starts Press the Display Menu OK arrow buttons buttons or switch the Operating Mode knob while a slide show is playing to interrupt the displ...

Page 30: ...IME The cursor skips to the data field and the first item Month in this field is selected Use the arrow buttons to change the number or press the OK button to proceed to the next item When the last it...

Page 31: ...he OK button again to make the change The cursor returns to the Setup menu automatically when the change is made The setting is conserved even if the camera power is off FORMAT MEDIA Formats the Compa...

Page 32: ...ps to the data field as the OK button being pressed Use the arrow buttons to toggle the selection Select YES and press the OK button to make the change and returns to the SETUP menu Select NO then pre...

Page 33: ...he images recorded in the camera internal memory do not insert any CF card or the camera will not be able to read the internal data with an external memory card attached DELETE CURRENT 1 Set the camer...

Page 34: ...ve the images unerased PC Mode Images can only be transferred to a PC via USB in this mode There are no menus associated with this mode and no buttons are active in this mode Transferring your Images...

Page 35: ...to transfer your images to the computer 1 Power on the camera 2 Set the operating mode to PC then a removable disk appears 3 Drag and drop the images in the above mentioned disk to the other director...

Page 36: ...Welcome screen or the Get button on the Navigation bar 3 Choose a photo source e g computer and click the Open button see below 4 Now you are able to process your images with all the tools provided by...

Page 37: ...r and its intuitive interface will let even a novice get great results in minutes To use the program follow the steps below Step 1 Open Source Images in MGI PhotoVista MGI PhotoVista requires some ove...

Page 38: ...on Step 4 View the Panorama In Action Choose Show Viewer from the Panorama menu The Stitch Preview window changes to viewer mode Press and drag the pointer over the panorama vertically and horizontall...

Page 39: ...gress dialog box displays the progress of the stitch Follow the procedure in Step 4 to view the panorama in action Step 6 Save a Panorama After Step5 you can save the panorama from the Stitched Result...

Page 40: ...RECORD mode press the Display button will toggle the LCD monitor On and Off In PLAY mode press the Display button to review the images in the following 3 modes 1 Single image display 2 Single image d...

Page 41: ...he power button to turn it on Shutter Button The Shutter button is only active in RECORD mode You may press the button in RECORD mode for image capturing processing and storing Before photo shooting p...

Page 42: ...2 bars on The battery is partially charged Battery icon with 1 bar on Prepare new batteries Battery icon with no bars on The battery needs to be replaced there is no battery power remains The camera...

Page 43: ...ing On On On Off Blinking On While detecting the system error Camera is powered on Image processing Compression Decompression CF card is inserted CF card is inserted Camera is capturing an image Self...

Page 44: ...Zoom JPEG EXIF 2 1 0 or 8MB Flash Memory Compact Flash Card Type 1 Slot Interval during taking pictures 2 sec picture playback time 4 sec PC Windows 98 2000 Me MGI PhotoSuite III SE 1 8 color LCD for...

Reviews: