background image

19

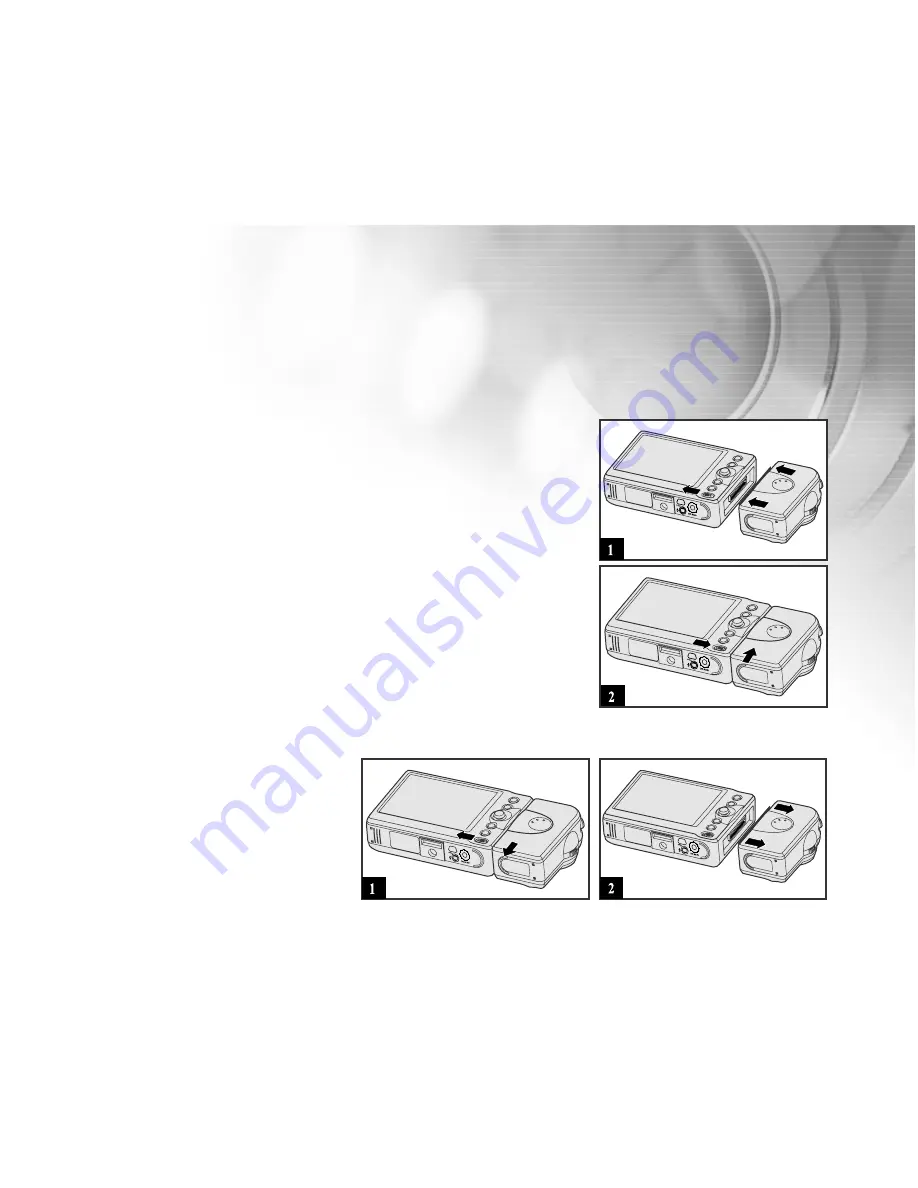
Attaching and Removing the Camera Module (Optional Accessory)

You can capture an image or record video clips by using the camera module.

Attaching the Camera Module

First, note the six small guide rails on the player body and corresponding
notches in the camera module swivel connector.
1. Insert the lower corner of camera module swivel connector into the

camera receptacle on the media player.

2. Note how the release tab (slide button) on the player body begins to

retract.

3. Seat the camera fully into the player receptacle.
4. Slide the camera module upwards slightly until the release tab clicks

and returns to its locked position.

Removing the Camera Moudle

1. Slide the camera release tab to the left end and hold it there.
2. Push the camera module downward slightly, and then remove the camera module from the media player body.

Note:

The DVR-390H must be powered off before attaching or removing the camera module, otherwise, the

DVR-390H will automatically shut down.

Summary of Contents for DVR-390H

Page 1: ...unications However there is no guarantee that interference will not occur in a particular installation If this equipment does cause harmful interference to radio or television reception which can be determined by turning the equipment off and on the user is encouraged to try to correct the interference by one or more of the following measures Reorient or relocate the receiving antenna Increase the...

Page 2: ...hicle Do not cover or wrap theDVR 390H or theAC power adapter with a cloth or quilt Always use theDVR 390H and its accessories in well ventilated locations Handle the DVR 390H carefully and do not bump the DVR 390H into any hard object If you are using the AC power adapter unplug the adapter from the AC power outlet after you have switched it off Ensure that any connector cords or cables to other ...

Page 3: ...d Removing the Camera Module Optional Accessory 19 Docking Cradle 20 Turning the Power On Off 20 Choosing the Display Language 21 Setting the Date and Time 22 Entering the Main Menu 23 Formatting Internal Memory or an SD Memory Card 24 Setting Image and Video Resolution and Quality 25 PLAYBACK MODES 26 Video Playback 26 Still Image Playback 27 Zoom Playback 27 Displaying Image Information 28 Playi...

Page 4: ...stalling the USB Driver for Windows 98 40 Transferring Files Between your DVR 390H and Computer 41 MENU OPTIONS SUMMARY 42 Video and Image Play Menu 42 Audio and MP3 Play Menu 43 Audio Video Input Menu 44 Video Recording Menu 45 Still Image Recording Menu 47 System Menu 49 Custom Menu 50 INSTALLING WinDVD Creator 51 INSTALLING MuveeTM autoProducer 52 INSTALLING PhotoSuite 53 INSTALLING Acrobat Rea...

Page 5: ...u store a large number of videos images audio files and even MP3 files You may also use the HDD to store unrelated data and computer files MP3 Audio Player Allows you to play back MP3 music or audio files using the built in speaker external earphones or headphones Voice Recorder Allows you to record voice using a microphone Docking Cradle WiththeDVR 390Hinitscradle youcanenjoywatchingyourvideosand...

Page 6: ...DVR 390H may be different from those described in this manual This is due to the fact that different retailers often specify slightly different product inclusions and accessories to suit their market requirements customer demographics and geographical preferences Products will often vary between retailers especially with accessories such as batteries chargers AC adapters memory cards cables carryi...

Page 7: ...ndard 3 5 mm 3 VOL Volume button Volume up Volume down 4 Secure Digital SD memory card slot 5 Integral Speaker 6 Hand strap eyelet 7 Camera Module interface 8 Camera Lens 9 Shutter button and Digital zoom control T Telephoto Zoom in W Wide angle Zoom out 10 Self timer LED 11 Integral Flash 1 2 3 4 5 6 9 7 8 11 10 ...

Page 8: ...ontrol 5 Play Pause button 6 Delete Back button 7 Camera Module release tab 8 DC IN 5V terminal 9 MIC LINE IN jack 10 USB port B mini 11 Tripod socket 12 Cradle connector 13 Battery cover door 14 Camera Module interface 15 Lens focus control Normal focus Macro close up focus 1 2 3 4 5 6 7 8 10 11 13 12 14 15 9 ...

Page 9: ...i Selector Button The multi selector button acts in two ways Some operations require that you press straight down on the center of the button Other functions require that you toggle it like a joystick or game controller The controller operations up down left and right are called keys and are refered to as Up key Down key Ok key etc Whenever an instruction says Press Ok you should depress the multi...

Page 10: ...plain the various icons and text messages Video Playback 1 Video mode icon 2 Video quality Super fine Fine Normal 3 Video resolution 640 x 480 320 x 240 4 Duration of current video 5 Sound level speaker volume Low volume Mild volume Medium volume High volume Fully volume Mute no sound 00 54 21 00001 Play 1 2 3 4 5 6 7 8 9 6 SD Memory Card indicator if a card is present 7 Battery power indicator Fu...

Page 11: ...attery power indicator 6 Image File number 7 File Folder number Audio and MP3 Playback 1 Audio MP3 mode icons 2 File or song number 3 Total number of files or songs 4 Repeat Repeat all indicator 5 Sound level speaker volume 6 SD Memory Card indicator if a card is present 7 Battery power indicator 8 Duration of song or sound file minutes seconds 9 Audio File name 1 2 3 4 5 6 7 100 0001 1 2 3 4 5 6 ...

Page 12: ...tomatic no icon presented Daylight Shade 1 Fluorescent 1 2 Fluorescent 2 Lamp 1 2 3 4 5 6 7 00 54 21 8 9 1 2 In this mode your DVR 390H may be used as a solid sate tape less camcorder Your videos will be stored to the internal hard drive or memory card if present Much like a tradtional camcorder your videos with audio can be recorded and played back at a later time Unlike a traditional camcorder h...

Page 13: ...ormal no icon presented Macro close focus 10 EV compensation icon present only when selected 11 White balance setting 12 Self timer indicator if used 13 Flash mode Red eye reduction Flash off Automatic flash In this mode your DVR 390H may be used as a three megapixel digital camera Your images will be stored to the internal hard drive or memory card if present Your images will be saved to memory i...

Page 14: ...r your videos can be recorded and played back at a later time Unlike a traditional VCR however your videos will be stored in full digital format as ASF files using MPEG4 compression The video source may be a VCR or DVD player a traditional camcorder or a TV signal passed through a monitor The video signal will be input to the DVR 390H using the AV IN jack on the docking cradle 1 2 3 4 1 2 3 5 6 4 ...

Page 15: ...fore inserting or removing the battery 1 Slide the battery cover in the direction of the OPEN arrow 2 Insert the battery in the correct orientation as shown 3 Close the battery cover Note If you are not going to use the battery for an extended period of time remove it from the DVR 390H to prevent leakage or corrosion Avoid using the battery in extremely cold environments as low temperatures will s...

Page 16: ...pter directly to the DC IN 5V terminal of the media player 2 Insert the other end of the AC power adapter into a wall outlet It is recommended that the battery be fully discharged before being recharged Charging time varies according to the ambient temperature and the status of battery Note The DVR 390H must be used with the specified AC power adapter Damage caused by the use of an incorrect adapt...

Page 17: ...from a video source Note also the steps in the preceding section Charging the Battery Note Make sure to use only the AC power adapter specified for the DVR 390H Damage caused by the use of an incorrect adapter is not covered under the warranty Attaching the Hand Strap To prevent the accidental dropping of your media player attach and use the hand strap Follow the illustration shown below ...

Page 18: ...ation as shown Insert an SD memory card contact pins first with the pin side of the SD card facing the LCD display side of the DVR 390H Insert the card as far as it can go You will hear and feel it click into place Removing an SD memory card Make sure the DVR 390H is turned off Press lightly on the edge of the memory card and it will eject Note To prevent valuable data from being accidentally eras...

Page 19: ...media player 2 Note how the release tab slide button on the player body begins to retract 3 Seat the camera fully into the player receptacle 4 Slide the camera module upwards slightly until the release tab clicks and returns to its locked position Removing the Camera Moudle 1 Slide the camera release tab to the left end and hold it there 2 Push the camera module downward slightly and then remove t...

Page 20: ...nsert the media player until it fits in place Turning the Power On Off Load the battery or connect the AC power adapter to your DVR 390H Press the Power button to turn on your DVR 390H To turn off your DVR 390H press again the Power button and hold about 2 seconds You can also select POWER OFF mode to turn off your DVR 390H Note The power is turned off automatically when the DVR 390H has not been ...

Page 21: ...irst turning the DVR 390H on the Language setting screen will automatically appear letting you choose a language for information displayed on the LCD monitor Select the desired language using the Up Down keys and press the Ok key to confirm ...

Page 22: ...urn on your DVR 390H 2 Use the Up Down Left Right keys to select any mode Press the Ok key to enter that mode 3 Press the Menu button The Menu screen is displayed 4 Move to Custom menu by using the Left Right keys 5 Select Date setup with the Up Down keys and use the Right key to enter its setup menu The Date setup screen is displayed 6 Select the item s field with the Left Right keys and adjust t...

Page 23: ...H the Main Menu screen appears letting you select the desired mode by using the Left Right Up Down keys and enter the one you ve selected by using the Ok key For returning to Main Menu from each mode press the Menu button and hold about 2 seconds long key ...

Page 24: ...es and songs try removing the SD card to again be able to see the internal memory Only when the SD memory card is removed will internal memory be accessible 1 Turn on your DVR 390H 2 Use the Up Down Left Right keys to select any mode Press the Ok key to enter that mode 3 Press the Menu button The Menu screen is displayed 4 Move to System menu using the Left Right keys 5 Select Format with the Up D...

Page 25: ...le for sharing images via e mail in a report or on a web page To change image video resolution or quality perform these steps 1 Turn on your DVR 390H 2 Use the Up Down Left Right keys to select VIDEO REC or IMAGE REC Press the Ok key to enter the desired mode 3 Press the Menu button 4 Navigate to the Image Size or Video Size menu using the Left Right keys 5 Use the Right key to view the resolution...

Page 26: ...ng video clips 1 Turn on your DVR 390H 2 Use the Up Down Left Right keys to select VIDEO PLAY mode Press the Ok key to enter the Video playback mode 3 Your video clips appear on the LCDmonitor as small thumbnail sized frames Each video is represented by the first frame of the video Select the desired video clip by using the Up Down Left Right keys 4 Press the Play Pause button to play the selected...

Page 27: ...Dmonitor in thumbnail mode Select the desired image by using the Up Down Left Right keys and press the Ok key to display the image full screen Zoom Playback You may enlarge your still images to view the finer details You may zoom up to 4 times the normal display size 1 Select the image you want to enlarge by using the Up Down Left Right keys 2 Adjust the zoom ratio by using the Ok key The image is...

Page 28: ... anAC power adapter while viewing your images and video files on a TV monitor 1 Place the DVR 390H in the cradle 2 Plug one end of the AV cable into the AV OUT jack of the cradle 3 Connect the other end to theAudio and Video input jacks on your TV Monitor It is important to note that the yellow RCA jack is the video signal and the other RCA jacks usually red and black are audio left and right chan...

Page 29: ... using the Up Down keys 5 Use the Right key to enter Protect submenu 6 Use the Up Down keys to select One image or All images and then press the Right key to enter its submenu To protect all images select All images in this step 7 Select Lock by using the Up Down keys and then press Ok Once the video clip image is protected the Protection icon will be displayed on each protected video and image Ca...

Page 30: ...ars on the image 6 Use the Left Right keys to select Yes Press the Ok key to confirm If you wish to cancel the deletion select No 7 Repeat the above steps to delete additional videos and images If all videos and images have been deleted No images will display To delete all videos or images at once 1 Perform the above steps 1 and 2 2 Press the Menu button to enter the Video or Still Image Playback ...

Page 31: ...lect Slide show using the Up Down keys 5 Use the Right key to enter Slide show submenu 6 Set the playback interval by using the Up Down keys Press the Ok key to confirm the interval 7 The images appear on the LCD monitor in thumbnail mode Press the Ok key to start slide show The slide show presents your images on the LCD monitor one by one with the interval that you set To stop the slide show disp...

Page 32: ... current file the selected files or all files 5 Press the Ok key to confirm which option you want To pause playback press the Play Pause button To resume playback press again the Play Pause button To stop playback press the Ok key To delete an MP3 or audio file press the Delete button Delete this appears on the screen Use the Left Right keys to select Yes Press the Ok key to confirm To cancel the ...

Page 33: ...ource may be a VCR or DVD player a traditional camcorder or a TV signal passed through a monitor The video signal will be input to the DVR 390H using the AV IN jack on the docking cradle 1 Place the media player in the cradle 2 Plug one end of the AV cable into the AV IN jack on the cradle 3 Connect the other end of the AV cable to the audio and video out jacks on your video source 4 Turn on your ...

Page 34: ...ack at a later time Unlike a traditional tape recorder however your sounds will be stored in full digital format as ASF files To record audio files follow these steps 1 Make sure the microphone has been inserted into the MIC LINE IN jack on the media player or cradle 2 Turn on your DVR 390H 3 Use the Up Down Left Right keys to select AUDIO REC mode Press the Ok key to enter that mode 4 Press the O...

Page 35: ...NE IN jack on the media player or cradle 2 Turn on your DVR 390H 3 Use the Up Down Left Right keys to select VIDEO REC mode Press the Ok key to enter that mode 4 Compose the image using the T zoom in W zoom out if desired 5 Fully press the Shutter button Video recording will begin Pressing Shutter button again to stop recording Note When recording video clips self timer cannot be activated Using t...

Page 36: ... 1 Power on the DVR 390H Make sure the DVR 390H is in IMAGE VIDEO REC mode 2 Press the Menu button to enter IMAGE VIDEO REC menu 3 Use the Up Down keys to select EV White balance option and then use the Right key to enter its submenu 4 Use the Up Down keys to select the exposure value The range of exposure compensation is 1 8 1 5 1 2 0 9 0 6 0 3 0 0 3 0 6 0 9 1 2 1 5 1 8 The larger the value the b...

Page 37: ...internal hard drive or memory card if present Your images will be saved to memory in the common JPG format for play back at a later time 1 Turn on your DVR 390H 2 Use the Up Down Left Right keys to select IMAGE REC mode Press the Ok key to enter that mode 3 Compose your shot on the LCD monitor For detailed information on how to use digital zoom please refer to section in this manual titled Using t...

Page 38: ... appropriate flash mode Flash mode Description The flash fires automatically according to the ambient lighting conditions Select Automatic flash this mode for general flash photography Use this mode to reduce the red eye phenomenon when you want to capture natural Red eye reduction looking images of people and animals in low light conditions The flash always fires twice and the image is captured a...

Page 39: ...u may wish to join into the scene when taking group shots The self timer duration is 10 seconds After the self timer is set the shutter automatically releases after 10 seconds The self timer LED starts blinking relatively slowly for seven seconds and then blinks rapidly for the final three seconds 1 Power on the DVR 390H Make sure the DVR 390H is in IMAGE REC mode 2 Compose the image 3 Press the S...

Page 40: ...s the Ok key to activate the USB IN function 5 Now you can transfer files between your DVR 390H and computer For further details refer to section Transferring Files Between Your DVR 390H and Computer in the following page Installing the USB Driver for Windows 98 Windows 98 computers The USB driver on the CD ROM is exclusively for computers running Windows 98 Second Edition Installing the USB drive...

Page 41: ...rive letter e or higher 3 Open the Removable Disk and subsequent folders by double clicking on them Your images videos audio are inside these folders 4 Select the images videos audio that you want and then choose Copy from the Edit menu Open the destination location folder and choose Paste from the Edit menu You may also drag and drop image video audio files from theDVR 390H to a desired location ...

Page 42: ...ct You may protest images and videos from accidental erasure Refer to the section in this manual titled Protecting Videos and Images for further details Delete all Please refer to section in this manual titled Deleting Videos and Images for further details Slide show Automatically plays back still images sequentially at a selected interval 1 Sec 3 Sec 5 Sec 7 Sec or 9 Sec ...

Page 43: ...iles at once Repeat This option allows you to repeatedly play your MP3 or audio files according to your preferences Select Off to play the listed files only once Delete all Deletes all audio or MP3 files in a single operation Select Yes or No by using the Left Right keys Press the Ok key to confirm ...

Page 44: ...Audio Video Input Menu Video size Sets the desired video resolution 640 x 480 pixels 320 x 240 pixels Video quality Sets the quality compression rate at which video is to be recorded Super fine Fine Normal ...

Page 45: ...video resolution video quality exposure value and white balance Video size Sets the desired video resolution 640 x 480 pixels 320 x 240 pixels Video quality Sets the quality compression rate at which the video is to be recorded Super fine Fine Normal ...

Page 46: ...g allows you to set the white balance when capturing images under specific lighting conditions Options on the White Balance menu Icon Lighting conditions Auto Automatically adjusts the white balance Daylight Outdoors on a bright day Shade For overcast shaded twilight or evening skies 1 Fluorescent 1 Fluorescent lighting 2 Fluorescent 2 Fluorescent lighting Lamp Tungsten lighting For information ab...

Page 47: ...e white balance and ISO Image size Sets the desired image resolution 2048 x 1536 pixels 1600 x 1200 pixels 1280 x 960 pixels Image quality Sets the quality compression rate at which the still images will be compressed and stored as JPG files Super fine Fine Normal EV White balance Refer to the similar section on the previous page ...

Page 48: ...s light Auto Automatic adjustment 100 Sensitivity equivalent to ISO100 200 Sensitivity equivalent to ISO200 400 Sensitivity equivalent to ISO400 Date imprint The capture date can be printed directly on your still images This function must be activated before the image is captured On Imprints the date on the still images when capturing images Off Does not imprint the date on the still images when c...

Page 49: ...mode and eventually turn itself off to conserve power If the DVR 390H is idle re activate it by pressing any button If the DVR 390H has powered off then you must turn it on again by pressing the Power button Use the Up Down keys to select the power off interval then press the Ok key to confirm The power off interval has five options 3 Min 5 Min 10 Min 30 Min Cancel power off is disabled Reset to d...

Page 50: ...DVR 390H Refer to section in this manual titled Setting the Date and Time for further details Light freq Sets the frequency of the sensor Two options are available 50Hz or 60Hz The image performance of the camera if used indoors will be optimized if you select the indoor lighting frequency that matches the local standard for your location Video out Sets the video output format broadcast standard f...

Page 51: ...n WinDVD Creator System Requirements PC Subsystem Minimum Recommended Processor Intel Celeron 800MHz Intel Pentium III 600MHz For Direct DVD Support requires P4 1 6GHz higher for real time requirement RAM 128 MB 256 MB Operating System Windows 98SE ME 2000 XP Windows 2000 XP Sound On board AC 97 Codec Windows compatible sound card that supports 48KHz playback PCI recommended Video On board Graphic...

Page 52: ...iting style and it does the rest Create myriad different productions instantly each one in a radically different style and with a polished professional feel To Install MuveeTM autoProducer 1 Insert the CD ROM packaged with the DVR 390H into the CD ROM drive The welcome screen appears 2 Click Install MuveeTM autoProducer Follow the on screen instructions to complete the installation Note For inform...

Page 53: ...plore this amazing program To Install PhotoSuite 1 Insert the CD ROM packaged with the DVR 390H into the CD ROM drive The welcome screen appears 2 Click Install PhotoSuite Follow the on screen instructions to complete the installation Note For information on how to use PhotoSuite to edit and retouch your recorded images please refer to its online help For Windows 2000 XP users make sure to install...

Page 54: ...installed in your computer Acrobat Reader is included on the DVR 390H CD ROM Using Acrobat Reader you can read the user s manual and print sections of interest 1 Insert the CD ROM that came with the DVR 390H into the CD ROM drive The welcome screen appears 2 Click Install Acrobat Reader Follow the on screen instructions to complete the installation ...

Page 55: ...nguages may be found on our website 1 Insert the CD ROM that came with theDVR 390H into the CD ROM drive The welcome screen appears 2 Click Install User s Manual Follow the on screen instructions to complete the installation Alternatively browse the CD ROM to find the PDF file For Mac users 1 Insert the CD ROM that came with the DVR 390H into the CD ROM drive 2 Select and double click Install User...

Page 56: ...56 USB Cable Notebook Computer TV PCMCIA Adapter SD Card Reader SD Card Reader AV Cable SD Memory Card Printer CONNECTING THE DVR 390H TO OTHER DEVICES ...

Page 57: ...M to Infinity Memory type Built in 20GB Hard Disk Drive External removable Memory Secure Digital SD Memory Cards up to 512 MB Self timer 10 second delay Digital zoom 4x for Image playback 2x for Image and Video Capture Compression formats Still image JPG Video MPEG 4 ASF file format Audio IMA ADPCM Flash Mode Automatic Red eye reduction Flash off Exposure compensation Automatic or Manual 1 8 EV in...

Page 58: ...2 5 mm plug mono Speaker mono USB port B mini DC IN 5V terminal Cradle interface USB port B mini DC IN 5V terminal AV IN jack AV OUT jack MIC LINE IN jack 2 5 mm plug mono Dimensions Media player body 4 x 2 8 x 1 3 106 x 71 x 32 mm Camera module 1 6 x 2 8 x 1 3 40 x 71 x 32 mm Weight Media Player body Approx 10 ounces 285 g Design and specifications are subject to change without notice ...

Reviews: