background image

System Installation

Installation

1. To prevent damage to your equipment due to ground potential influence, 
make sure that all devices on the installation are properly grounded. Consult 
your dealer for technical details if necessary.                                         
2. Please turn off the power of all devices before connection.

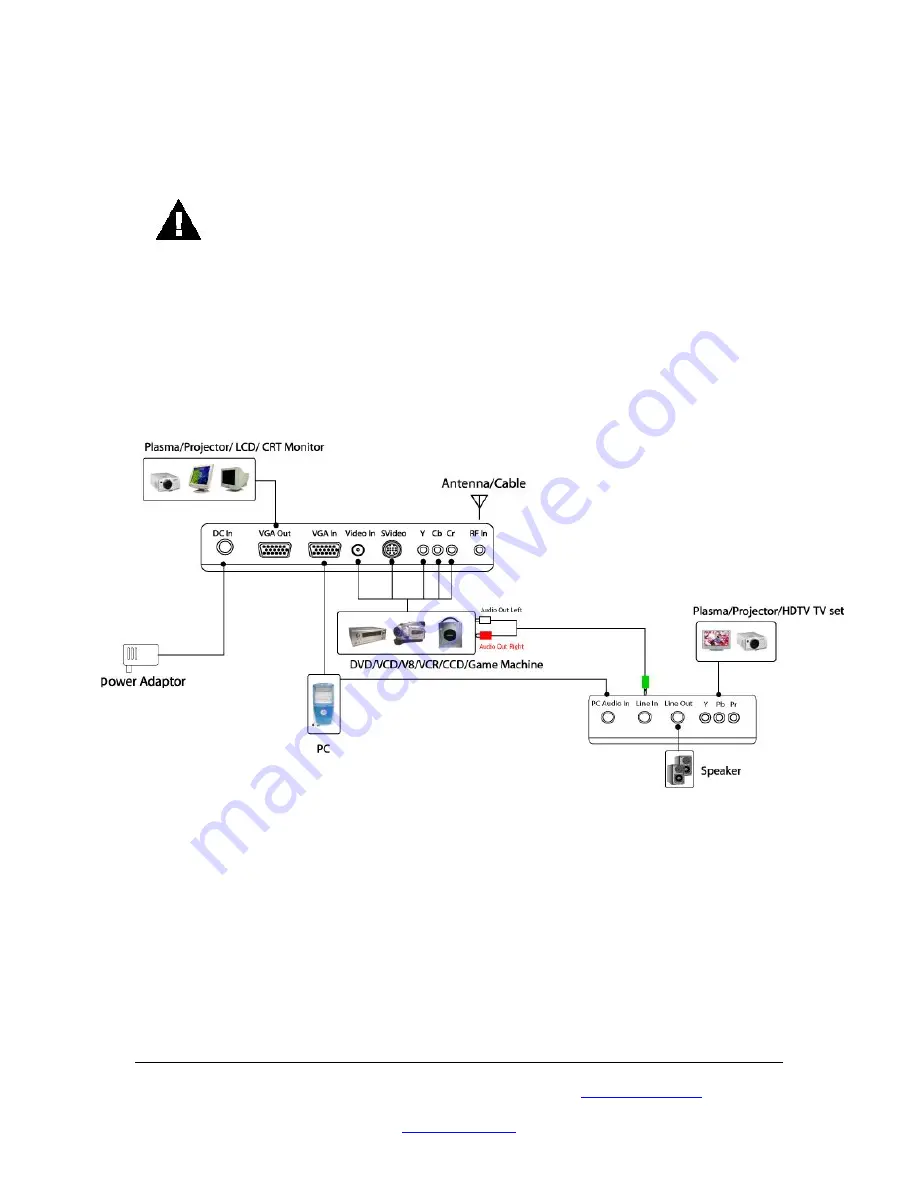
To install the TVBOX for the analog TV and A/V device connection, please refer to the 
diagram below.

Notes:

Audio/Video   connection:   For   audio   connection,   pleas   use   RCA   audio   (LTR) 
connector. For video connection, please choose either RCA video connector or S-
Video connector.

Moreover, for connection to a stand alone, please omit those connections associated 
with PC.


Please browse our online catalogue to view our full product range.

44-48 Maitland Road, Mayfield East, NSW, 2304 Australia, 

[email protected]

Phone +61 249689313   Fax +61 249689314

www.converters.tv

Summary of Contents for VTB-104

Page 1: ...B 104 Operation Manual Please browse our online catalogue to view our full product range 44 48 Maitland Road Mayfield East NSW 2304 Australia sales converters tv Phone 61 249689313 Fax 61 249689314 ww...

Page 2: ...e resolutions for HDTV ready displays as well as VGA SVGA and XGA for PC compatible displays The brightness will be significantly increased and the flicker dramatically reduced In addition its 3 2 pul...

Page 3: ...p timer setting channel editing favourite channel setting Support 3 2 pull down conversions for film mode Supports MTS for NTSC system Nicam Stereo for PAL system option Video output to a CRT LCD from...

Page 4: ...Decrease the sound volume 5 Increase the sound volume 6 Adjust channel decrease 7 Adjust channel increase Rear Panel 1 DC In Connect to a 12V power supply 2 VGA Out Connect your 15 pin Monitor to the...

Page 5: ...le TV signal Side Panel 1 PC Audio In Connect the audio from sound card to Line In port Thus you should be able to have sound from PC external speakers even when your TV Box is in stand by mode 2 Line...

Page 6: ...analog TV and A V device connection please refer to the diagram below Notes Audio Video connection For audio connection pleas use RCA audio LTR connector For video connection please choose either RCA...

Page 7: ...tton to scan and memorize all the channels 5 After the auto scan is finished please press channel or channel number keys to select channels 6 Press the Menu button and the OSD Main Menu window appears...

Page 8: ...ovides BRIGHTNESS CONTRAST TINT SHARPNESS adjustment modes 1 In the Picture Sub MENU PRESS or button to choose the required item 2 Press or button to adjust the selected item 3 Press ENTER to confirm...

Page 9: ...e buttons and then pressing ENTER to confirm the setting Auto scan Auto scan function provides Full Band Cable channel Air channel for user manual selection by demand If you choose Cable channel or Ai...

Page 10: ...tually removed or added but skipped from or recovered to the channel table You can still select the removed channel by pressing the channel number Channel Name The CH NAME function allows you to edit...

Page 11: ...S Video 4 pin mini DIN connector PC Audio In Phone Jack 3 5 Line In Phone Jack 3 5 Line Out Phone Jack 3 5 RF In F Female connector for NTSC system EC Female connector for Pal system VGA Output D Sub...

Reviews: