


элементы питания или прибегните к использованию сетевого адаптера (также проверьте
правильность установки элементов питания в соответствии со схемой полярности,
приведенной внутри батарейного отсека).
ВАЖНАЯ ИНФОРМАЦИЯ
Удаление использованных или разряженных элементов питания необходимо осуществлять в
соответствии с нормами законодательства. Для получения более подробной информации,
связывайтесь с региональным дилером производителя.
ДОПУСТИМЫЕ ИСТОЧНИКИ ЭЛЕКТРОПИТАНИЯ (2)
ЗАРЯДКА И ИСПОЛЬЗОВАНИЕ АККУМУЛЯТОРНЫХ БАТАРЕЙ
Данное устройство снабжено функцией зарядки аккумуляторных батарей. Перед первым
использованием аккумуляторных батарей, а также, если имел место перерыв в их
использовании (более 60 дней), аккумуляторные батареи необходимо зарядить в течение 15
часов.
•
Откройте крышку батарейного отсека, вставьте две
аккумуляторные батареи (1.2V 650mA) рекомендуемого
типа, соблюдая полярность.
ИСПОЛЬЗУЙТЕ НИКЕЛЬ"КАДМИЕВЫЕ
АККУМУЛЯТОРНЫЕ БАТАРЕИ. ИНАЧЕ АККУМУЛЯТОРЫ
МОГУТ ВЗОРВАТЬСЯ ИЛИ ПРОТЕЧЬ В ПРОЦЕССЕ
ЗАРЯДКИ
•
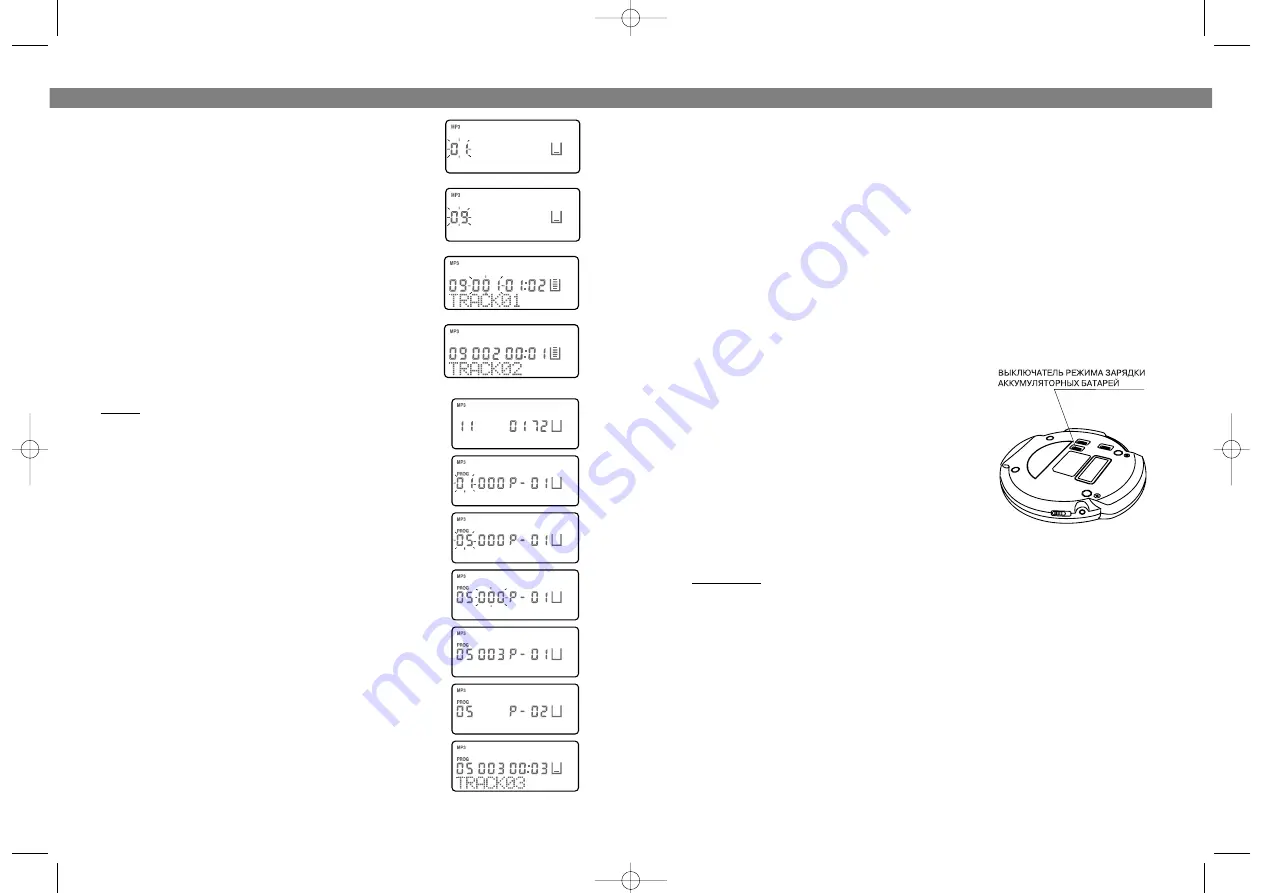
Подключите штекер адаптера к гнезду (25), переведите
выключатель зарядки аккумуляторных батарей (21) в
положение ВКЛ. (ON), вставьте сетевой адаптер в
розетку. Во время зарядки горит индикатор зарядки (16).
•
По истечении 15 часов, отключите адаптер от сети
переменного тока, отсоедините штекер адаптера от
устройства (25) и переведите выключатель режима
зарядки батарей (21) в положение ВЫКЛ. (OFF).
НЕ
РЕКОМЕНДУЕТСЯ
ПРОИЗВОДИТЬ
ЗАРЯДКУ
АККУМУЛЯТОРНЫХ БАТАРЕЙ В ТЕЧЕНИЕ 24 ИЛИ БОЛЕЕ
ЧАСОВ. ДЛИТЕЛЬНАЯ ПОДЗАРЯДКА АККУМУЛЯТОРНЫХ
БАТАРЕЙ МОЖЕТ ПРИВЕСТИ К УХУДШЕНИЮ ИХ
ЭКСПЛУТАЦИОННЫХ КАЧЕСТВ.
Примечание:
подзарядка аккумуляторных батарей может проводиться в ходе
прослушивания диска.
•
В случае резкого сокращения эксплуатационного времени аккумуляторных никель"
кадмиевых батарей даже после их надлежащей зарядки, замените комплект аккумуляторных
никель"кадмиевых батарей.
•
Длительный перерыв в использовании аккумуляторных батарей может привести к
некоторому сокращению их эксплуатационного времени при последующем использовании.
В таком случае рекомендуется несколько раз разрядить и зарядить батареи.
УХОД ЗА КОМПАКТ ДИСКАМИ
Устройство разработано специально для проигрывания компакт"дисков, на которых
присутствует соответствующий логотип.
Диски, не маркированные указанным образом, не отвечают стандартам, принятым для компакт"
дисков, и надлежащие качество их воспроизведения не гарантируется.
Воспроизведение дисков, имеющих загрязненную поверхность или царапины, а также
деформированных дисков может сопровождаться пропусками фрагментов композиций или
шумом. Необходимо уделять внимание следующим моментам: держите диск за края во
избежание загрязнения поверхности диска, не прикасайтесь к поверхности диска.
РУССКИЙ
21
2. Press and hold ALBUM/10+/ESP button (15), the display
will show catalog "
0
01
1
".
3. Press the SKIP/SEARCH button (
or
) to select the
catalog, showing as follows:
4. Press the PLAY/PAUSE button (17), the 1st track in cata"
log 9 appears, starting to play.
5. Press the SKIP/SEARCH button (4 or 3) to select track 2,
the play may begin.
MUSIC AUDIO EFFECT SELECTION
In playing mode, Pressing the PROG/EQ button (12) differ"
ent times gives you the played track different types. The
music of dbb type appears by pressing the button one time,
and two times pressing the button gives you the music of
popular type, three times gives you the classic type, four
times gives you the jazz type, five times gives you the rock
type, and six times gives you the normal type.
PROGRAM PLAY (up to 64 tracks can be edited)
NOTE:
This can only be done during stopping state.
1. While the unit is in stop mode, press PROG/EQ button.
2. Press the SKIP/SEARCH button (4 or 3 )to select catalog.
3. Press PROG/EQ button (12) again.
4. Press the SKIP/SEARCH button (4 or 3) to select your
required tracks, and then press PROG/EQ button (12) to con"
firm.
5. Repeat the above steps to program the other tracks.
6. Press PLAY/PAUSE button (17) to enter program play.
Take the track 3 in catalog 5 as an example.
1. In stopping mode, display shows "
1
11
1
M
MP
P3
3
0
01
1 7
72
2
".
2. Press the PROG/EQ button (12), display shows "
0
01
1
" and
"
P
P0
01
1
".
3. Press the SKIP/SEARCH button (4 or 3) to select catalog 5,
the display shows "
0
05
5
".
4. Press the PROG/EQ button (12), the display will show track
number "
0
00
00
0
" blinking.
5. Press the SKIP/SEARCH button (4 or 3) to select track 3,
"
0
00
03
3
" appears on the display.
6. Again press the PROG/EQ button (12), "
P
P0
02
2
" appears on
the display, waiting for editing the second track.
7. Repeat steps 3"6 to edit the required tracks, till the pro"
gram finishes.
8. After finishing programming, press PLAY/PAUSE button
(17) to enter program playing mode.
ENGLISH
12
3775.qxd 05.05.04 8:57 Page 22


