


5
ENGLISH
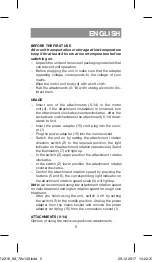
BEFORE THE FIRST USE
After unit transportation or storage at low temperature
keep it for at least 3 hours at room temperature before
switching on.
– Unpack the unit and remove all packaging materials that
can prevent unit operation.
– Before plugging the unit in make sure that the adapter
operating voltage corresponds to the voltage of your
mains.
– Wipe the motor unit body (4) with a soft cloth.
– Rub the attachments (8-14) with rubbing alcohol to dis-
infect them.
USAGE
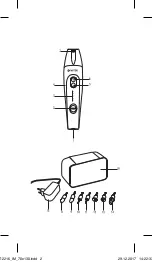
– Insert one of the attachments (8-14) in the motor
unit (4), if the attachment installation is hindered, turn
the attachment clockwise/counterclockwise, after the
sockets are matched press the attachment (8-14) down-
wards to fix it.
– Insert the power adapter (15) cord plug into the sock-
et (1).
– Plug the power adapter (15) into the mains socket.
– Switch the unit on by setting the attachment rotation
direction switch (2) to the required position, the light
indicator on the attachment rotation speed scale (3) and
the illumination (7) will light up.
– In the switch (2) upper position the attachment rotates
clockwise.
– In the switch (2) lower position the attachment rotates
counterclockwise.
– Control the attachment rotation speed by pressing the
buttons (5 and 6), the corresponding light indicator on
the attachment rotation speed scale (3) will light up.
Note: we recommend using low attachment rotation speed
for nails treatment and higher rotation speed for rough skin
treatment.
– After you finish using the unit, switch it off by setting
the switch (2) to the middle position. Unplug the power
adapter from the mains socket and remove the power
adapter cord plug (15) from the connection socket (1).
ATTACHMENTS (8-14)
Options of using the manicure/pedicure attachments.
VT-2216_IM_70x130.indd 5
29.12.2017 14:22:33
Summary of Contents for VT-2216
Page 1: ...1 VT 2216 Manicure set 3 9 16 23 30 37 T 2216_IM_70x130 indd 1 29 12 2017 14 22 33...
Page 2: ...T 2216_IM_70x130 indd 2 29 12 2017 14 22 33...
Page 10: ...10 T 2216_IM_70x130 indd 10 29 12 2017 14 22 33...
Page 11: ...11 www vitek ru 3 4 8 14 4 8 14 8 14 15 1 T 2216_IM_70x130 indd 11 29 12 2017 14 22 33...
Page 12: ...12 15 2 3 7 2 2 3 5 6 3 2 15 1 8 14 8 8 9 9 9 10 T 2216_IM_70x130 indd 12 29 12 2017 14 22 33...
Page 15: ...15 info vitek ru 3 15 38 117209 28 1 T 2216_IM_70x130 indd 15 29 12 2017 14 22 34...
Page 16: ...16 VT 2216 1 2 3 4 5 6 7 8 9 10 11 12 13 14 15 16 T 2216_IM_70x130 indd 16 29 12 2017 14 22 34...
Page 17: ...17 20 15 T 2216_IM_70x130 indd 17 29 12 2017 14 22 34...
Page 18: ...18 www vitek ru 4 8 14 4 8 14 8 14 T 2216_IM_70x130 indd 18 29 12 2017 14 22 34...
Page 22: ...22 info vitek ru 3 i i i i i i i i i i i i T 2216_IM_70x130 indd 22 29 12 2017 14 22 34...
Page 24: ...24 T 2216_IM_70x130 indd 24 29 12 2017 14 22 34...
Page 27: ...27 12 12 13 12 13 14 14 14 14 8 15 15 1 4 T 2216_IM_70x130 indd 27 29 12 2017 14 22 34...
Page 29: ...29 2014 30 2014 35 T 2216_IM_70x130 indd 29 29 12 2017 14 22 34...
Page 30: ...30 VT 2216 1 2 3 4 5 6 7 8 9 10 11 12 13 14 15 16 T 2216_IM_70x130 indd 30 29 12 2017 14 22 34...
Page 31: ...31 20 15 T 2216_IM_70x130 indd 31 29 12 2017 14 22 34...
Page 32: ...32 www vitek ru 4 8 14 8 14 4 T 2216_IM_70x130 indd 32 29 12 2017 14 22 34...
Page 36: ...36 info vitek ru 3 T 2216_IM_70x130 indd 36 29 12 2017 14 22 34...