


VITA - Vacumat 4000 Premium
39/03/04
Vita Zahnfabrik H.Rauter GmbH&Co.KG 79704 Bad Säckingen
7
3.4 CE
mark
The CE-mark is the legally binding statement which confirms that the furnace satisfies the
Essential Requirements of the EC Council Directive 73 / 23 / EEC (concerning low voltage) and
the Council Directive 89 336 / EEC (concerning EMV)
3.5 Ventilator
The unit is equipped with a ventilator that switches on at half performance at a firing chamber temperature of
605°C – 800°C after a firing program has started, and then increases to full performance until the end of the
program and cooling to 600°C. The ventilator prevents the furnace from overheating and contributes to the
general operational safety. In the event of a failure in the ventilator, an error message will be shown in the
display (see section on error messages). For reasons of safety the furnace should not be operated without a
ventilator. Make sure the top cover of the firing chamber and the openings on the rear plate are not blocked
or obstructed by any objects.
3.6 Mains power failure
The furnace is equipped with power failure protection. This prevents the program from aborting, thus
avoiding incorrect firing in the event of a short-term power failure. The power failure protection is activated as
soon as the mains power is cut off while a firing program is running.
In the case of a mains power failure lasting less than 15 seconds:
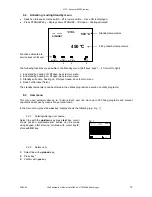
The program continues running and is not aborted, during this time the display is out of action. For your
information the message
Recover (program interruption)
is shown in the display after the mains power is on
again. To clear this message press the key
Continue
(confirm).
In the case of a mains power failure lasting more than 15 seconds:
The program is aborted, the display is out of operation. Once the mains power is on again, the message
"Power failure"
is shown on the display. Press the key
Continue
(confirm) to delete this message.
Attention:
After the mains power is on again, the control element takes approx. 20 seconds to switch on
again.
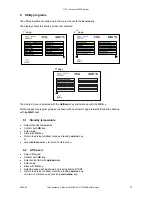
4 Program
parameters
The firing programs contain the following parameters that can be set and can be programmed in the
graphics or tabular mode.
Pre-drying temperature
200 °C – 700 °C
Pre-drying time
0:00 – 40:00 min. (entry in min/sec.)
Temperature rise rate
2:00 – 40:00 min. or 20°C/min – 120°C/min
(see Section 5, "Temperature rise")
End temperature
max. 1200°C
Hold time for end temperature
0:00 – 40:00 min. (entry in min/sec)
Cooling temperature
min.: 200°C
max.: according to end temperature selected.
Hold time for cooling temperature
0 – 40:00 min
Vacuum start and vacuum level*
Starts together with the temperature rise
(Starts automatically at pre-drying temperature.
or select start in the temperature range from 200°C – 1100°C)
Pre-vacuum
1:00 – 5:00 min (see pre-vacuum)
Lift positions for pre-drying and cooling can only be programmed in graphics mode.
3 lift positions for pre-drying
0% - 100% (100% = lift completely closed)
(see also section on lift positions for pre-drying)
1 lift position for cooling
0% - 100% (see also section on lift positions for cooling)