Vista VK2-1080BIR37e Quick Manual Download Page 6


Quick Installation Guide 

VK2-1080BIR37e Quick user guide V1.0 

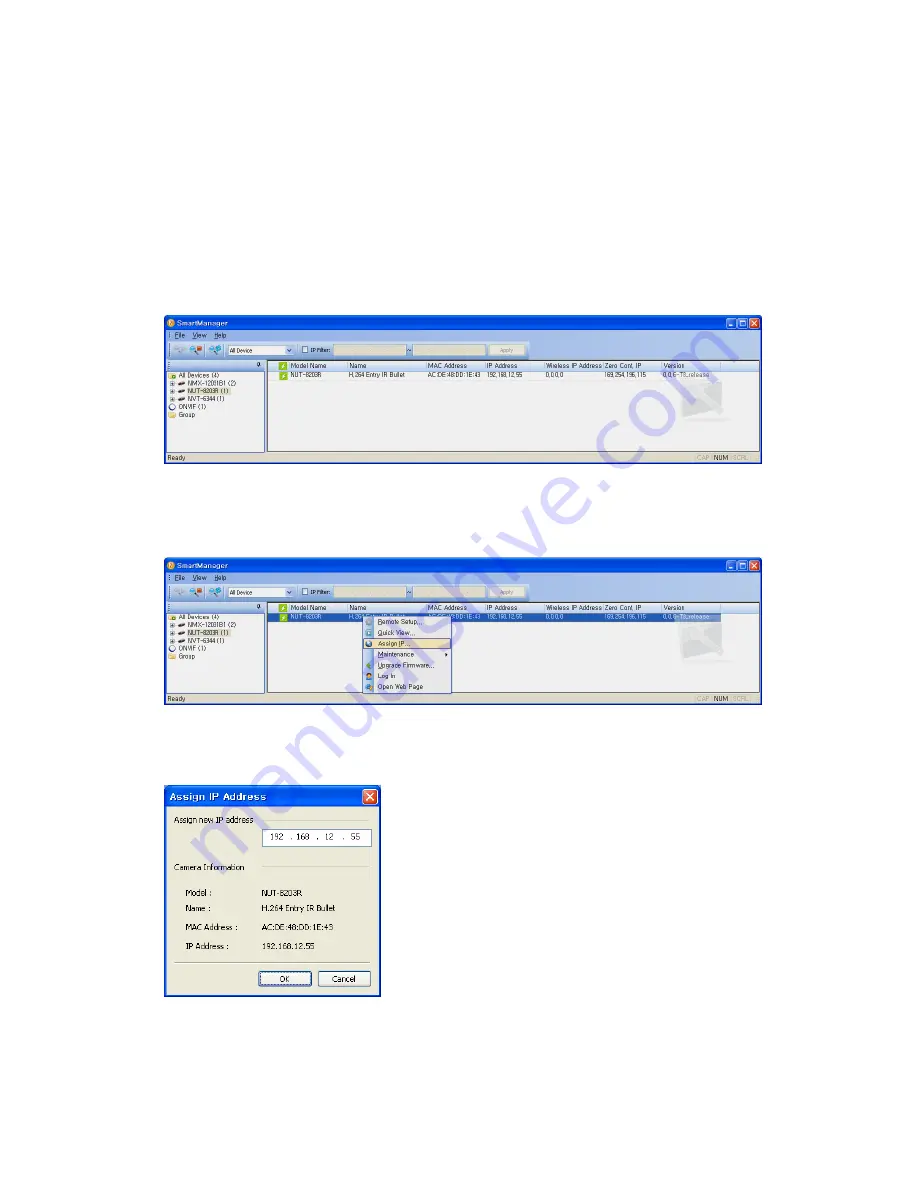
2.2 Network Connection and IP assignment 

 
When the camera is first connected to the network it has no assigned IP address. So, it is necessary 
to allocate an IP address to the device using 

the “Smart Manager” utility found on the supplied CD. 

(Default IP 192.168.30.220)


1. 

Connect the VK2-1080BIR37e to the network and power up. 

2. 

Start SmartManager utility (Start>All programs>SmartManager>SmartManager), the main window 
will be displayed, after a short while any network devices connected to the network will be 
displayed in the list. 


3. 

Select the camera on the list and click right button of the mouse. You can see the pop-up menu 
below. 


4. 

Select Assign IP. You will see the "Assign IP Address" window. Enter the required IP address. 


Note:


For more information, refer to the Smart Manger User’s Manual. 


Summary of Contents for VK2-1080BIR37e

Page 1: ...Please read this manual thoroughly before use and keep it handy for future reference VK2 1080BIR37e Quick Guide...

Page 2: ...Quick Installation Guide VK2 1080BIR37e Quick user guide V1 0 2...

Page 3: ...nect the VK2 1080BIR37e 3 Set an IP address 4 Set the password Package Component The system comes with the following components Camera Unit Installation CD Installation Guide Accessory Kit Contents in...

Page 4: ...for the exact dimension Dimensions Unit mm Base Installation Cable through the wall or ceiling with the mount base Secure the camera to the wall or ceiling by the camera stand Ceiling Mount Wall Mount...

Page 5: ...rk camera Generally a cross over cable is used for directly connection to PC while a direct cable is used for connection to a hub or switch Micro SD memory slot Remove the front cap of the camera to i...

Page 6: ...220 1 Connect the VK2 1080BIR37e to the network and power up 2 Start SmartManager utility Start All programs SmartManager SmartManager the main window will be displayed after a short while any network...

Page 7: ...see a starting page Click Live View or Setup to enter web page 4 The network camera s Live View page appears in your browser 3 2 Access from the internet Access from the internet once connected the V...

Page 8: ...x1200 1280x1024 1280x720 704x480 576 640x480 352x240 288 and 320x240 Users are allowed to select the most suitable one out of those modes Please adjust the mode in accordance with your PC specificatio...

Page 9: ...l images and video stream formats Your requirements and the properties of your network will determine the type you use The Live View page in the VK2 1080BIR37e provides access to H 264 MPEG 4 and Moti...

Page 10: ...Switch off the VK2 1080BIR37e by disconnecting the power adapter 2 Remove the front cap of the camera 3 Press and hold the Reset button while reconnecting the power 3 Keep the Reset button pressed for...

Page 11: ...Quick Installation Guide VK2 1080BIR37e Quick user guide V1 0 11...

Page 12: ...Quick Installation Guide VK2 1080BIR37e Quick user guide V1 0 12 Printed in Korea...

Reviews: