Vision VN7XFHD Instruction Manual Download Page 9


6-1. On Screen Display Menu 

MAIN MENU


VIDEO OUT 

VIDEO OUTSIZE 

FRAME RATE 

CVBS OUT MODE 


SAVE/ 

RETURN 

AUTO MENU 

NORMAL   

50HZ INDOOR 

60HZ INDOOR 

OUTDOOR 

RETURN 

DAY/NIGHT 

AUTO/COLOR/IR 

D TO N LEVEL 

N TO D LEVEL 

D TO N TIME 

N TO D TIME 

D/N RESET 

RETURN 

AWB 

(ATW)/PUSH/HOLD 

TRACK/USER/8000K/ 

6000K/4200K/3200K 

RED 

BLUE 

AWB RESET 

RETURN 

AE 

IRIS   

ATR-EX(WDR) 

DSS 

DC IRIS 

BLC/FLC 


BRIGHTNESS 

LSC 


FLICKERLESS 

AGC 

AE RESET 

RETURN 

PRIVACY 

AREA NUMBER 

MASK POSITION 

MASK DEFINE 

PRIVACY RESET 

MASK PATTERN 

MASK SIZE 

RETURN 

EFFECT 

COLOR ADJUST 

2DNR   

SHARPNESS 

3DNR 

CONTRAST 

EFFECT RESET 

REVERSAL   


RETURN 

SYSTEM 

CAMERA ID 

FIRMWARE 

ID DISPLAY 

485 TERM 

CAMERA NAME 

BAUD RATE 

NAME DISPLAY 

SYSTEM RESET 

RETURN 

INITIALIZE 

FACTORY INIT 


RETURN 


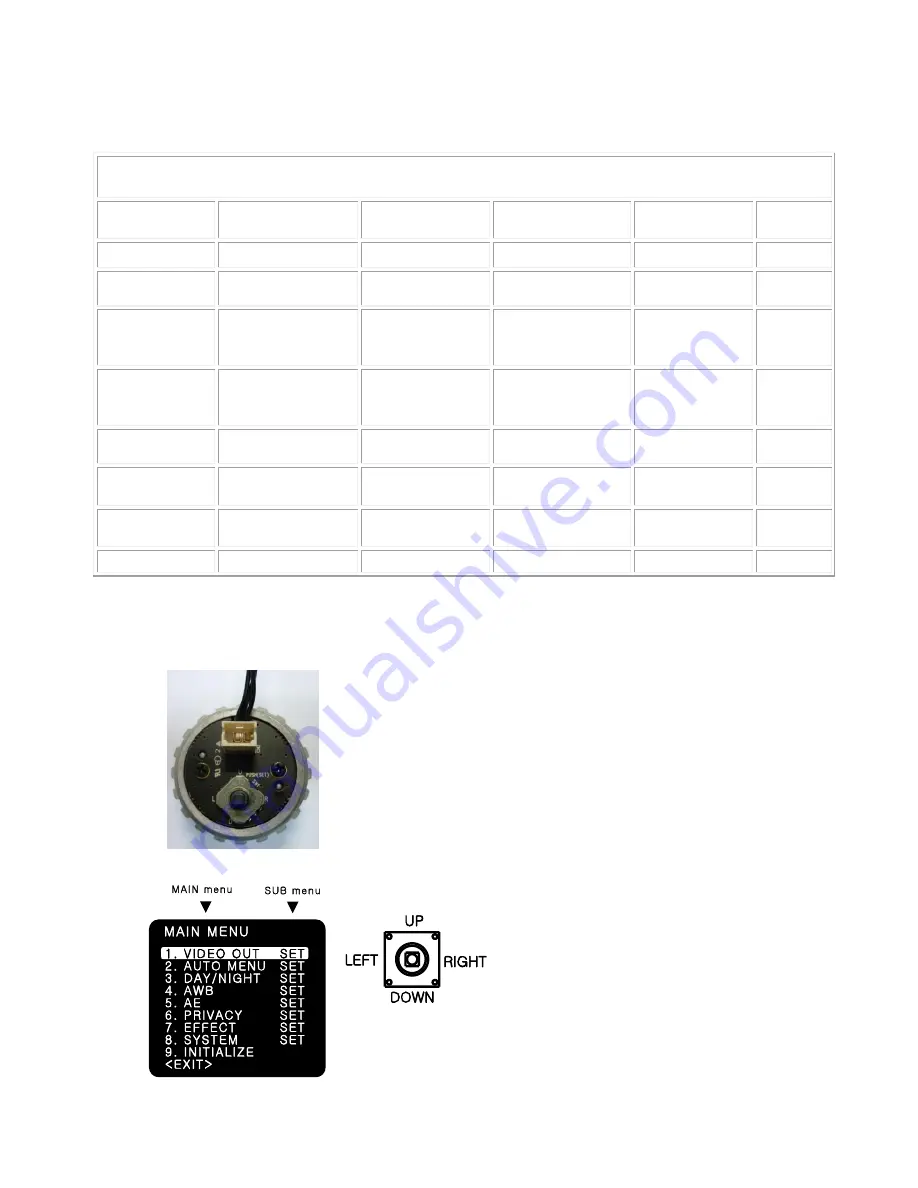
6-2. Setting up the menu 

Settings can be made using the OSD Switch located on the back of the camera. 


1. Press the button to access the SETUP mode. The SETUP menu is 

displayed on the monitor. 

2. Please select any function you wish to activate by using the 

UP/DOWN selections. The bar can be moved up or down by using 

the UP/DOWN selections. Position the bar to point to the function 

you wish to operate. 


* MAIN-menu : Use UP/ DOWN selections. / SUB-menu : Use LEFT/ RIGHT selection 


3. Change the status of the selected feature using the LEFT/RIGHT selections. 

    When the LEFT or RIGHT selection is selected, available values and modes are displayed in order.   

Summary of Contents for VN7XFHD

Page 1: ...VN7XFHD Full HD Motorized zoom IR Outdoor Bullet Camera INSTRUCTION MANUAL Power option 12VDC VHT HCL 1 0 Release Date 27 OCT 2013...

Page 2: ...Operation of this equipment in a residential area is likely to cause harmful interference in which case the user will be required to correct the interference at one s own expense WARNING Changes or m...

Page 3: ...s adjustment 5 4 Lens external adjustment EXT Video 5 5 How to adjust Zoom Focus 5 6 Waterproof processing of cable and connection 6 Function and operation 9 6 1 On Screen Menu OSD 6 2 Setting up the...

Page 4: ...to obtain the best picture quality all the time Be careful not to be stained by fingerprint Don t face the camera directly toward sunlight or sunlight reflecting area CCD may go defective at this con...

Page 5: ...n or cause including any failure or problem of the product 5 Any problem consequential inconvenience or loss or damage arising out of the system combined by the devices of third party 6 Any claim or a...

Page 6: ...olt firmly Slightly loosen bolt B then adjust pan 360 of the camera and tighten the bolt firmly 5 2 How to install to Wall Drill three screw holes on the wall plate to fix three plastic anchors suppli...

Page 7: ...tilt of the camera using a serration on the bracket and tighten the bolt firmly Rotation 360 Slightly loosen Tilt bolt then adjust rotation of the camera using a serration on the bracket and tighten t...

Page 8: ...ape Do not use a sealing material on those parts It is useful to connect the cable ends from camera to the extension cable for waterproof Connect and tape the power cables Power Power Ground Ground Bi...

Page 9: ...RETURN SYSTEM CAMERA ID FIRMWARE ID DISPLAY 485 TERM CAMERA NAME BAUD RATE NAME DISPLAY SYSTEM RESET RETURN INITIALIZE FACTORY INIT RETURN 6 2 Setting up the menu Settings can be made using the OSD S...

Page 10: ...heck your DVR or related HD devices first whether they support this mode or not In this mode cable connection distance is less than half of 1080P 30 mode 6 4 AUTO MENU SET 1 NORMAL Sets as initial fac...

Page 11: ...OTE Day Night cameras without CDS ICR are to be set in this mode 2 D TO N LEVEL Sets the level of illumination in which COLOR mode is turned into B W mode This menu is not activated in case of IR MODE...

Page 12: ...4 HOLD MODE This mode is used to fix AWB in a specific environment NOTE When there are drastic movements of some specific colored features such as red blue green or yellow cars on the express road and...

Page 13: ...50Hz and the TV system 60Hz are different Flickerless on mode is recommended for indoor use Flickerless off mode is recommended for outdoor use 5 ATR EX WDR This mode functions like WDR 3 modes of Of...

Page 14: ...er This is an electronically activated function to improve the sensitivity for viewing low light condition in addition to the original sensitivity from the sensor itself Shutter level is adjustable x2...

Page 15: ...vertically reversed image VER vertically reversed and mirrored image FLIP 5 2DNR Cuts off the noise in low light condition 4 modes of OFF LOW MID HIGH are available NOTE Higher 2DNR level reduces more...

Page 16: ...not appear on the monitor even if it has been input 3 Up to 10 letters are available for the NAME DISPLAY Please move the cursor to the letter to choose by using the UP and DOWN selections Set an ID f...

Page 17: ...etting of SYSTEM menu CAMERA ID 485 TERM settings are not initialized 9 RETURN Returns to the MAIN MENU 6 11 INITIALIZE Resets the camera setting to the factory defaults CAMERA ID 485 TERM settings ar...

Page 18: ...monitor If you have an interim device set the 75 Hi z properly The camera is not working properly and the surface of the camera is hot Please check that you have properly connected the camera to an ap...

Page 19: ...Mode Select Video Output Format 1 5G SDI 3G SDI Output SMPTE 424M SMPTE 292M AV Output 1V p p Composite 75 Ohms Digital Output SDI Output Day Night ICR Serial Port RS485 Lens 5 60mm VF Auto Iris Mega...

Reviews: