background image

APPENDIX Α


The V40-10HDMI offers a USB interface with the appropriate software (DVProbe.exe) for advance programming.  
The software can be found on the CD that accompanies the V40-10HDMI. 

System requirements


  Windows XP (SP1 or higher) 


  Windows Vista 


  Windows 7 (32 & 64 bit) 


  Windows 8 (32 & 64 bit) 


  Windows 10 (32 & 64 bit) 

Device connection via software


1. Insert the supplied software CD into your CD-ROM drive. 
2. Connect the V40-10HDMI via the USB cable (A-male to B-male type) 
3. In case Windows cannot install the USB drivers automatically, when prompt, insert the correct path of the CD folder 
named “USB drivers”, which contains the V40-10HDMI USB drivers. 
4. Once Windows has successfully installed the USB drivers of the V40-10HDMI, a pop-up  message appears to verify this 
process. 
5. Run the DVProbe.exe file and the main screen will appear (Figure 2.): 


Figure 2. Main screen 

Software guidelines


1. From the “ComPort” combo box choose the correct USB port that connects the V40-10HDMI and press “Connect”. 

2. Once the software has successfully connected with the device, it will automatically download all the settings of the  
V40-10HDMI. 

3. The DVProbe consists of  four sub-categories as described below: 
 

  DVB-T Settings – Parameters regarding the modulator part 


  Encoder Settings – Parameters regarding the H.264 encoder 


  Multiplexer Settings – Parameters regarding the multiplex part 


  System Settings – Parameters regarding system information 


Vision Model Number? 

Summary of Contents for V40-10HDMI

Page 1: ...V40 10HDMI HDMI to DVB T HD MODULATOR Operation Manual...

Page 2: ...s to cover any ventilation slots Only mount the modulator in vertical position with the RF connector at the bottom Always allow at least 10cm of free space around all sides of the modulator to aid ven...

Page 3: ...ply 3 2 1 Auto reset functions and watchdog During the normal operation of the V40 10HDMI the main CPU monitors all the internal parts in order to ensure that the device works normally In case of an i...

Page 4: ...gure 1 Front panel operating controls 1 Channel or Profile selection button 2 Seven Segment Display SSD 3 UP DOWN buttons 4 LED indicators a Lock ON when HDMI communication have been established b Cha...

Page 5: ...ode is selected How Profiles works In an installation all the modulators or Mux in general need to have different values of the following fields to avoid conflicts in the automated scan of the TV sets...

Page 6: ...rable Parameters TS ID Original Network ID Network ID Provider Name LCN support Yes LCN Providers Nordin ITC UK EICTA Europe New Zealand DVB T Output Standard EN 300 744 Bandwidth 5 6 7 8 MHz Mode 2K...

Page 7: ...contains the V40 10HDMI USB drivers 4 Once Windows has successfully installed the USB drivers of the V40 10HDMI a pop up message appears to verify this process 5 Run the DVProbe exe file and the main...

Page 8: ...Audio PID value 3 9 LCN No Set the LCN No 1 999 must be enabled first 3 10 LCN Provider Set the LCN provider Caution Modulation settings must be applied with care and in order to have adequate output...

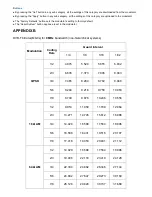
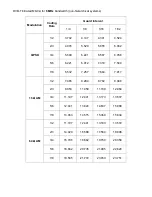
Page 9: ...es Mbit s for 8 MHz bandwidth non hierarchical systems Modulation Coding Rate Guard Interval 1 4 1 8 1 16 1 32 QPSK 1 2 4 976 5 529 5 855 6 032 2 3 6 635 7 373 7 806 8 043 3 4 7 465 8 294 8 782 9 048...

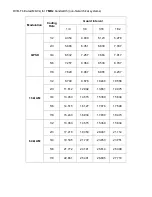
Page 10: ...7 684 7 917 5 6 7 257 8 064 8 538 8 797 7 8 7 620 8 467 8 965 9 237 16 QAM 1 2 8 709 9 676 10 246 10 556 2 3 11 612 12 902 13 661 14 075 3 4 13 063 14 515 15 369 15 834 5 6 14 515 16 127 17 076 17 594...

Page 11: ...1 6 587 6 786 5 6 6 221 6 912 7 318 7 540 7 8 6 532 7 257 7 684 7 917 16 QAM 1 2 7 465 8 294 8 782 9 048 2 3 9 953 11 059 11 709 12 064 3 4 11 197 12 441 13 173 13 572 5 6 12 441 13 824 14 637 15 080...

Reviews: