MONITOR
ASSEMBLY
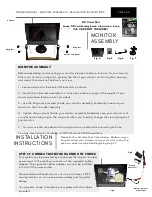
Before assembling and mounting your monitor please consider a location for your monitor
that is out of direct sunlight (to prolong the life of your monitor and for optimal viewing)
and a spot that does not obstruct your view.
1 - Secure antenna to the back of the monitor as shown.
2 - Mount the U-bracket assembly to a structure suitable to support the weight of your
monitor and base (hardware not provided).
3 - Use the Wing nuts provided (inside your monitor assembly hardware) to secure your
monitor to the U-bracket assembly.
4 - Tighten the wing nuts (inside your monitor assembly hardware) once your monitor is at
your desired viewing angle. The wing nuts allow you to easily change the viewing angle of
your monitor.
5 - You may use the provided suction cup mount as an alternative mounting solution.
You may also chose to Purchase a VWPVPM mount SOLD Separately
MONITOR ASSEMBLY
OWNERS MANUAL - MONITOR ASSEMBLY & INSTALLATION INSTRUCTIONS
Fig 5.
Fig 6.
Please follow all directions listed below. Make sure you
have mounted your camera and your monitor (using the
previous directions) before beginning step #1.
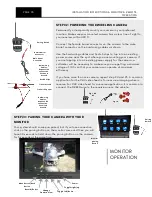
Your system can be powered by connecting the monitor harness
power input to the mating connector of the cigarette lighter
adapter. The cigarette lighter adapter can now be installed
into a 12VDC power source.
We recommend when Monitor is not in use to Power it OFF,
Leaving monitor on can cause camera delay and long term
damge
You may also chose to hardwire your system with the cables
provided.
INSTALLATION
INSTRUCTIONS
STEP #1: CONNECT MONITOR HARNESS TO POWER
Wing Nut
Fig 4.
Fig 4.
Fig 8.
PAGE 04
Wing Nut
Antenna
Mating
Connector
Monitor Harness
Power Input
SD Card Slot
some SD cards may have clearance issue
(SD CARD NOT INCLUDED)
Fig 7.
Suction Cup Mount


